সহযোগিতা
কলা
সৌন্দর্য এবং সুস্থতা
ক্রাফট
সংস্কৃতি ও ইতিহাস
বিনোদন
পরিবেশ
খাদ্য ও পানীয়
রিভার্স ইঞ্জিনিয়ারিং
বিজ্ঞান
খেলাধুলা
টেকনোলজি
পরিধানযোগ্য
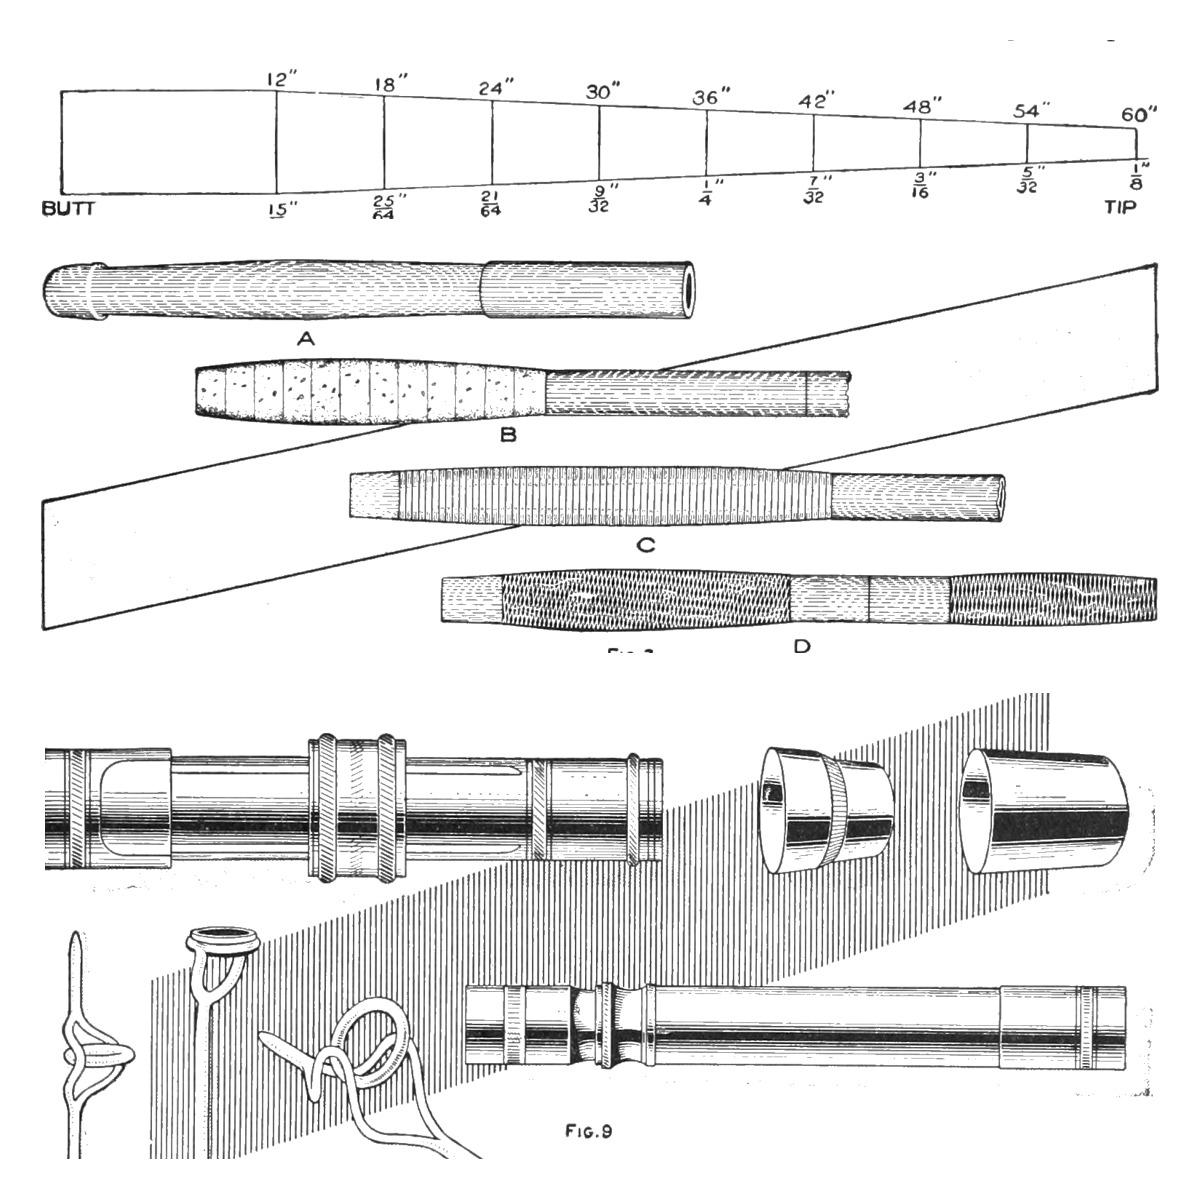


Five-Foot Bait-Casting Rod: Hand-Tapered Dagame Stick, Cork Grasps and Agate Guides (Boy Mechanic, 1915)
Stillman Taylor's first rod for a beginner, from The Boy Mechanic, Book 2 (1915): a one-piece 5 ft bait-casting rod planed by hand from a 5/8 in square stick of dagame to his calipered taper (1/2 in at the grasp to 1/8 in at the tip), with a double cork grasp around the reel seat, two agate guides and an agate tip, whipped in silk and varnished. He made it with "a saw, plane, jackknife, file, and sandpaper".
মধ্যবর্তী
About 2 weeks (glue and varnish drying)
নির্দেশাবলি
1
1
Fig. 5: the taper, station by station
Fig. 5: the taper, station by station
Jupyter নোটবুক লোড হচ্ছে…
2
2
Read The Boy Mechanic, Book 2
Read The Boy Mechanic, Book 2
"The short one-piece bait-casting rod with but one ferrule is the easiest rod to make." His materials: 1 dagame or greenheart stick, 5 ft long and 5/8 in square; 1 reel seat with straight hood, 3/4 in; 1 butt cap, 1 in; 1 taper, small end 15/32 in; 1 offset agate top, 3/32 in, and 2 narrow agate guides, 1/2 in, all in German silver; 2 doz. corks, 1-1/4 by 1-1/8 in; two 50 yd spools of silk, red and green, 00 size.
3
3
Make the gauge and grooved board
Make the gauge and grooved board
On a strip of paper draw the rod full length: a 1/2 in line for the butt, a centre line 60 in long, a 1/8 in line at the tip, and join the ends. From 12 in, mark a crossline every 6 in and write his diameters on them (see the notebook). File nine slots in a thin strip of brass to these diameters as a gauge. Plane a groove, gradually shallower toward one end, in a 5 ft tongue-and-groove pine board about 1 in thick, and nail it to the bench edge, groove up.
এই ধাপের উপকরণ:
 পিতলের পাত1 টুকরা
 পাইন কাঠের তক্তা1 টুকরা
 পেরেক1 টুকরা
প্রয়োজনীয় সরঞ্জাম:
 বাদামি মোড়ক কাগজ
 পেনসিল
 রেতি (হাতের রেতি)
 বেঞ্চ ভাইস
 ভার্নিয়ার ক্যালিপার
 রান্দা
 হাতুড়ি
 ফিতা-মাপ
4
4
Plane the stick square and tapered
Plane the stick square and tapered
Plane along each side and from both ends of a 5/8 in square dagame strip to find the grain. Drill two holes about 1/4 in from the butt end and hook them over a brad in the bench corner, so you plane with the grain. Plane it straight and true to 1/2 in square, evenly from all sides, ignoring kinks. Knife-mark the hand grasp 12 in from the butt (11 in for a single grasp). Then plane an even taper from butt to tip, checking with caliper and gauge at every 6 in mark and planing the thick spots lightly. Bend the tip on the floor: if it stays bent, the wood needs a few weeks' seasoning in a warm place.
এই ধাপের উপকরণ:
 দাগামে কাঠ1 টুকরাপেরেক1 টুকরা
প্রয়োজনীয় সরঞ্জাম:
রান্দা ব্লক রাঁদা
 শান দেওয়ার পাথর
 হাত-ড্রিলভার্নিয়ার ক্যালিপার
 কারুকাজের ছুরিহাতুড়ি
5
5
Round the rod
Round the rod
Lay the rod in the grooved board, a corner up, and take each corner off with a finely set small plane to make it eight-sided, calipering every 6 in mark and keeping the eight sides even, until it is almost round and tapers evenly from the grasp mark to the tip. File grooves across the edge of a cabinetmaker's steel scraper with a round file, sharpen them, and scrape the rod perfectly round; sandpaper it smooth. Tie on the tip and guides and string the reel on to try a few casts, then smooth it with No. 0 sandpaper.
এই ধাপের উপকরণ:
 শিরিষ কাগজ1 টুকরা
প্রয়োজনীয় সরঞ্জাম:
ব্লক রাঁদা ইস্পাতের চাঁছনিরেতি (হাতের রেতি)ভার্নিয়ার ক্যালিপার
6
6
Build the lower grasp and reel-seat sleeve
Build the lower grasp and reel-seat sleeve
Cut a hole in the corks with a sharpened tube turned like a wad cutter. Cut the butt off square about 1 in from the end, to remove the holes. Glue on a cork with hot glue, then cork after cork, about 10, for a grasp a trifle over 5 in long. For the reel-seat sleeve, bore a 15/32 in hole through white pine about 3/4 in thick and 5 in long, plane the outside to slip inside the reel seat, taper one end to match it, and make it about 1/4 in shorter than the reel seat. Glue it down on top of the last cork and leave the glue a day or two.
এই ধাপের উপকরণ:
 কর্কের আংটি10 টুকরা
 পশু আঠা1 টুকরাপাইন কাঠের তক্তা1 টুকরা
প্রয়োজনীয় সরঞ্জাম:
 পিতলের নলরেতি (হাতের রেতি)
 হাত-করাতহাত-ড্রিলব্লক রাঁদা
7
7
Fit the butt cap and reel seat
Fit the butt cap and reel seat
Trim the grasp to about 1-1/16 in diameter (1-1/4 in corks need little trimming), leaving the top cork as a shoulder, and fit the lower corks to the butt cap's taper. Heat the cap moderately, rub melted ferrule cement inside and force it on; when hard, drive a small brass pin or brad through and file it flush. Cut the 4-1/2 in reel seat down to 3-7/8 in and fit it with the hood at the lower end, worked into the cork for a tight joint. Cement the sleeve, push the reel seat home and drive a small pin through the hood into the wood a short way only, not through the rod.
এই ধাপের উপকরণ:
 ছিপের গোড়ার টুপি1 টুকরা
 রিল সিট1 টুকরা
 ফেরুলের আঠা1 টুকরা
প্রয়োজনীয় সরঞ্জাম:
কারুকাজের ছুরিরেতি (হাতের রেতি) প্রোপেন মশালহাতুড়ি
8
8
Build the upper grasp and finish the wood
Build the upper grasp and finish the wood
Cement corks above the reel seat, the first pressed against the seat and turned so the metal enters it, then shape them into a smooth swelled grasp and cement on the winding check. Sand the rod, wet it to raise the grain, and sand again with old paper; for a finer polish rub with pumice and oil and an oiled rag. File the tip to fit the agate top, smear on melted ferrule cement and push the top home. Rub the wood over with a cloth wet with varnish to fill the pores, and wipe off the surplus.
এই ধাপের উপকরণ:
কর্কের আংটি6 টুকরাপশু আঠা1 টুকরা ওয়াইন্ডিং চেক1 টুকরা
 ছিপের ডগার গাইড1 টুকরাফেরুলের আঠা1 টুকরাশিরিষ কাগজ1 টুকরা
 কোচ বার্নিশ1 টুকরা
প্রয়োজনীয় সরঞ্জাম:
কারুকাজের ছুরিরেতি (হাতের রেতি)প্রোপেন মশাল9
9
Whip on the guides
Whip on the guides
Place the first guide 19-1/2 in from the metal taper above the upper grasp and the second 15-1/2 in further on; round the sharp edges of their bases with a fine file and hold them with a few turns of common thread. Whip with 00 silk using the invisible knot: tuck the end under the first coil, wind tightly by turning the rod, lay a waxed loop of silk about 4 in long under the last turns, wind about 1/8 in beyond the pointed flange, cut the silk and pull its end back under with the loop. About a dozen turns make a winding; edgings of three or four turns go on after, in red with green or yellow.
এই ধাপের উপকরণ:
 ছিপের সুতা-গাইড2 টুকরা
 ছিপ বাঁধার রেশম1 টুকরা
 মসিনার সুতা1 টুকরা
 মৌমাছির মোম1 টুকরা
প্রয়োজনীয় সরঞ্জাম:
রেতি (হাতের রেতি)কারুকাজের ছুরি10
10
Shellac and varnish
Shellac and varnish
Clip any fuzzy ends and give the silk two light coats of white shellac dissolved in grain alcohol, warmed and laid on with a small camel's-hair brush; let it dry a couple of days. Warm the coach varnish in a pot of hot water for five minutes and brush it on evenly with a brush about 1/2 in wide, in a warm place (about 75 deg F). Hang the rod by the tip in a dust-free room; allow three days between coats; two coats protect it, three give complete protection.
এই ধাপের উপকরণ:
 শেলাকের বার্নিশ1 টুকরাকোচ বার্নিশ3 টুকরা
প্রয়োজনীয় সরঞ্জাম:
 চওড়া রঙের তুলি
11
11
Troubleshooting
Troubleshooting
Casting rod troubleshooting.
Flow
Loading...
12
12
History and honest limits
History and honest limits
From "Fishing-Rod Making and Angling, Part I -- A One-Piece Casting Rod" by Stillman Taylor, in **The Boy Mechanic, Book 2**, Popular Mechanics, 1915 (Project Gutenberg 44585; checked on the archive.org scan boymechanicbook200chic2, pp. 59-66). His text says about 10 corks for the lower grasp; his list allows 2 dozen for both grasps. The block plane, vernier caliper and other modern tool names, and the metric figures, are ours; his tools were "a saw, plane, jackknife, file, and sandpaper" plus those in his tools section.
উপকরণ
18- 1 টুকরাপ্লেসহোল্ডার
- 1 টুকরাপ্লেসহোল্ডার
- 2 টুকরাপ্লেসহোল্ডার
- 1 টুকরাপ্লেসহোল্ডার
- 2 টুকরাপ্লেসহোল্ডার
- 10 টুকরাপ্লেসহোল্ডার
- 1 টুকরাপ্লেসহোল্ডার
- 1 টুকরাপ্লেসহোল্ডার
- 1 টুকরাপ্লেসহোল্ডার
- 2 টুকরাপ্লেসহোল্ডার
- 1 টুকরাপ্লেসহোল্ডার
- 1 টুকরাপ্লেসহোল্ডার
- 4 টুকরাপ্লেসহোল্ডার
- 2 টুকরাপ্লেসহোল্ডার
- 1 টুকরাপ্লেসহোল্ডার
- 1 টুকরাপ্লেসহোল্ডার
- 1 টুকরাপ্লেসহোল্ডার
- 1 টুকরাপ্লেসহোল্ডার
প্রয়োজনীয় সরঞ্জাম
17- প্লেসহোল্ডার
- 1 vendor sell this, none ship to you yetপ্লেসহোল্ডার
- প্লেসহোল্ডার
- প্লেসহোল্ডার
- প্লেসহোল্ডার
- প্লেসহোল্ডার
- প্লেসহোল্ডার
- 1 vendor sell this, none ship to you yetপ্লেসহোল্ডার
- প্লেসহোল্ডার
- প্লেসহোল্ডার
- প্লেসহোল্ডার
- প্লেসহোল্ডার
- প্লেসহোল্ডার
- প্লেসহোল্ডার
- প্লেসহোল্ডার
- প্লেসহোল্ডার
- প্লেসহোল্ডার
এই ব্লুপ্রিন্ট যা তৈরি করে
সম্পর্কিত ব্লুপ্রিন্ট
এই ব্লুপ্রিন্টগুলি জ্ঞান ভাগ করে — কৌশল, উপকরণ বা নীতি
CC0 পাবলিক ডোমেন
এই ব্লুপ্রিন্ট CC0-এর অধীনে প্রকাশিত। আপনি অনুমতি ছাড়াই যেকোনো উদ্দেশ্যে এটি অনুলিপি, পরিবর্তন, বিতরণ ও ব্যবহার করতে পারেন।
মেকারের ব্লুপ্রিন্টের মাধ্যমে পণ্য কিনে তাঁকে সমর্থন করুন, যেখানে তিনি আয় করেন মেকার কমিশন বিক্রেতাদের নির্ধারিত, অথবা এই ব্লুপ্রিন্টের একটি নতুন সংস্করণ তৈরি করে নিজের ব্লুপ্রিন্টে সংযোগ হিসেবে যুক্ত করে আয় ভাগ করুন।