Cutting and Leading Stained Glass — Medieval Window Art
নির্দেশ
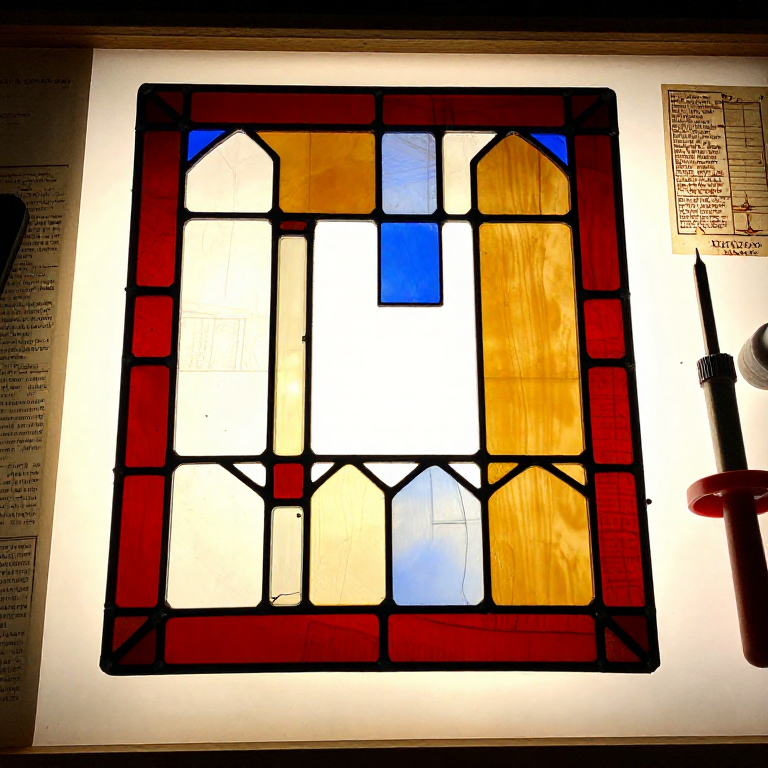
Create the Cartoon and Cut Templates
Create the Cartoon and Cut Templates
Draw the full-size design (cartoon) on heavy paper or card, marking each glass piece with its colour and a reference number. The design should account for the width of the lead came between each piece — allow approximately 1.5 mm on each side of every glass piece for the came heart. Cut templates for each piece from the cartoon using pattern shears (special scissors that remove a thin strip of paper equal to the came heart width, ensuring accurate fit). In medieval practice, the master glazier drew the design on a whitewashed wooden table, and the cartoon was the working surface itself. The design of a traditional medieval window is governed by the lead lines — the came network is both structural and decorative, outlining figures, drapery, and architectural elements.
ইস চরণ কে লিএ সামগ্রী:
আবশ্যক উপকরণ:
 Glass Cutter
 Soldering Iron
 Drawknife
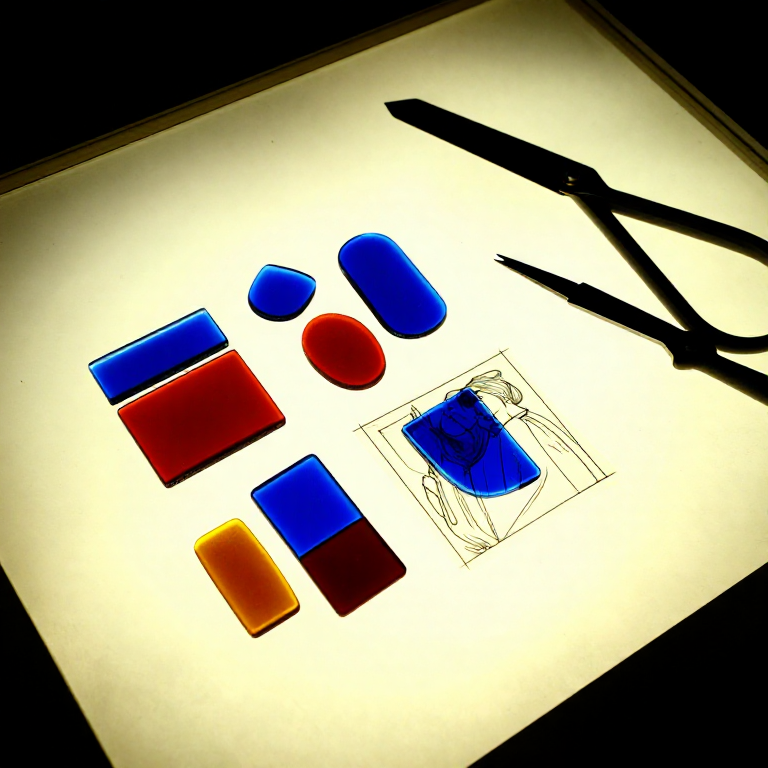
Cut the Glass Pieces
Cut the Glass Pieces
Place each template on the appropriate colour of glass and trace around it with a glass cutter, applying firm, even pressure to score a continuous line. Use running pliers to snap the glass along the score line. For curved cuts, score and break in gentle stages, nibbling away excess glass with grozing pliers. Each piece should fit its template within approximately 0.5 mm for clean assembly. Medieval glaziers used a hot iron to crack glass along scored lines — the thermal stress caused a clean break. Check each piece against the cartoon by placing it in position. All pieces should fit together with consistent gaps for the lead came. Number each piece to match the cartoon for easy assembly.
Assemble with Lead Came
Assemble with Lead Came
Nail two straight lead came border strips along the bottom and left edges of the work board to create a right-angle corner. Starting from this corner, fit the first glass piece into the border came channels. Cut a piece of H-came to length and press it against the exposed edge of the first glass piece. Fit the next glass piece into the other channel of the H-came. Continue building the panel piece by piece, working from the corner outward and upward, holding pieces in position with horseshoe nails pressed against the came. Each glass piece should sit snugly in the came channels without rattling. Open the came channels slightly with a wooden fid if needed. The lead is soft enough to bend around curves by hand.
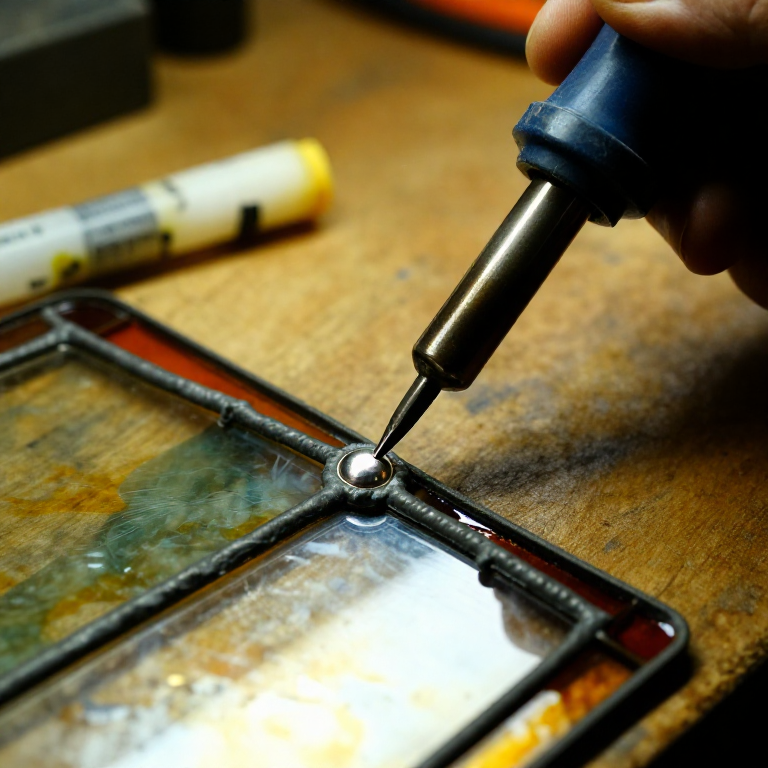
Solder the Joints
Solder the Joints
Apply a small amount of flux (oleic acid paste or simply rub a tallow candle) to each came intersection where two or more came strips meet. Touch the hot soldering iron to a stick of lead-tin solder and apply a smooth, slightly domed solder joint at each intersection. The solder should flow over the came at the joint, bonding the strips together, but should not be so hot that it melts through the came. Each joint should be neat and slightly convex. Turn the panel over (carefully — it is fragile until all joints are soldered) and solder the joints on the reverse side. The solder joints provide the structural integrity of the panel — each joint is a rigid connection that prevents the came from shifting. Add the border came strips along the top and right edges and solder them in place to complete the frame.
Cement and Clean the Panel
Cement and Clean the Panel
Mix glazing cement (linseed oil, whiting powder, and a small amount of lamp black for colour) to a thick paste consistency. Work this cement under the came flanges on both sides of the panel using a stiff brush, pushing the putty into every gap between the glass and the lead came. This cements the glass firmly in position, waterproofs the joints, and adds structural rigidity. Scrub excess cement from the glass surfaces with a scrub brush and sprinkle dry whiting powder over the panel to absorb residual oils. Allow the cement to set for 24 to 48 hours before handling. Clean both glass surfaces with a damp cloth. The finished panel can be installed in a window opening, supported by a saddle bar (a horizontal iron bar soldered to copper ties attached to the panel). Medieval stained glass panels were designed to be read from inside the building, with the painted details facing inward and the light streaming through the coloured glass to illuminate the interior.
সামগ্রী
5- assorted pieces totalling 30 x 30 cm টুকরাপ্লেসহোল্ডর
- 3-4 metres টুকরাপ্লেসহোল্ডর
- 50 grams টুকরাপ্লেসহোল্ডর
- small amount টুকরাপ্লেসহোল্ডর
- small amount টুকরাপ্লেসহোল্ডর
আবশ্যক উপকরণ
6- প্লেসহোল্ডর
- প্লেসহোল্ডর
- প্লেসহোল্ডর
- প্লেসহোল্ডর
- প্লেসহোল্ডর
কনেক্টেড ব্লূপ্রিংট সামগ্রী
Related blueprints
Other builds that share materials, tools, or techniques with this one.


CC0 পব্লিক ডোমেন
যহ ব্লূপ্রিংট CC0 কে তহত জারী কিযা গযা হৈ। আপ বিনা অনুমতি মাঁগে ইস কার্য কো কিসী ভী উদ্দেশ্য কে লিএ কॉপী, সংশোধিত, বিতরিত ঔর উপযোগ করনে কে লিএ স্বতংত্র হৈং।
উনকে ব্লূপ্রিংট কে মাধ্যম সে উত্পাদ খরীদকর মেকর কা সমর্থন করেং জহাঁ বে মেকর কমীশন কমাতে হৈং জো বিক্রেতাওং দ্বারা নির্ধারিত হোতা হৈ, যা ইস ব্লূপ্রিংট কা নযা সংস্করণ বনাএঁ ঔর রাজস্ব সাঝা করনে কে লিএ ইসে অপনে ব্লূপ্রিংট মেং কনেক্শন কে রূপ মেং শামিল করেং।