কলা
সৌন্দর্য এবং সুস্থতা
ক্রাফট
সংস্কৃতি ও ইতিহাস
বিনোদন
পরিবেশ
খাদ্য ও পানীয়
রিভার্স ইঞ্জিনিয়ারিং
বিজ্ঞান
খেলাধুলা
টেকনোলজি
পরিধানযোগ্য
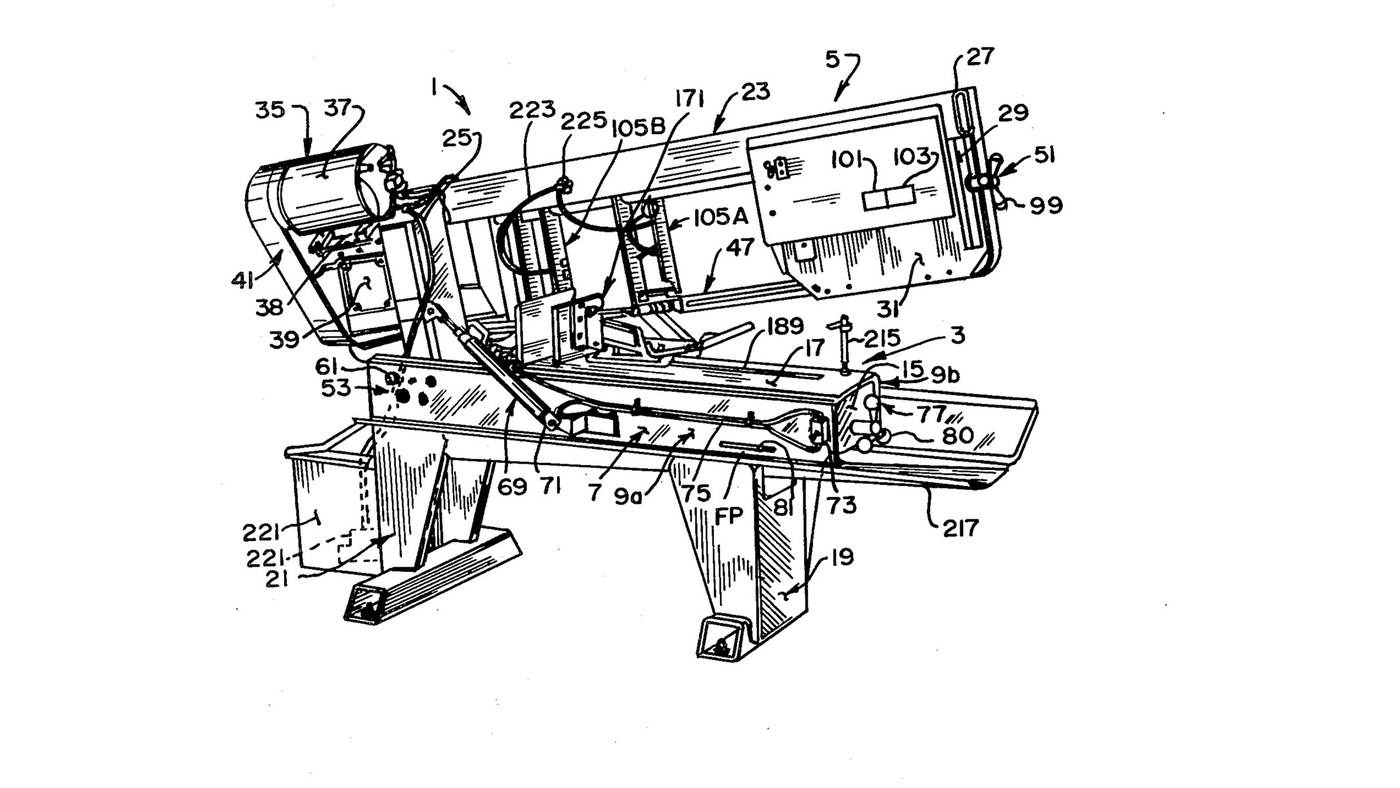


Metal Band Saw: Horizontal Saw on a Welded Steel Frame
Curtis Eccardt's horizontal power band saw (Emerson Electric, US 4,364,294, 1982), built from welded steel channel and tube instead of iron castings to cut its cost. The saw head swings down on trunnions over the bed; a hydraulic cylinder with a valve sets how fast it feeds, a spring counterbalances it, and a spring tensioner shows the blade tension on a scale. Two guides with rollers twist the blade's lower run 90° so its teeth face down into the work, and carbide inserts hold it there.
The patent gives no sizes, speeds or ratings; the welder and wrenches are ours. The picture: the patent's Fig. 1.
উন্নত
4 days
নির্দেশাবলি
1
1
Weld the bed
Weld the bed
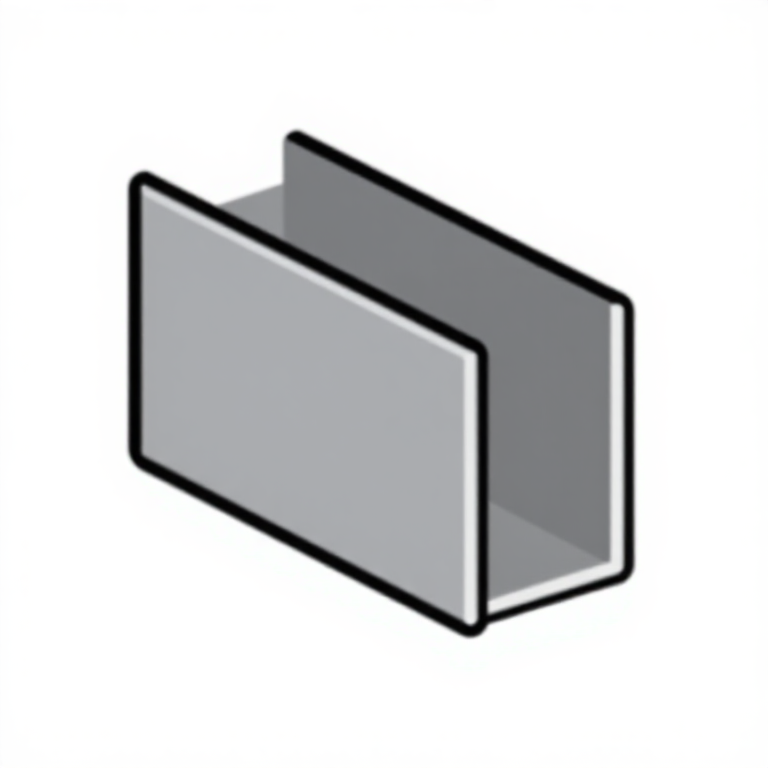
Stand two steel channels (9a, 9b) parallel, webs upright and flanges facing in, and weld gussets (15) between their webs. Bolt a bed plate (17) across the top flanges as the work surface. Ours: MIG welder, drill press for the bolt holes.
এই ধাপের উপকরণ:
 ইস্পাতের U অংশ2 টুকরা
 নরম ইস্পাতের প্লেট1 টুকরা
 ষড়ভুজ মাথার বোল্ট - শ্রেণি 8.81 টুকরা
প্রয়োজনীয় সরঞ্জাম:
 MIG ঝালাই যন্ত্র
 স্তম্ভযুক্ত তুরপুন যন্ত্র
 রেঞ্চ (সমন্বয়যোগ্য)
2
2
Weld and bolt on the legs
Weld and bolt on the legs
Weld formed sheet-steel legs onto horizontal floor members to make front and rear leg weldments (19, 21), and bolt them under the bed.
এই ধাপের উপকরণ:
 ইস্পাতের পাত1 টুকরা
 ইস্পাতের নল1 টুকরাষড়ভুজ মাথার বোল্ট - শ্রেণি 8.81 টুকরা
প্রয়োজনীয় সরঞ্জাম:
MIG ঝালাই যন্ত্ররেঞ্চ (সমন্বয়যোগ্য)3
3
Weld the head
Weld the head
Weld a head post (25) of square or rectangular steel tube square to a head beam (27) of rectangular tube. Weld a bracket leg (29) down from the beam's outer end, and fix support plates at both ends (31, 33).
এই ধাপের উপকরণ:
ইস্পাতের নল1 টুকরানরম ইস্পাতের প্লেট1 টুকরাপ্রয়োজনীয় সরঞ্জাম:
MIG ঝালাই যন্ত্র4
4
Fit the trunnions and align the pivot
Fit the trunnions and align the pivot
Fix a shaft through the head post with its ends out as trunnions (55a, 55b), in bushings in two bearing blocks (59a, 59b) bolted inside the channel webs. Each block has one close-fit bolt hole and three oversize ones: shift the blocks until the pivot is parallel to the bed plate, then torque the bolts. A set screw (67) takes out end play.
এই ধাপের উপকরণ:
 ইস্পাতের শ্যাফট1 টুকরা
 ধাতব বুশিং2 টুকরা
 বেয়ারিং ব্লক2 টুকরাষড়ভুজ মাথার বোল্ট - শ্রেণি 8.88 টুকরা
 বাটির মতো ডগাওয়ালা সেট স্ক্রু1 টুকরা
প্রয়োজনীয় সরঞ্জাম:
স্তম্ভযুক্ত তুরপুন যন্ত্র টর্ক রেঞ্চ
5
5
Mount motor, belt drive and gearbox
Mount motor, belt drive and gearbox
Mount the electric motor (37) on a plate (38) pivoted on the head beam, and couple it by a multi-speed belt and pulleys (41) to a gearbox (39). Fit the drive wheel (43) on the gearbox output shaft.
এই ধাপের উপকরণ:
 বৈদ্যুতিক মোটর1 টুকরানরম ইস্পাতের প্লেট1 টুকরা
 ড্রাইভ বেল্ট1 টুকরা
 কপিকল1 টুকরা
 গিয়ারবক্স1 টুকরা
 ব্যান্ড করাতের চাকা1 টুকরা
প্রয়োজনীয় সরঞ্জাম:
রেঞ্চ (সমন্বয়যোগ্য)6
6
Build the idler tensioner
Build the idler tensioner
Weld an idler yoke (87) of rolled steel plate, pivot it on the head beam with a pin (89), and cantilever the idler axle from it with the idler wheel (45) on bearings (85). A threaded rod (91) pulls the yoke through a coil spring (93) held between compression plates and a U-bolt (97); a knob (99) turns the rod. An indicator (101) on the spring reads the tension on a scale (103).
এই ধাপের উপকরণ:
নরম ইস্পাতের প্লেট1 টুকরা ইস্পাতের পিন1 টুকরাইস্পাতের শ্যাফট1 টুকরাব্যান্ড করাতের চাকা1 টুকরা
 বল বেয়ারিং1 টুকরা
 প্যাঁচকাটা দণ্ড1 টুকরা
 Coil Spring1 টুকরা
 U আকারের আংটা1 টুকরা
 নিয়ন্ত্রণ নব1 টুকরা
প্রয়োজনীয় সরঞ্জাম:
MIG ঝালাই যন্ত্ররেঞ্চ (সমন্বয়যোগ্য)7
7
Build the two blade guides
Build the two blade guides
In each guide channel (111) mount two guide rollers (115a, 115b) on ball bearings on eccentric bushings, one fixed and one adjusted to the blade thickness. Add a carbide thrust insert (133) on the blade's back edge and two carbide side inserts (137a fixed, 137b on a sprung swing bracket set by a bolt and knob). Clamp the guides on two bar tracks (107).
এই ধাপের উপকরণ:
 গাইড রোলার4 টুকরাবল বেয়ারিং4 টুকরা
 কেন্দ্রচ্যুত বুশ4 টুকরা
 কার্বাইড ইনসার্ট6 টুকরাCoil Spring2 টুকরানিয়ন্ত্রণ নব2 টুকরাইস্পাতের নল1 টুকরা
প্রয়োজনীয় সরঞ্জাম:
রেঞ্চ (সমন্বয়যোগ্য)8
8
Fit the blade and set the tension
Fit the blade and set the tension
By hand, run the endless blade (47) round the drive and idler wheels and through both guides; the rollers twist its lower run about 90° so the teeth face down. Turn the tension knob until the scale shows the tension you want.
এই ধাপের উপকরণ:
 ব্যান্ড করাতের ফলা1 টুকরা
9
9
Fit the feed cylinder and counterbalance
Fit the feed cylinder and counterbalance
Connect a hydraulic cylinder (71) between bed channel and head post above the trunnions, filled with oil and piped through tubing (75) to a control valve (73): the valve sets the feed rate and, closed, holds the head. Fit a coil spring (78) on a threaded linkage (79) between an end gusset and the head post below the trunnions, adjusted by a knob (80), to counterbalance the head.
এই ধাপের উপকরণ:
 জলচালিত সিলিন্ডার1 টুকরা
 হাইড্রোলিক তেল1 batch
 হাইড্রোলিক নল1 টুকরা
 প্রবাহ নিয়ন্ত্রণ ভালভ1 টুকরাCoil Spring1 টুকরাপ্যাঁচকাটা দণ্ড1 টুকরানিয়ন্ত্রণ নব1 টুকরা
প্রয়োজনীয় সরঞ্জাম:
রেঞ্চ (সমন্বয়যোগ্য)10
10
Bolt on the vice
Bolt on the vice
Bolt the quick-acting vice to the bed plate to clamp the work square under the blade.
এই ধাপের উপকরণ:
 মেশিন ভাইস1 টুকরাষড়ভুজ মাথার বোল্ট - শ্রেণি 8.81 টুকরা
প্রয়োজনীয় সরঞ্জাম:
রেঞ্চ (সমন্বয়যোগ্য)উপকরণ
29- 2 টুকরাপ্লেসহোল্ডার
- 1 টুকরাপ্লেসহোল্ডার
- 11 টুকরাপ্লেসহোল্ডার
- 1 টুকরাপ্লেসহোল্ডার
- 1 টুকরাপ্লেসহোল্ডার
- 1 টুকরাপ্লেসহোল্ডার
- 2 টুকরাপ্লেসহোল্ডার
- 2 টুকরাপ্লেসহোল্ডার
- প্লেসহোল্ডার
- 1 টুকরাপ্লেসহোল্ডার
- 1 টুকরাপ্লেসহোল্ডার
- 1 টুকরাপ্লেসহোল্ডার
- 1 টুকরাপ্লেসহোল্ডার
- 1 টুকরাপ্লেসহোল্ডার
- 1 টুকরাপ্লেসহোল্ডার
- প্লেসহোল্ডার
- 1 টুকরাপ্লেসহোল্ডার
- 4 টুকরাপ্লেসহোল্ডার
- 1 টুকরাপ্লেসহোল্ডার
- প্লেসহোল্ডার
- 4 টুকরাপ্লেসহোল্ডার
- 4 টুকরাপ্লেসহোল্ডার
- 6 টুকরাপ্লেসহোল্ডার
- 1 টুকরাপ্লেসহোল্ডার
- 1 টুকরাপ্লেসহোল্ডার
- 1 batchপ্লেসহোল্ডার
- 1 টুকরাপ্লেসহোল্ডার
- 1 টুকরাপ্লেসহোল্ডার
- 1 টুকরাপ্লেসহোল্ডার
এই ব্লুপ্রিন্ট যা তৈরি করে
CC0 পাবলিক ডোমেন
এই ব্লুপ্রিন্ট CC0-এর অধীনে প্রকাশিত। আপনি অনুমতি ছাড়াই যেকোনো উদ্দেশ্যে এটি অনুলিপি, পরিবর্তন, বিতরণ ও ব্যবহার করতে পারেন।
মেকারের ব্লুপ্রিন্টের মাধ্যমে পণ্য কিনে তাঁকে সমর্থন করুন, যেখানে তিনি আয় করেন মেকার কমিশন বিক্রেতাদের নির্ধারিত, অথবা এই ব্লুপ্রিন্টের একটি নতুন সংস্করণ তৈরি করে নিজের ব্লুপ্রিন্টে সংযোগ হিসেবে যুক্ত করে আয় ভাগ করুন।