
Recovering Selenium from Copper Refinery Anode Slime — The Photoconductor That Sees Light
Selenium is element 34 — a chalcogen sitting directly below sulfur on the periodic table, and one of the most photosensitive elements known. In darkness, selenium is a poor electrical conductor; exposed to light, its conductivity increases up to a thousandfold. This remarkable photoconductive property, discovered by Willoughby Smith in 1873, launched the entire field of photoelectric technology: selenium cells powered the first light meters, the first fax machines (1920s), and the first photocopiers (Xerox, 1959). Today, selenium is used in photovoltaic cells, glass decolorization, and as a nutritional trace element essential for human health.
Selenium rarely forms its own minerals. Instead, it substitutes for sulfur in copper sulfide ores — wherever copper is smelted and electrolytically refined, selenium concentrates in the anode slime: the dark mud that accumulates at the bottom of electrolytic refining cells. This slime also contains tellurium, silver, gold, and platinum-group metals. Commercial selenium is almost entirely a by-product of copper refining.
This blueprint demonstrates the laboratory-scale recovery of selenium from simulated or real copper anode slime through oxidizing roasting, soda ash fusion, aqueous leaching, and reduction with sulfur dioxide. The final product is vitreous (glassy) selenium — the dark red-black allotrope used in photoelectric applications.
HAZARD: Selenium compounds are toxic. Selenium dioxide (SeO₂) is severely irritating to eyes and lungs, and hydrogen selenide (H₂Se), though not deliberately produced here, is extremely toxic and smells of rotting horseradish. All heating steps must be performed under a fume hood or in a well-ventilated outdoor area. Concentrated sulfuric acid causes severe burns. Wear chemical splash goggles, acid-resistant gloves, and a respirator with acid gas cartridge at all times.
Instructions
Understand selenium's chemistry and significance
Understand selenium's chemistry and significance
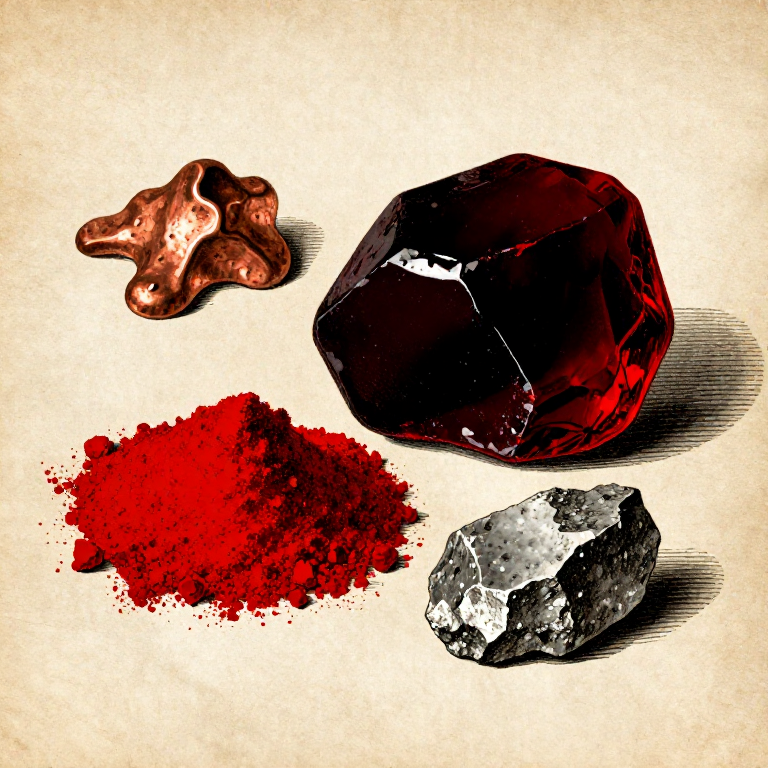
Selenium (Se, atomic number 34, atomic mass 78.96) is a nonmetal chalcogen with six stable isotopes and several allotropes. The thermodynamically stable form is grey (trigonal) selenium — a semiconducting solid composed of helical Se chains packed in a hexagonal lattice. The metastable vitreous (amorphous) form is a dark red-black glass. Red selenium consists of Se₈ rings analogous to sulfur's S₈ rings.
Selenium's defining property is photoconductivity: grey selenium's electrical resistivity drops from ~10⁶ Ω·m in darkness to ~10³ Ω·m in bright light, because photons excite electrons across its 1.74 eV band gap into the conduction band. This was the world's first known photoconductive effect (1873) and enabled Chester Carlson's invention of xerography (1938) — the photocopier works by charging a selenium drum in darkness, selectively discharging it with light from the document image, and attracting toner powder to the still-charged areas. Selenium is also essential in biology: the amino acid selenocysteine, the '21st amino acid', is incorporated into glutathione peroxidase and other enzymes that protect cells from oxidative damage.
Obtain copper anode slime or prepare a selenium-bearing sample
Obtain copper anode slime or prepare a selenium-bearing sample
Copper anode slime is the dark brown to black sludge that settles from the anodes during electrolytic copper refining. It typically contains 5–25% selenium (as Cu₂Se and Ag₂Se), along with tellurium, silver, gold, lead sulfate, and silica. If you have access to a copper refinery or can obtain a sample from a metallurgical supplier, 50–100 grams of anode slime is ideal.
For laboratory demonstration without industrial contacts, prepare a synthetic sample: dissolve 5 grams of sodium selenite (Na₂SeO₃) in 50 mL of water. This provides a known quantity of selenium in a soluble form, allowing you to practice the reduction and collection steps (skip to step 8). Sodium selenite is available from chemical suppliers — handle it with gloves, as it is toxic if ingested or absorbed through skin. The remainder of this blueprint describes the full extraction from raw anode slime.
Tools needed:
 Chemical-Resistant Gloves
 Precision Scale (0.01g)
Decopperize the anode slime with dilute sulfuric acid
Decopperize the anode slime with dilute sulfuric acid
The first step in processing raw anode slime is removing residual copper, which constitutes up to 30% by weight. Place 50 grams of anode slime in a heat-resistant glass beaker and add 200 mL of dilute sulfuric acid (approximately 10–15% H₂SO₄). Heat gently to 60–70 °C while stirring for 1 hour. Copper dissolves as blue CuSO₄ while selenium compounds (Cu₂Se, Ag₂Se) and precious metals remain insoluble.
Filter the hot slurry through fine filter paper. The blue filtrate contains dissolved copper — set it aside (it can be recovered by cementation with scrap iron if desired). Wash the filter cake twice with hot distilled water. The decopperized residue is now enriched in selenium, tellurium, silver, and gold. It should be dark brown to black and weigh considerably less than the starting material.
Materials for this step:
 Sulfuric Acid (50% concentration)50 ml
 Distilled Water (1 Liter)200 ml
Tools needed:
 Heat-Resistant Glass Beaker (1 liter)
 Borosilicate Glass Rod
 Filter Paper (fine pore)
 Hot Plate (Laboratory/Kitchen)
 Chemical Splash GogglesChemical-Resistant Gloves
Roast the decopperized slime with soda ash
Roast the decopperized slime with soda ash
The standard industrial method for converting selenium in anode slime to a soluble form is soda roasting: heating with sodium carbonate (soda ash, Na₂CO₃) in air at 500–600 °C. The reactions are: Cu₂Se + Na₂CO₃ + 2O₂ → Na₂SeO₃ + 2CuO + CO₂ and Ag₂Se + Na₂CO₃ + 2O₂ → Na₂SeO₃ + 2AgO + CO₂. Selenium is oxidized to selenite (SeO₃²⁻) and combines with sodium to form water-soluble sodium selenite.
Mix the decopperized slime thoroughly with an equal weight of anhydrous sodium carbonate. Transfer the mixture to a refractory crucible and heat in a furnace or kiln to 550 °C for 2 hours with good air circulation. Stir occasionally with an iron rod to ensure uniform oxidation. Perform this step under a fume hood or outdoors — selenium dioxide vapor (white, acrid) is released during roasting and is severely irritating to the respiratory tract. The roasted product should be a grey-green to brownish cake.
Tools needed:
 Clay Crucible (refractory)
 P100/FFP3 Respirator with Acid Gas Cartridge
 Leather Gauntlet Gloves
 Safety Goggles
 Crucible Tongs (long-handled)
Leach the roasted cake with hot water
Leach the roasted cake with hot water
Crush the cooled roasted cake in a mortar and transfer to a glass beaker. Add 300 mL of hot distilled water (80–90 °C) and stir for 30 minutes. Sodium selenite (Na₂SeO₃) dissolves readily in water, while copper oxide, silver, gold, and silica remain insoluble. The selenite solution should be clear to pale yellow.
Filter through fine filter paper. The insoluble residue contains silver and gold — in an industrial setting this is sent to precious metals recovery. The clear filtrate contains dissolved selenium as Na₂SeO₃. Test the filtrate: acidify a small portion with a drop of HCl and add a piece of copper foil. If selenium is present, a red-brown deposit of elemental selenium forms on the copper surface within minutes. This is a quick qualitative confirmation before proceeding to the precipitation step.
Materials for this step:
Distilled Water (1 Liter)300 mlTools needed:
 Mortar and Pestle (Porcelain)Heat-Resistant Glass Beaker (1 liter)Borosilicate Glass RodFilter Paper (fine pore)
Acidify the selenite solution
Acidify the selenite solution
To prepare for selenium precipitation, the alkaline Na₂SeO₃ solution must be acidified. Slowly add dilute hydrochloric acid (10% HCl) to the filtered selenite solution while stirring, until the pH drops to approximately 1–2 (strongly acidic). The reaction: Na₂SeO₃ + 2HCl → H₂SeO₃ + 2NaCl. The selenious acid (H₂SeO₃) remains in solution — the liquid should be clear and colorless to pale yellow.
Monitor the pH carefully with litmus paper. If the solution turns cloudy or a precipitate forms during acidification, this may indicate tellurium dioxide (TeO₂) precipitating — tellurium's chemistry diverges from selenium's at this point, providing a natural separation. If a white precipitate appears, filter it out. This precipitate is enriched in tellurium. The clear acidic filtrate contains your selenium as H₂SeO₃, ready for reduction.
Materials for this step:
 Hydrochloric Acid (10% dilute)150 ml
Tools needed:
Borosilicate Glass Rod Litmus PaperFilter Paper (fine pore)Chemical Splash Goggles
Reduce selenious acid to elemental selenium with SO₂
Reduce selenious acid to elemental selenium with SO₂
The classic method for recovering elemental selenium from acidic selenite solution is reduction with sulfur dioxide gas (SO₂). The reaction: H₂SeO₃ + 2SO₂ + H₂O → Se↓ + 2H₂SO₄. Selenium precipitates as a bright red amorphous powder while sulfuric acid remains in solution.
Generate SO₂ by carefully adding dilute sulfuric acid to sodium sulfite (Na₂SO₃) or sodium bisulfite (NaHSO₃) in a separate flask fitted with a delivery tube. This must be done under a fume hood or outdoors — SO₂ is a toxic, irritating gas. Bubble the SO₂ gas through the acidic selenite solution. Within minutes, the solution turns orange, then turbid red as colloidal selenium precipitates. Continue passing SO₂ until no further red precipitate forms and the solution above the precipitate is clear. Allow the red selenium to settle overnight.
Tools needed:
 Erlenmeyer FlaskBorosilicate Glass RodP100/FFP3 Respirator with Acid Gas CartridgeChemical Splash Goggles
Alternative reduction using ascorbic acid
Alternative reduction using ascorbic acid
If SO₂ generation is impractical, selenious acid can be reduced with ascorbic acid (vitamin C) — a gentler, fume-free alternative. Dissolve 5 grams of ascorbic acid in 50 mL of water. Add this solution slowly to the acidified selenite while stirring at 60–70 °C. The reaction: H₂SeO₃ + 2C₆H₈O₆ → Se↓ + 2C₆H₆O₆ + 3H₂O. Selenium precipitates as a red-orange powder while dehydroascorbic acid remains in solution.
The reduction is slower than with SO₂ — allow 30–60 minutes at temperature, stirring frequently. The solution progressively turns orange, then dark red as elemental selenium forms. When precipitation is complete, the supernatant should be clear or very pale yellow. Allow the selenium to settle, then decant the liquid. This method produces amorphous red selenium of slightly lower purity than the SO₂ method but is far safer for small-scale laboratory work.
Tools needed:
Hot Plate (Laboratory/Kitchen) Borosilicate BeakerBorosilicate Glass RodPrecision Scale (0.01g)
Filter and wash the selenium precipitate
Filter and wash the selenium precipitate
Filter the selenium precipitate through fine filter paper. The collected solid should be a vivid red to red-orange powder — this is amorphous (red) selenium, consisting of disordered Se₈ rings and short Se chains. Wash the precipitate three times with small portions of hot distilled water to remove residual acid and salts. Then wash once with a small amount of ethanol or isopropanol to displace water and speed drying.
Spread the washed precipitate on clean filter paper and allow to dry at room temperature in a well-ventilated area. Do not heat above 50 °C during drying — amorphous selenium converts to grey crystalline selenium above approximately 70 °C, and the conversion is accompanied by volume change that can scatter the powder. Once dry, weigh the product and calculate the recovery yield. From 50 grams of anode slime containing 15% Se, the theoretical yield is 7.5 grams of elemental selenium.
Materials for this step:
Filter Paper (fine pore)3 sheetsDistilled Water (1 Liter)100 mlTools needed:
Precision Scale (0.01g)Convert to vitreous selenium by melting
Convert to vitreous selenium by melting
To produce vitreous (glassy) selenium — the form historically used in photoelectric cells and xerography drums — place the dried red selenium powder in a small borosilicate test tube or crucible. Heat slowly to 220 °C (the melting point of selenium). The red powder first darkens, then melts to a viscous dark red liquid. Continue heating to 250 °C to reduce viscosity, then quickly pour the molten selenium onto a cold metal plate or plunge the tube into ice water.
Rapid cooling (quenching) prevents crystallization and produces vitreous selenium — a dark red-black, brittle glass with a characteristic conchoidal fracture and vitreous lustre. If cooled slowly instead, the selenium crystallizes to the grey trigonal form — a silvery metallic-looking solid that is the stable allotrope. Both forms are useful: vitreous selenium for photoconductivity demonstrations, grey selenium for semiconductor applications. Perform melting under a fume hood — selenium vapor at elevated temperatures produces toxic SeO₂ fumes on contact with air.
Tools needed:
Clay Crucible (refractory)Crucible Tongs (long-handled)Safety GogglesP100/FFP3 Respirator with Acid Gas CartridgeLeather Gauntlet GlovesDemonstrate selenium's photoconductivity
Demonstrate selenium's photoconductivity
The most dramatic property of selenium is its light sensitivity. To demonstrate photoconductivity, press a thin strip of vitreous or grey selenium between two copper electrodes (copper tape or wire pressed firmly against the selenium surface). Connect the electrodes to a multimeter set to measure resistance (ohms). In a dark room, note the resistance reading — it should be very high (megaohms).
Now shine a bright flashlight or desk lamp directly onto the selenium. The resistance drops dramatically — typically by a factor of 100 to 1000. Remove the light and the resistance climbs back up. This is the photoconductive effect that Willoughby Smith discovered in 1873 while testing selenium resistors for underwater telegraph cables, and that Alexander Graham Bell exploited in his 'photophone' (1880) — the world's first device to transmit speech on a beam of light, decades before fiber optics. Record the dark resistance, illuminated resistance, and the ratio between them.
Perform the selenium flame test and observe allotropes
Perform the selenium flame test and observe allotropes
Place a tiny amount of selenium on a clean nichrome wire loop and hold in a gas flame. Selenium burns with a characteristic bright blue flame and produces a distinctive, pungent odour often described as 'rotting horseradish' or 'decayed radish' — this is due to trace H₂Se and organic selenium compounds. The blue flame is diagnostic: no common element produces the same combination of blue flame and characteristic odour. Perform outdoors or under a fume hood — the combustion products (SeO₂) are toxic.
Lay your samples side by side for comparison: the vivid red amorphous powder, the dark red-black vitreous glass, and (if you made it) the metallic grey trigonal crystal. These three allotropes of the same element look completely different — red, black-glass, and silver-metallic — yet all contain nothing but selenium atoms arranged in different structural patterns. This allotropy, more dramatic than even sulfur's, illustrates how crystal structure determines every physical property: color, conductivity, hardness, and melting point.
Tools needed:
 Bunsen BurnerSafety GogglesP100/FFP3 Respirator with Acid Gas Cartridge
Materials
4- 50 mlPlaceholder
- Placeholder
- Placeholder
- 1 piecePlaceholder
Tools Required
17- Placeholder
- Placeholder
- Placeholder
- Placeholder
- Placeholder
- Placeholder
- Placeholder
- Placeholder
- Placeholder
- Placeholder
- Placeholder
- Placeholder
- Placeholder
- Placeholder
- Placeholder
- Placeholder
- Placeholder
Connected Blueprint Materials
Related blueprints
Other builds that share materials, tools, or techniques with this one.
CC0 Public Domain
This blueprint is released under CC0. You are free to copy, modify, distribute, and use this work for any purpose, without asking permission.
Support the Maker by purchasing products through their Blueprint where they earn a Maker Commission set by Vendors, or create a new iteration of this Blueprint and include it as a connection in your own Blueprint to share revenue.