Making Traditional Gesso — The White Ground That Prepared Every Panel Painting in History
Gesso (from the Italian 'gypsum') is the white ground coating applied to wood panels, canvas, and other surfaces before painting. Traditional gesso — made from hide glue and chalk white (whiting) — was the universal painting ground from at least the 12th century through the 19th century. Every medieval altarpiece, every Renaissance masterpiece, every gilded icon began with multiple coats of gesso, sanded to a smooth, brilliant white surface that provided the luminous foundation for tempera and oil painting.
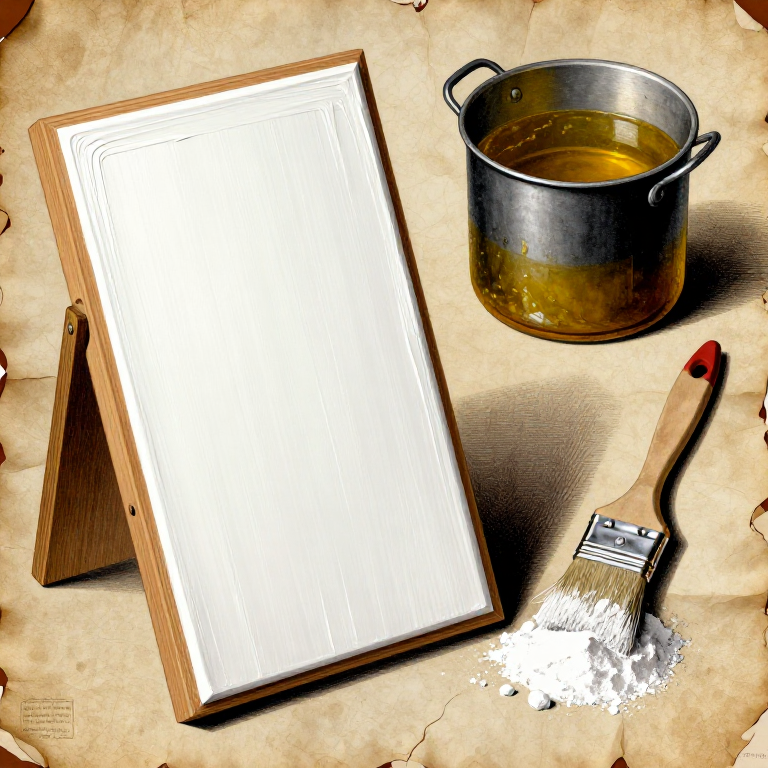
The recipe is simple: rabbit skin glue (or other hide glue) is dissolved in warm water and mixed with whiting (ground chalk, calcium carbonate). The mixture is applied in thin coats, each allowed to dry before the next, building up a smooth, absorbent, brilliant white surface. When fully cured and sanded, traditional gesso has a porcelain-like smoothness that no modern acrylic gesso can match — it is harder, smoother, and more luminous.
Gesso serves three critical functions: it seals the surface (preventing oil from rotting wood fibres), provides tooth for the paint to grip, and creates a reflective white ground that makes overlying paint colours appear more luminous (light passes through transparent paint layers, bounces off the white gesso, and passes back through the paint — this optical effect is the foundation of the luminosity in Old Master paintings). Understanding gesso is understanding the foundation that all traditional painting rests on.
ལམ་སྟོན
Soak the hide glue overnight
Soak the hide glue overnight
Weigh out 70 g of rabbit skin glue granules and place in a clean container. Cover with 1 litre of cold water. Let the glue soak for 8-12 hours until the granules have swelled into a soft, jelly-like mass. The ratio is approximately 1:14 by weight — slightly weaker than the glue used for distemper, because gesso must remain slightly flexible on wood panels. Do not heat until fully swelled.
གོམ་པ་འདིའི་རྫས་རིགས:
 Rabbit Skin Glue (Granules)70 g
ལག་ཆས་དགོས་མཁོ:
 Digital Kitchen Scale
Dissolve the glue in a water bath
Dissolve the glue in a water bath
Place the container of swelled glue in a larger pot of warm water (double boiler). Heat the outer water to 60°C. Stir gently as the jelly melts into a thin, clear liquid. NEVER boil hide glue — boiling destroys the collagen protein irreversibly. The glue solution should be warm, clear, and flow freely. Keep the water bath at 50-60°C throughout the gesso preparation.
ལག་ཆས་དགོས་མཁོ:
 Stock Pot
 Cooking Thermometer (0-200°C)
Apply a sizing coat to the panel
Apply a sizing coat to the panel
Before adding whiting, brush a thin coat of the pure glue solution onto the wood panel. This 'sizing' seals the wood and gives the gesso something to grip. Use a wide, soft brush and apply evenly. Let this sizing coat dry completely (2-4 hours). The surface should feel smooth and slightly glossy. This step prevents the wood from absorbing too much moisture from the gesso and causing warping.
ལག་ཆས་དགོས་མཁོ:
 Wide Paint Brush
Mix whiting into the warm glue to make gesso
Mix whiting into the warm glue to make gesso
Gradually sift 500-700 g of whiting (ground chalk, calcium carbonate) into the warm glue solution, stirring gently to avoid creating bubbles. Add the whiting in small batches, stirring each addition smooth before adding more. The final consistency should be like thick cream — it should coat a brush and flow smoothly. If too thick, add a little warm water. If too thin, add more whiting. Strain through a fine mesh to remove lumps. Air bubbles are the enemy — stir gently, never whisk.
གོམ་པ་འདིའི་རྫས་རིགས:
 Calcium Carbonate (Whiting)600 g
ལག་ཆས་དགོས་མཁོ:
 Fine Mesh Strainer
 Wooden Stirring Spoon
Apply 6-8 thin coats
Apply 6-8 thin coats
Apply thin, even coats of warm gesso to the sized panel. Each coat should be thin enough to see the previous layer through it. Alternate the brush direction with each coat — horizontal, then vertical, then horizontal — to build up an even surface. Let each coat dry until touch-dry (30-60 minutes) before applying the next. Apply 6-8 coats for a full, opaque ground. Keep the gesso warm in the water bath throughout — it gels as it cools. Reheat gently if it thickens.
Sand smooth when fully dry
Sand smooth when fully dry
After the final coat has dried completely (24-48 hours), sand the gesso surface smooth with progressively finer sandpaper — start with 220 grit to level high spots, then finish with 400 grit for a silky-smooth surface. Traditional gesso sands beautifully — it cuts cleanly without clogging. The finished surface should be brilliant white, smooth as porcelain, and perfectly even. Dust off with a soft brush. The panel is now ready for underdrawing and painting in egg tempera, oil, or for gilding with gold leaf.
ལག་ཆས་དགོས་མཁོ:
རྫས་རིགས
2- ས་ཆ་འཛིན
- ས་ཆ་འཛིན
ལག་ཆས་དགོས་མཁོ
7- ས་ཆ་འཛིན
- ས་ཆ་འཛིན
- ས་ཆ་འཛིན
- ས་ཆ་འཛིན
- ས་ཆ་འཛིན
མཐུད་སྦྲེལ་བིལུ་པིརིན་ཊི་རྫས་རིགས
You might also need
Materials makers commonly use alongside this build.


འབྲེལ་ཡོད་བིལུ་པིརིན་ཊི
བིལུ་པིརིན་ཊི་འདི་ཚུ་ཐབས་ལམ་དང་རྫས་རིགས། སྤྱི་ཆོས་བགོ་བཤའ་བྱེད
Related blueprints
Other builds that share materials, tools, or techniques with this one.


CC0 སྤྱི་དབང
བིལུ་པིརིན་ཊི་འདི་CC0 འོག་བཀྲམས་ཡོད། ཁྱེད་རང་གིས་ཆོག་མཆན་མ་བཞེས་པར་ཕབ་ལེན་དང་བཟོ་བཅོས། བགོ་བཤའ། དགོས་མཁོ་གང་ལའང་བཀོལ་སྤྱོད་བྱས་ཆོག
བཟོ་མཁན་ལ་རྒྱབ་སྐྱོར་བྱེད་པའི་ཆེད་ཁོང་ཚོའི་བིལུ་པིརིན་ཊི་བརྒྱུད་ཐོན་སྐྱེད་ཉོ། བཟོ་མཁན་གྱིས བཟོ་མཁན་གྱི་ཁེ་ཕོགས ཚོང་པས་གཏན་འཁེལ་བྱས་པ། ཡང་ན་བིལུ་པིརིན་ཊི་འདིའི་པར་གསར་བཟོས་ཏེ་ཁྱེད་རང་གི་བིལུ་པིརིན་ཊི་ནང་མཐུད་སྦྲེལ་བྱས་ཏེ་ཡོང་སྒོ་བགོ་བཤའ་བྱེད།