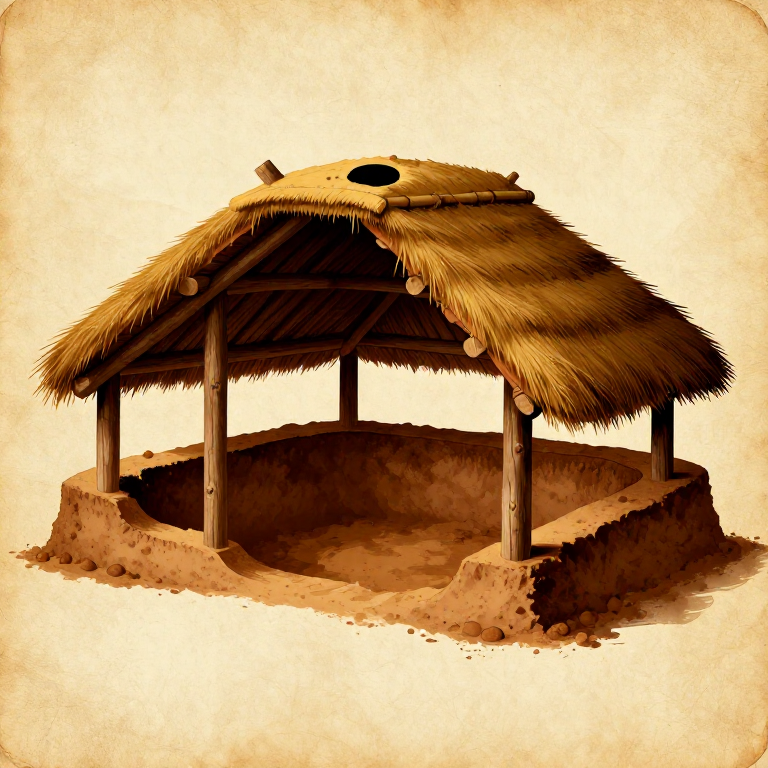
Building a Pit House — Semi-Subterranean Earth Lodge Dwelling
ལམ་སྟོན
Select a Well-Drained Site
Select a Well-Drained Site
Mark Out the Pit Dimensions
Mark Out the Pit Dimensions
གོམ་པ་འདིའི་རྫས་རིགས:
 Cordage3 metre
Dig the Pit
Dig the Pit
ལག་ཆས་དགོས་མཁོ:
 Flat Stone Slab
Dig the Entrance Tunnel
Dig the Entrance Tunnel
ལག་ཆས་དགོས་མཁོ:
Flat Stone SlabSet the Centre Post
Set the Centre Post
གོམ་པ་འདིའི་རྫས་རིགས:
 Hardwood Sapling1 piece
ལག་ཆས་དགོས་མཁོ:
 Hammerstone
Set Perimeter Wall Posts
Set Perimeter Wall Posts
གོམ་པ་འདིའི་རྫས་རིགས:
Hardwood Sapling10 pieceལག་ཆས་དགོས་མཁོ:
HammerstoneLay the Roof Pole Framework
Lay the Roof Pole Framework
གོམ་པ་འདིའི་རྫས་རིགས:
Hardwood Sapling12 pieceCordage15 metreAdd Cross-Bracing and Lattice
Add Cross-Bracing and Lattice
གོམ་པ་འདིའི་རྫས་རིགས:
Hardwood Sapling20 pieceCordage10 metreApply the Bark Waterproofing Layer
Apply the Bark Waterproofing Layer
གོམ་པ་འདིའི་རྫས་རིགས:
 Birch Bark Sheets8 piece
Cover with Earth
Cover with Earth
ལག་ཆས་དགོས་མཁོ:
Flat Stone SlabFrame the Entrance Tunnel Roof
Frame the Entrance Tunnel Roof
གོམ་པ་འདིའི་རྫས་རིགས:
Hardwood Sapling4 pieceBuild the Interior Fire Pit
Build the Interior Fire Pit
ལག་ཆས་དགོས་མཁོ:
Flat Stone SlabCreate Sleeping Platforms
Create Sleeping Platforms
གོམ་པ་འདིའི་རྫས་རིགས:
Hardwood Sapling6 piece Dried Reed20 piece
Dig Storage Niches in the Pit Walls
Dig Storage Niches in the Pit Walls
ལག་ཆས་དགོས་མཁོ:
Flat Stone SlabCreate a Smoke Hole Cover
Create a Smoke Hole Cover
གོམ་པ་འདིའི་རྫས་རིགས:
Hardwood Sapling3 pieceCordage2 metreརྫས་རིགས
4- 56 pieceས་ཆ་འཛིན
- 8 pieceས་ཆ་འཛིན
- 20 pieceས་ཆ་འཛིན
མཐུད་སྦྲེལ་བིལུ་པིརིན་ཊི་རྫས་རིགས
འབྲེལ་ཡོད་བིལུ་པིརིན་ཊི
བིལུ་པིརིན་ཊི་འདི་ཚུ་ཐབས་ལམ་དང་རྫས་རིགས། སྤྱི་ཆོས་བགོ་བཤའ་བྱེད
Related blueprints
Other builds that share materials, tools, or techniques with this one.


CC0 སྤྱི་དབང
བིལུ་པིརིན་ཊི་འདི་CC0 འོག་བཀྲམས་ཡོད། ཁྱེད་རང་གིས་ཆོག་མཆན་མ་བཞེས་པར་ཕབ་ལེན་དང་བཟོ་བཅོས། བགོ་བཤའ། དགོས་མཁོ་གང་ལའང་བཀོལ་སྤྱོད་བྱས་ཆོག
བཟོ་མཁན་ལ་རྒྱབ་སྐྱོར་བྱེད་པའི་ཆེད་ཁོང་ཚོའི་བིལུ་པིརིན་ཊི་བརྒྱུད་ཐོན་སྐྱེད་ཉོ། བཟོ་མཁན་གྱིས བཟོ་མཁན་གྱི་ཁེ་ཕོགས ཚོང་པས་གཏན་འཁེལ་བྱས་པ། ཡང་ན་བིལུ་པིརིན་ཊི་འདིའི་པར་གསར་བཟོས་ཏེ་ཁྱེད་རང་གི་བིལུ་པིརིན་ཊི་ནང་མཐུད་སྦྲེལ་བྱས་ཏེ་ཡོང་སྒོ་བགོ་བཤའ་བྱེད།