Building a Hypocaust Underfloor Heating System — Roman Central Heating
ལམ་སྟོན
Excavate and Prepare the Subfloor
Excavate and Prepare the Subfloor
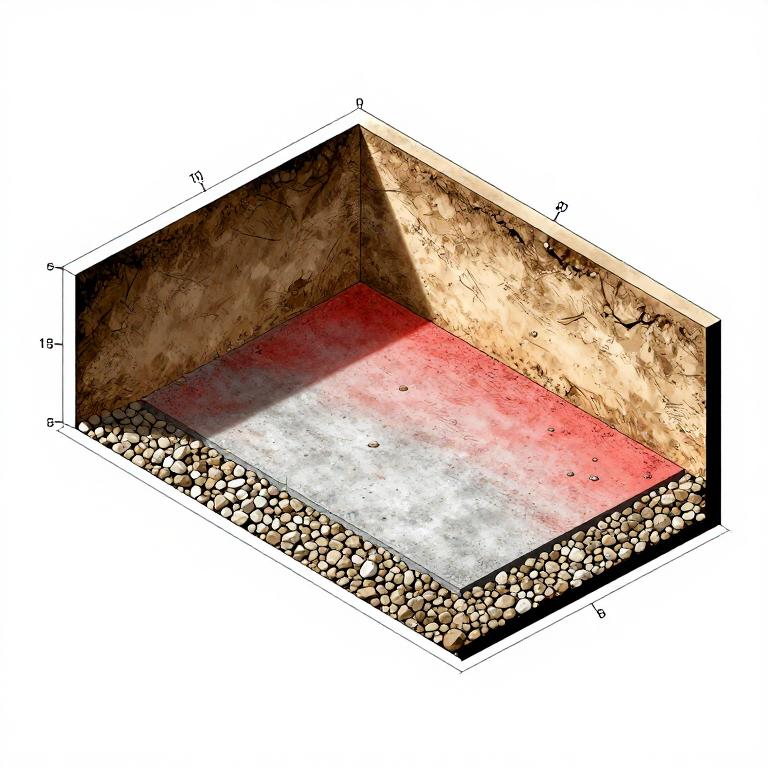
Excavate the floor area to a depth of approximately 60 to 80 cm below the intended finished floor level. This depth must accommodate the concrete base slab, the brick pilae (typically 40 to 60 cm tall), and the suspended floor tiles. Level and compact the earth thoroughly. Lay a base of rammed rubble (statumen) approximately 15 cm deep, then apply a layer of opus signinum (lime mortar mixed with crushed ceramic) approximately 10 cm thick over the rubble to form a solid, waterproof subfloor. This base must slope very slightly (about 1 in 100) toward the praefurnium opening to ensure that any condensation drains outward rather than pooling under the floor.
Build the Pilae (Support Pillars)
Build the Pilae (Support Pillars)
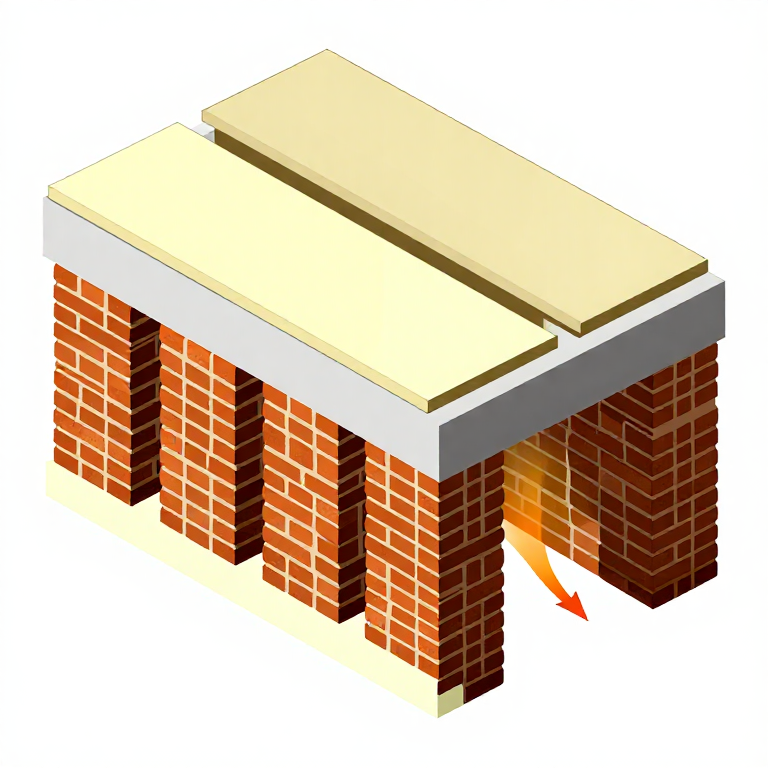
Stack small square bricks (bessales, approximately 20 cm square) into columns using lime mortar between each course. Each pila should rise 40 to 60 cm above the subfloor, depending on the desired air cavity height. Space the pilae in a regular grid at intervals of approximately 40 to 60 cm centre to centre — close enough that the large spanning tiles will not crack under the weight of the floor above. Use a level and string line to ensure all pilae are exactly the same height, as the suspended floor must be perfectly flat. Typical pilae consist of 8 to 12 bessales stacked with thin mortar joints. Allow the mortar to set for at least 48 hours before loading the suspended floor tiles on top.
གོམ་པ་འདིའི་རྫས་རིགས:
 Lime (Calcium Hydroxide)as needed piece
Lay the Suspended Floor
Lay the Suspended Floor
Set large bipedalis tiles (approximately 60 cm square, 5 cm thick) across the tops of the pilae to form the suspended floor. Each tile should rest on at least four pilae. Bed the tiles onto the pilae tops with a thin layer of lime mortar to seal the joints and prevent hot air from leaking upward through gaps. Over the tile layer, apply a 5 to 8 cm layer of opus signinum or lime concrete to add thermal mass and create a smooth, durable floor surface. The thermal mass of this concrete layer is critical — it absorbs heat from the hot air below and releases it slowly and evenly into the room above, preventing hotspots directly over the pilae.
Install Wall Flues (Tubuli)
Install Wall Flues (Tubuli)
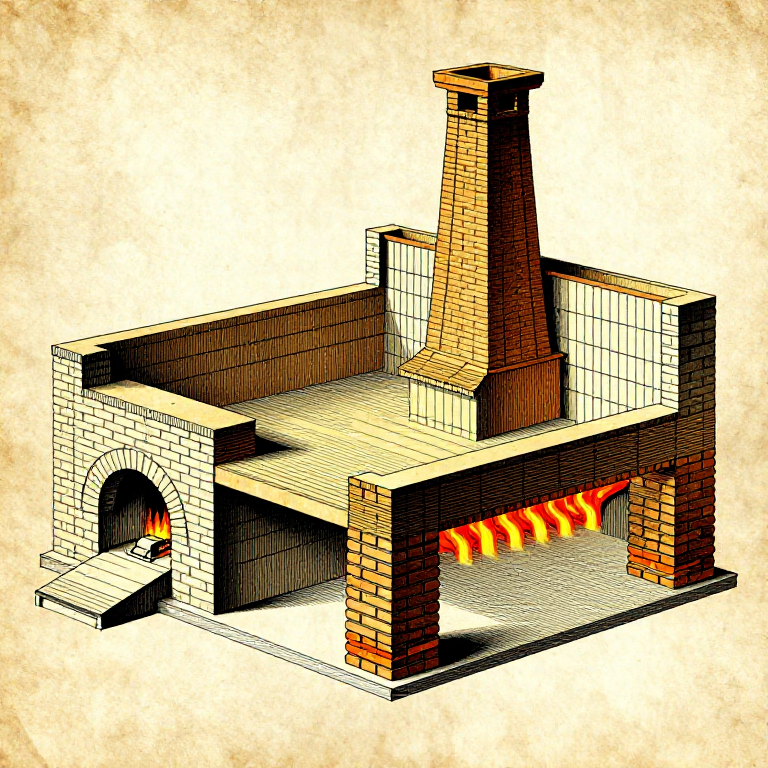
Mount hollow rectangular box-tiles (tubuli) vertically against the interior walls, with their open bottom ends connecting to the underfloor cavity and their top ends venting through the wall to an external chimney flue. Each tubulus is approximately 30 cm tall, 15 cm wide, and 10 cm deep, with open top and bottom. Stack them vertically and mortar them to the wall surface and to each other, forming continuous vertical channels. Space the tubuli columns at intervals of 30 to 50 cm around the room perimeter. The rising hot air creates a natural convective draft that pulls fresh combustion air into the praefurnium, through the underfloor cavity, and up through the tubuli, heating the walls as well as the floor.
Construct the Praefurnium (Furnace)
Construct the Praefurnium (Furnace)
Build the furnace (praefurnium) at one end of the hypocaust, outside the heated room. Construct a brick firebox with an arched opening approximately 40 to 50 cm wide and 30 cm tall that feeds directly into the underfloor cavity. The firebox arch must be built from firebrick or well-fired clay brick to withstand continuous high temperatures. The stoking area should be accessible from a service corridor so that slaves or attendants could feed the fire without entering the heated rooms. In Roman bathhouses, the hottest room (caldarium) was placed nearest the praefurnium, with the warm room (tepidarium) further away, and the cold room (frigidarium) furthest — the temperature gradient was controlled entirely by distance from the fire source and the number of connecting flue openings.
གོམ་པ་འདིའི་རྫས་རིགས:
Lime (Calcium Hydroxide)as needed pieceརྫས་རིགས
5- 200-300 bricks pieceས་ཆ་འཛིན
- as needed for floor area pieceས་ཆ་འཛིན
- 20-40 tiles pieceས་ཆ་འཛིན
- as needed pieceས་ཆ་འཛིན
- for floor surface layer pieceས་ཆ་འཛིན
ལག་ཆས་དགོས་མཁོ
4- ས་ཆ་འཛིན
- ས་ཆ་འཛིན
- ས་ཆ་འཛིན
Related blueprints
Other builds that share materials, tools, or techniques with this one.

CC0 སྤྱི་དབང
བིལུ་པིརིན་ཊི་འདི་CC0 འོག་བཀྲམས་ཡོད། ཁྱེད་རང་གིས་ཆོག་མཆན་མ་བཞེས་པར་ཕབ་ལེན་དང་བཟོ་བཅོས། བགོ་བཤའ། དགོས་མཁོ་གང་ལའང་བཀོལ་སྤྱོད་བྱས་ཆོག
བཟོ་མཁན་ལ་རྒྱབ་སྐྱོར་བྱེད་པའི་ཆེད་ཁོང་ཚོའི་བིལུ་པིརིན་ཊི་བརྒྱུད་ཐོན་སྐྱེད་ཉོ། བཟོ་མཁན་གྱིས བཟོ་མཁན་གྱི་ཁེ་ཕོགས ཚོང་པས་གཏན་འཁེལ་བྱས་པ། ཡང་ན་བིལུ་པིརིན་ཊི་འདིའི་པར་གསར་བཟོས་ཏེ་ཁྱེད་རང་གི་བིལུ་པིརིན་ཊི་ནང་མཐུད་སྦྲེལ་བྱས་ཏེ་ཡོང་སྒོ་བགོ་བཤའ་བྱེད།