Laying an Opus Tessellatum Mosaic — Roman Tile Art
ལམ་སྟོན
Prepare the Substrate Layers
Prepare the Substrate Layers
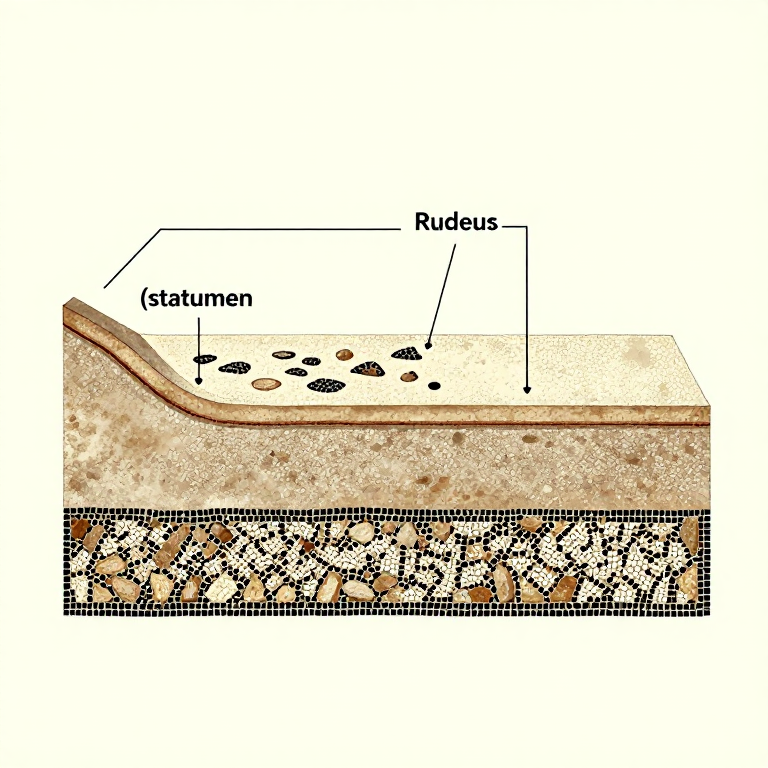
Roman mosaic floors were laid on a multi-layer substrate described by Vitruvius. First, ensure the base surface is solid, level, and dry. Spread a layer of coarse aggregate (statumen) — broken stones and rubble — approximately 10 cm deep if working on earth. Over this, trowel a 3 to 5 cm layer of coarse lime mortar mixed with crushed brick or pottery (rudus). Allow this layer to partially set until firm but not fully hard, typically 24 hours. Finally, apply the setting bed (nucleus) — a finer lime mortar of slaked lime putty and fine sand at a 1:2 ratio, spread 10 to 15 mm thick over the area you intend to tile in the current work session. Only spread as much setting bed as you can tile before the mortar stiffens, usually a section of 30 by 30 cm at a time.
གོམ་པ་འདིའི་རྫས་རིགས:
 Lime (Calcium Hydroxide)enough to cover work area 10-15 mm deep mmLime (Calcium Hydroxide)for base layer 20-30 mm deep mm
ལག་ཆས་དགོས་མཁོ:
 Chalk Line
Cut and Sort Tesserae
Cut and Sort Tesserae
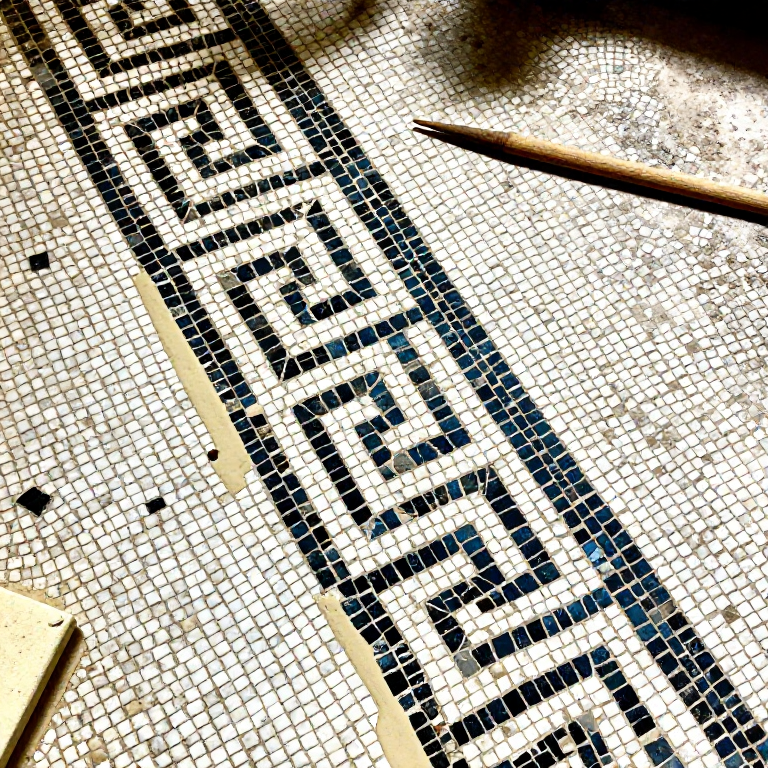
Place a mosaic cutting anvil (hardie) into a wooden stump so the sharp blade faces upward. Hold a strip of marble or limestone against the blade edge and strike sharply with a mosaic hammer to cleave it into roughly cubic pieces of 10 to 15 mm on each side. The fracture should produce reasonably flat top faces and slightly irregular sides, which is desirable as the mortar grips the rough surfaces. Cut tesserae from at least two contrasting stones — white marble or pale limestone for the background, and dark basalt, slate, or black limestone for the pattern. Sort the finished tesserae by colour and approximate size into separate containers.
Lay Out the Geometric Pattern
Lay Out the Geometric Pattern
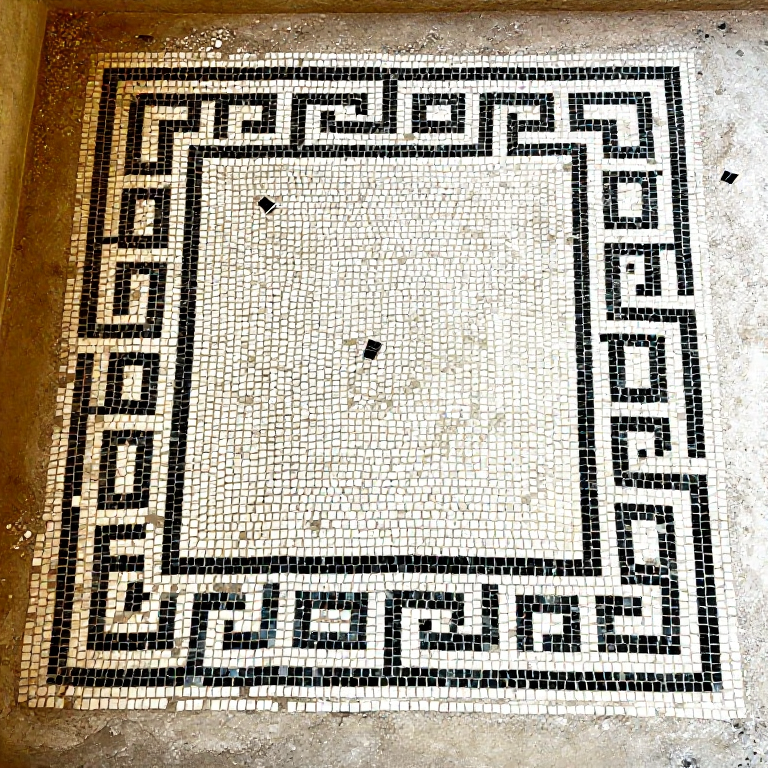
Snap chalk lines on the setting bed to define the border area and any central design zones. For a classic Roman meander (Greek key) border, mark parallel guide lines for the inner and outer edges of the band, typically 5 to 8 tesserae wide. Begin placing the dark tesserae that form the meander line first, as these define the pattern. Press each tessera into the fresh lime mortar with a slight twisting motion so that mortar rises approximately halfway up the sides. Leave gaps of 1 to 2 mm between tesserae for grouting. Use a straightedge frequently to keep the rows aligned. Work from the border inward, completing the geometric frame before filling the background field.
Fill the Background Field
Fill the Background Field
Once the border pattern is established, fill the background areas with white or pale tesserae. Lay them in consistent rows that follow the contour of the nearest border or design element — this technique, called andamento, creates a visual flow that unifies the composition. Press each tessera to the same depth so the surface remains level. If the mortar begins to stiffen before you finish a section, do not try to set tesserae into hard mortar; instead, scrape it away and apply a fresh patch of setting bed. Check the surface level frequently by laying a straightedge across the mosaic and looking for any tesserae that sit too high or too low.
Grout and Polish
Grout and Polish
Allow the mosaic to set undisturbed for at least 48 hours until the mortar is firm. Mix a thin slurry of fine lime putty and marble dust (or very fine sand) and pour it over the mosaic surface, working it into the gaps between tesserae with a sponge or soft cloth using circular motions. Scrape excess grout off the tessera faces with a flat trowel held at a low angle. Allow the grout to cure for another 48 hours, keeping it damp by misting with water daily. Once fully cured, the surface can be polished by rubbing with progressively finer abrasive stones and water — the Romans used sandstone, then pumice — to bring out the colour of the stone and create a smooth, durable floor surface.
རྫས་རིགས
4- 200-300 pieces pieceས་ཆ་འཛིན
- 100-150 pieces pieceས་ཆ་འཛིན
- enough to cover work area 10-15 mm deep pieceས་ཆ་འཛིན
- for base layer 20-30 mm deep pieceས་ཆ་འཛིན
ལག་ཆས་དགོས་མཁོ
6- ས་ཆ་འཛིན
- ས་ཆ་འཛིན
- ས་ཆ་འཛིན
- ས་ཆ་འཛིན
- ས་ཆ་འཛིན
- ས་ཆ་འཛིན
Related blueprints
Other builds that share materials, tools, or techniques with this one.

CC0 སྤྱི་དབང
བིལུ་པིརིན་ཊི་འདི་CC0 འོག་བཀྲམས་ཡོད། ཁྱེད་རང་གིས་ཆོག་མཆན་མ་བཞེས་པར་ཕབ་ལེན་དང་བཟོ་བཅོས། བགོ་བཤའ། དགོས་མཁོ་གང་ལའང་བཀོལ་སྤྱོད་བྱས་ཆོག
བཟོ་མཁན་ལ་རྒྱབ་སྐྱོར་བྱེད་པའི་ཆེད་ཁོང་ཚོའི་བིལུ་པིརིན་ཊི་བརྒྱུད་ཐོན་སྐྱེད་ཉོ། བཟོ་མཁན་གྱིས བཟོ་མཁན་གྱི་ཁེ་ཕོགས ཚོང་པས་གཏན་འཁེལ་བྱས་པ། ཡང་ན་བིལུ་པིརིན་ཊི་འདིའི་པར་གསར་བཟོས་ཏེ་ཁྱེད་རང་གི་བིལུ་པིརིན་ཊི་ནང་མཐུད་སྦྲེལ་བྱས་ཏེ་ཡོང་སྒོ་བགོ་བཤའ་བྱེད།