སྒྱུ་རྩལ
མཛེས་སྡུག་དང་བདེ་ཐང
བཟོ་རིག
རིག་གནས་དང་ལོ་རྒྱུས
དགའ་སྟོན
ཁོར་ཡུག
ཟས་དང་བཏུང་རྫས
ཕྱིར་འཕྲུལ་རིག
ཚན་རིག
རྩེད་འགྲན
རིག་རྩལ
གྱོན་རུང
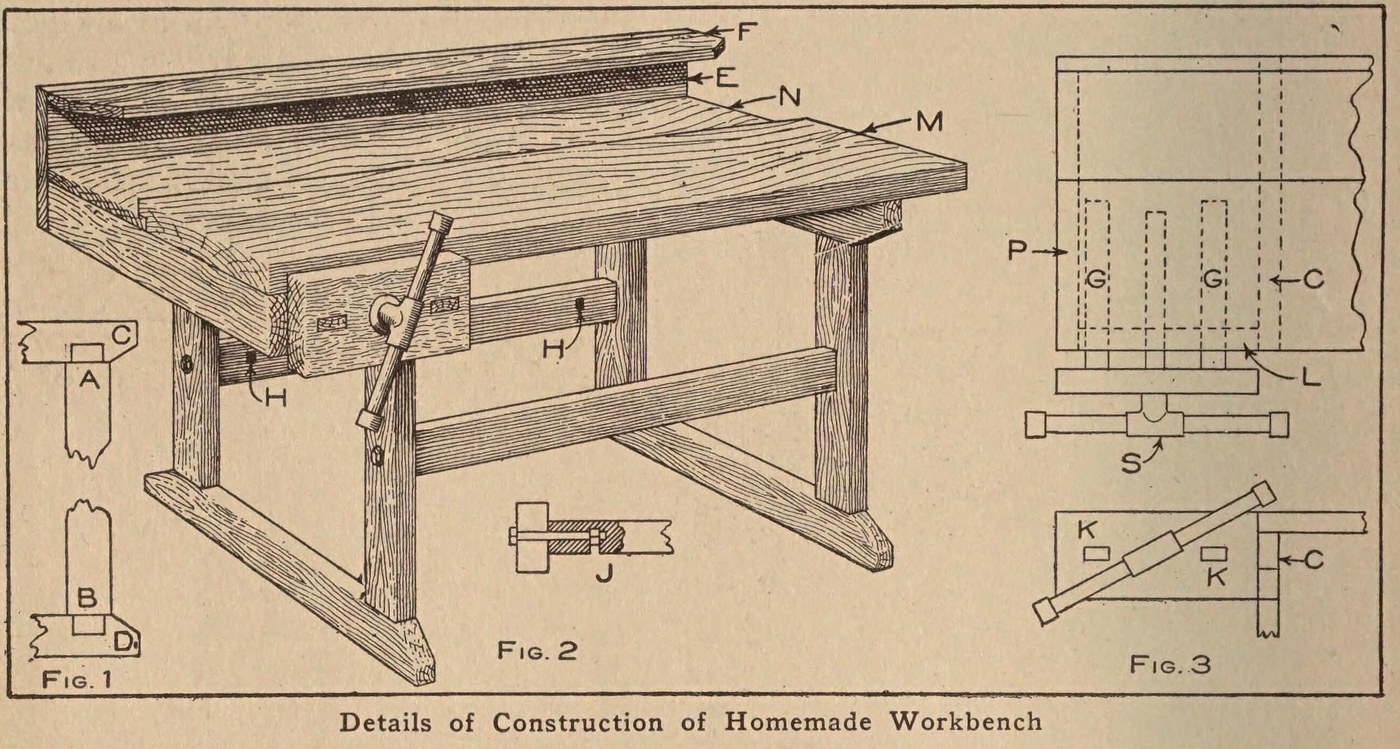


Workbench: a Pine Bench with a Plank Top and Vise (Boy Mechanic, 1913)
A boy's first workshop bench: two mortised pine leg frames bolted to braces, a 3 1/2 ft top of one 2 x 12 in plank with a back board, a tool rack behind, and a wooden vise on an iron bench screw.
Source: C. E. McKinney, Jr., 'Homemade Workbench', The Boy Mechanic, Book 1 (1913), pp. 442-443. Picture: Figs. 1-3 of the book.
བར་མ
Unknown
ལམ་སྟོན
1
1
Make the two leg frames
Make the two leg frames
Cut four 2 x 4 in pine legs 23 in long with a tenon on each end 1/2 in thick, 3 1/2 in wide and 1 1/2 in long (Fig. 1, A and B). Cut four crosspieces of the same stock 20 in long, mortised in the narrow edge 1 1/4 in from each end, and slope their corners from the leg out to the middle. Fit each pair of legs to a pair of crosspieces to make the two supports.
གོམ་པ་འདིའི་རྫས་རིགས:
 ཐང་ཤིང་གི་ཤིང་ཆས།1 2 x 4 in: legs, crosspieces
ལག་ཆས་དགོས་མཁོ:
 ལག་སོག་ལེ།
 ཁུང་བཟོའི་གཟོང
 ཐོ་བ།
2
2
Brace them together
Brace them together
Join the supports with two 2 x 4 in braces 24 in long, ends sawn square. Bore through each leg and 4 in into the centre of each brace end, bore an intersecting hole on the back of each brace for the nut, and draw each joint tight with a 3/8 x 6 in bolt (Fig. 2, J). A cross brace on the back stops rocking when planing.
གོམ་པ་འདིའི་རྫས་རིགས:
ཐང་ཤིང་གི་ཤིང་ཆས།1 2 x 4 in: braces མགོ་ཟླུམ་གྱི་བོལ་ཊུ།4 3/8 x 6 in
ལག་ཆས་དགོས་མཁོ:
ལག་སོག་ལེ། ལག་པ་གིས་འཁོར་བའི་སྦུབས་ཆས་དང་མགོ།
 ཚད་བསྒྱུར་ཚུགས་པའི་མཐེབ་ལྕགས།
3
3
Fit the plank top
Fit the plank top
Make the main top M from one 2 x 12 in plank 3 1/2 ft long. Rabbet its back edge 1/2 in to take a back board N of the same length, 8 1/2 in wide and 7/8 in thick. Screw the top to the top crosspieces with long screws.
གོམ་པ་འདིའི་རྫས་རིགས:
 སྲ་བའི་ཤིང་གི་པང་ལེབ་མཐུག་ཏོ1 2 x 12 in, 3 1/2 ft
 ཐང་ཤིང་གི་ལེབ།1 back board
 ཤིང་གི་སྒྲོག1 long
ལག་ཆས་དགོས་མཁོ:
ལག་སོག་ལེ། བཏོག་ཆས་ཆུང་ཀུ་ (ཟུར་ཁ་དམའ)
 གཟེར་སྒྲིལ་ལེབ
4
4
Add the tool rack
Add the tool rack
Nail a board E 10 in wide to the back of the bench and fasten a 2 1/2 in board F on top of it at right angles; both 7/8 in thick and 3 1/2 ft long. Bore holes or cut notches in F to hold tools.
གོམ་པ་འདིའི་རྫས་རིགས:
ཐང་ཤིང་གི་ལེབ།2 7/8 in, 3 1/2 ft གཟེར་བུ1 དུམ་བུ།
ལག་ཆས་དགོས་མཁོ:
ལག་པ་གིས་འཁོར་བའི་སྦུབས་ཆས་དང་མགོ།ལག་སོག་ལེ།ཐོ་བ།5
5
Fit the vise
Fit the vise
Fasten an iron bench screw in a 2 x 6 in block 12 in long. Mortise two guide rails 7/8 x 1 1/2 in and 20 in long into the block; they slide in mortises in a 2 x 4 piece L bolted under the top, which holds the bench-screw nut between the two mortises. Nail L to a top crosspiece and to a 2 x 4 piece P bolted under the top at the end (Fig. 3).
གོམ་པ་འདིའི་རྫས་རིགས:
ཐང་ཤིང་གི་ཤིང་ཆས།1 2 x 6 block, 2 x 4 pieces, guide rails ཤིང་བརྐོ་ནིའི་ཅོག་ཙེའི་ཛིག་ཀ།1 དུམ་བུ།མགོ་ཟླུམ་གྱི་བོལ་ཊུ།1 for L and Pགཟེར་བུ1 དུམ་བུ།
ལག་ཆས་དགོས་མཁོ:
ལག་སོག་ལེ།ཁུང་བཟོའི་གཟོངལག་པ་གིས་འཁོར་བའི་སྦུབས་ཆས་དང་མགོ།ཚད་བསྒྱུར་ཚུགས་པའི་མཐེབ་ལྕགས།ཐོ་བ།རྫས་རིགས
7- 1 2 x 6 block, 2 x 4 pieces, guide railsས་ཆ་འཛིན
- 1 for L and Pས་ཆ་འཛིན
- 1 2 x 12 in, 3 1/2 ftས་ཆ་འཛིན
- 2 7/8 in, 3 1/2 ftས་ཆ་འཛིན
- 1 longས་ཆ་འཛིན
- 2 དུམ་བུ།ས་ཆ་འཛིན
- 1 དུམ་བུ།ས་ཆ་འཛིན
བིལུ་པིརིན་ཊི་འདི་གིས་བཟོ་མི

CC0 སྤྱི་དབང
བིལུ་པིརིན་ཊི་འདི་CC0 འོག་བཀྲམས་ཡོད། ཁྱེད་རང་གིས་ཆོག་མཆན་མ་བཞེས་པར་ཕབ་ལེན་དང་བཟོ་བཅོས། བགོ་བཤའ། དགོས་མཁོ་གང་ལའང་བཀོལ་སྤྱོད་བྱས་ཆོག
བཟོ་མཁན་ལ་རྒྱབ་སྐྱོར་བྱེད་པའི་ཆེད་ཁོང་ཚོའི་བིལུ་པིརིན་ཊི་བརྒྱུད་ཐོན་སྐྱེད་ཉོ། བཟོ་མཁན་གྱིས བཟོ་མཁན་གྱི་ཁེ་ཕོགས ཚོང་པས་གཏན་འཁེལ་བྱས་པ། ཡང་ན་བིལུ་པིརིན་ཊི་འདིའི་པར་གསར་བཟོས་ཏེ་ཁྱེད་རང་གི་བིལུ་པིརིན་ཊི་ནང་མཐུད་སྦྲེལ་བྱས་ཏེ་ཡོང་སྒོ་བགོ་བཤའ་བྱེད།