合作
艺术
美容与健康
工艺
文化与历史
娱乐
环境
食品与饮料
逆向工程
科学
体育
技术
可穿戴设备
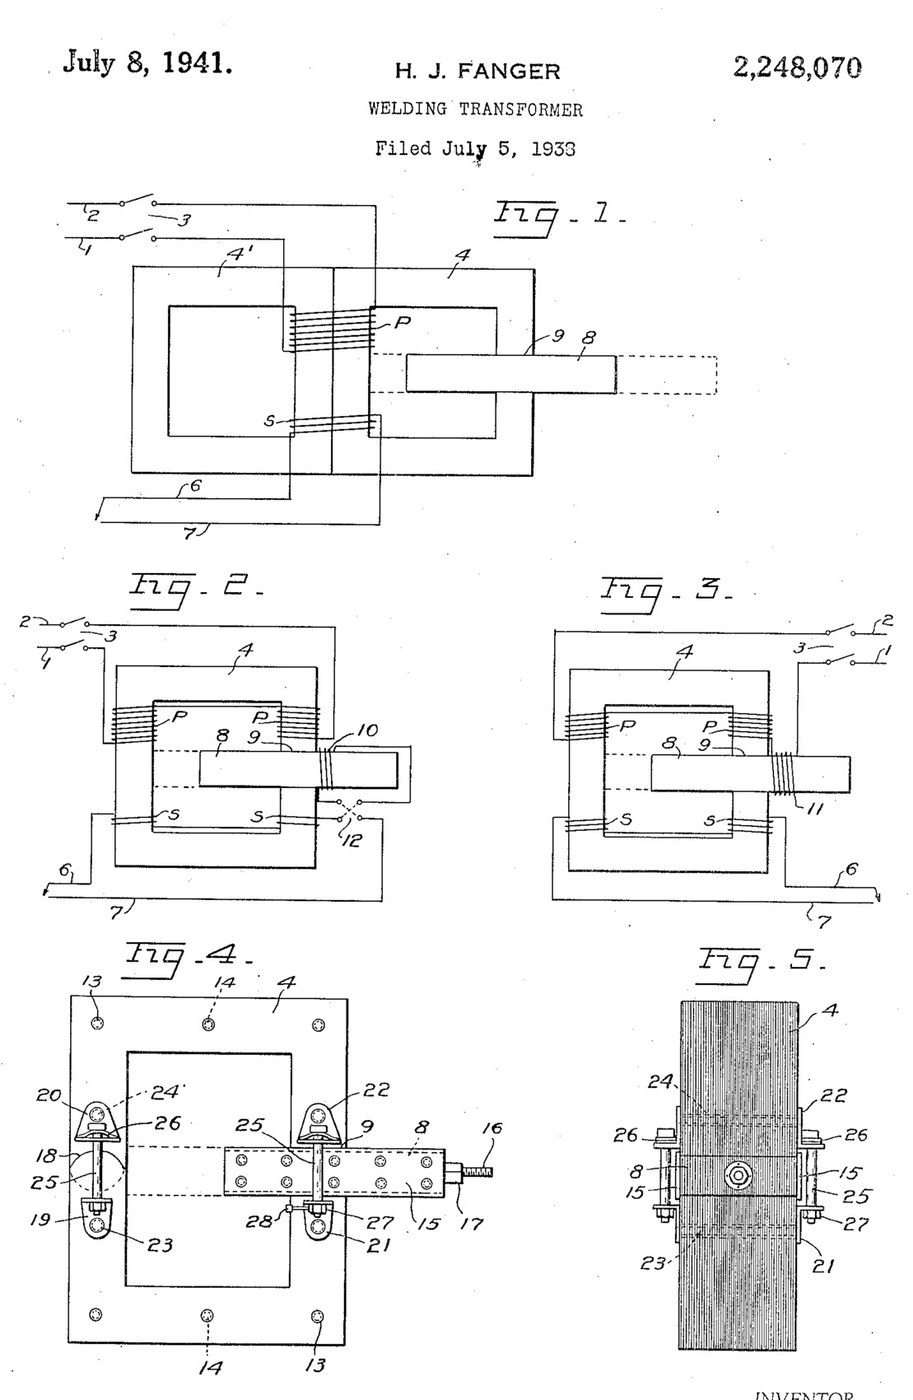


Arc Welder: AC Transformer with a Sliding Shunt Core (Fanger, US 2,248,070)
An AC arc welder is a step-down transformer whose current can be turned up and down. H. J. Fanger (US 2,248,070, 1941) cuts a gap through one leg of a laminated ring core and slides a laminated iron shunt bar through it: pushed in, it carries flux past the secondary and lowers the welding current; pulled out, the current rises.
For arc welding he gives about 60 to 68 volts open circuit, 15 to 200 amps, dropping to 38 or 40 volts at the working arc, with a small coil on the shunt bar in series with the secondary.
Source: H. J. Fanger, "Welding Transformer", US Patent 2,248,070 (filed 1938, granted 1941). Picture: its Figs. 1-5.
高级
Unknown
说明
1
1
Read Fanger
Read Fanger
"With arc welding, infinite control of the volume of the secondary current, between maximum and minimum is obtained by adjustment of the slidable shunt core without altering the welding characteristics of the current, also better ignition of the arc is had at a given voltage, and greater stability of the arc".
2
2
Stack the core
Stack the core
Build a single rectangular ring core of insulated iron laminations, held together with brass (or insulated) bolts or rivets in insulating tubes (Fig. 4). Cut a gap straight through one leg, accurately machined and finished, and make a circular joint through the opposite leg with the segments staggered to overlap in successive laminations. Core size, lamination iron and thickness are not given (ours: the tools).
此步骤所需材料:
 未知金属1 iron laminations
 六角螺栓组合1 brass bolts
 未知绝缘材料1 insulating tubes
所需工具:
 铁皮剪
 台钻
 钻头套装
 锉刀(手用锉)
 未知尺寸
3
3
Make the shunt bar
Make the shunt bar
Make the sliding shunt section of the same laminated iron, a snug fit in the gap with its laminations edge-to-edge with the core's, and long enough to fill the gap at every position. Sheath both sides with a slightly wider plate of Bakelite that overlaps the edges of the gap to guide it. Fit a threaded rod on its outer end, working in a nut fixed to the section (or move it by hand, with calibration marks along one edge).
此步骤所需材料:
未知金属1 shunt laminations 电木(Bakelite)2 side plates六角螺栓组合1 brass bolts
 全螺纹杆1 个
 六角螺母1 个
所需工具:
台钻钻头套装锉刀(手用锉)4
4
Wind the coils
Wind the coils
Wind the primary and secondary windings on both legs of the core (Fig. 2), in series or in parallel to suit the line voltage and the current wanted. Wind a small auxiliary coil round the shunt bar's path, fixed so the bar slides through it, and connect it in series with the secondary through a reversing switch (some jobs weld better with the current through it one way). Turns and wire sizes are not given.
此步骤所需材料:
 铜线1 insulation and size not given
所需工具:
未知尺寸5
5
Spring the joints
Spring the joints
On both sides of the gap and of the circular joint fit pairs of confronting angle plates, held by brass bolts in insulating sleeves and drawn together by spring bolts whose heads rest on slightly arched spring plates, so the joints close snugly on the sliding bar. A small lever on the gap-joint nut gives a half turn to release the bar for moving. The angle-plate material is not given.
此步骤所需材料:
 未知材料4 angle plates六角螺栓组合1 brass and spring bolts未知绝缘材料1 sleeves
 弹簧钢带1 arched spring plates六角螺母4 个
所需工具:
台钻钻头套装 活动扳手
6
6
Connect and set
Connect and set
Connect the primary to the line through a line switch, and the secondary leads to the electrode holder and the work. Pull the shunt bar out for more current, push it in for less: Fanger gives about 60-68 volts open circuit and 15-200 amps, dropping to 38-40 volts at the arc.
此步骤所需材料:
 电源开关1 line switch
所需工具:
活动扳手材料
10- 1 shunt laminations占位符
- 1 brass and spring bolts占位符
- 1 sleeves占位符
- 2 side plates占位符
- 1 个占位符
- 5 个占位符
- 1 insulation and size not given占位符
- 4 angle plates占位符
- 1 arched spring plates占位符
- 1 line switch占位符
此蓝图制作

CC0 公共领域
此蓝图以 CC0 协议发布。你可以自由复制、修改、分发和使用此作品,无需征得许可。
通过购买蓝图中的产品支持创客,他们将获得 创客佣金 (由供应商设定),或创建此蓝图的新版本并将其作为连接包含在你自己的蓝图中以分享收入。