合作
艺术
美容与健康
工艺
文化与历史
娱乐
环境
食品与饮料
逆向工程
科学
体育
技术
可穿戴设备
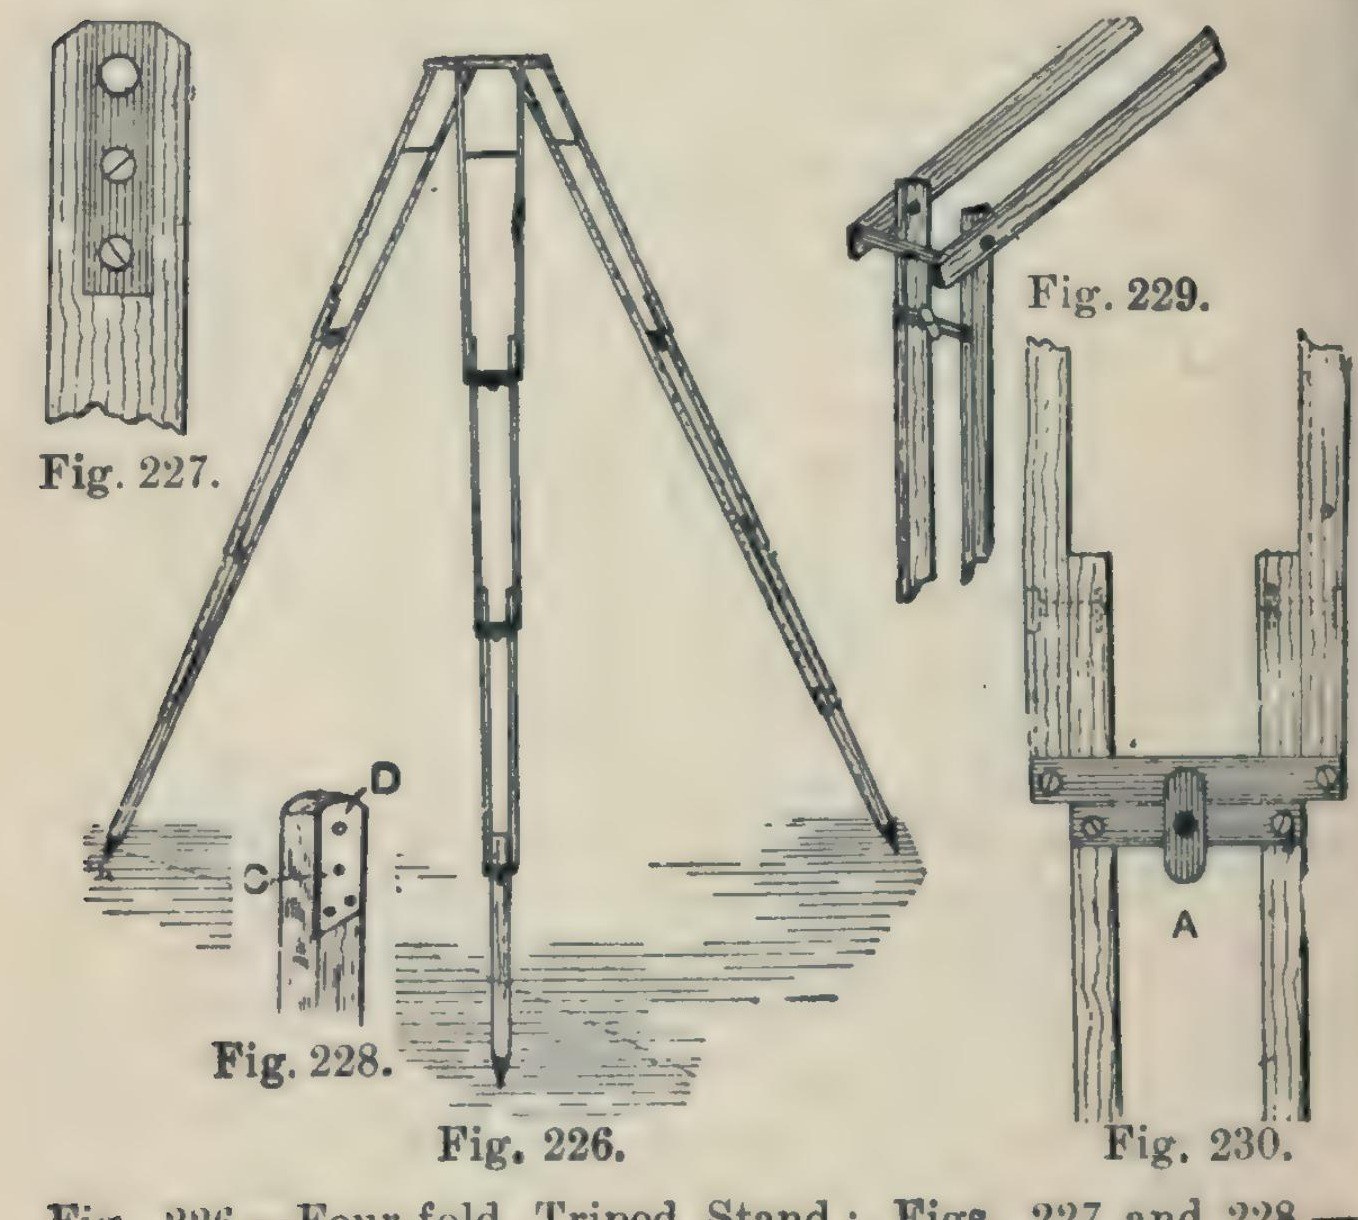


Camera Tripod: a Four-Fold Ash Tripod Stand (Hasluck, 1902)
A light, compact folding camera stand: three legs, each of seven ash laths riveted so it folds in four, locked open by brass buttons, on a triangular ash top with brass pins and a hole for the camera screw.
Hasluck says the same method makes stands that fold in three or two.
Source: Paul N. Hasluck, Photographic Cameras and Accessories (1902), pp. 153-157. Picture: Figs. 226-230 of the book.
中级
Unknown
说明
1
1
Cut the ash laths
Cut the ash laths
Cut laths of good ash, true and square or the stand won't be rigid, and round the edges slightly: six 17 1/4 x 5/8 x 3/8 in, six 16 x 5/8 x 3/8 in, six 15 1/2 x 5/8 x 3/8 in, and three 14 x 5/8 x 5/8 in.
此步骤所需材料:
 白蜡木板1 21 laths
所需工具:
 夹背锯
 短刨
2
2
Fit the top ends and stretcher
Fit the top ends and stretcher
On each 17 1/4 in lath let in flush a 1/16 in brass plate, 1 1/4 in long, with a 3/16 in hole 1/4 in from the top, held by two countersunk brass screws; bore the wood to match and take off the top corners. On one lath of each pair cut a groove inside, about 3/16 in deep and 3 1/2 in long, starting 2 in from the top, and hinge a 1/8 in brass rod stretcher in it on a pin. On the other lath cut a curved groove 1 1/2 in long, 3/16 in wide, with a small hole at the bottom where the rod catches.
此步骤所需材料:
 黄铜板1 1/16 in plates
 木螺钉1 small brass screws
 黄铜棒1 1/8 in stretcher
所需工具:
 钢锯弓配锯条
 金属锉
 手摇钻
 凿子
 一字螺丝刀
3
3
Bore and rivet the legs
Bore and rivet the legs
Bore the rivet holes: in the long laths 1 3/4 in from the lower end, counterbored so the copper rivet head sits flush, then 1/8 in through; in the 16 in and 15 1/2 in laths 1/2 in and 1 3/4 in from the ends; in each 14 in piece 1/2 in from one end, and taper its other end for a pointed iron shoe or a steel point and ferrule. Rivet the 21 laths into three legs with 1/8 in copper rivets and washers: a 16 in lath inside each 17 1/4 in one, a 15 1/2 in lath inside that, the 14 in foot between the last pair. Rivets flush, just tight enough to fold but not loose.
此步骤所需材料:
 铜铆钉1 1/8 in, with washers
 未知金属3 iron shoes or steel points
所需工具:
 手摇曲柄钻与钻头手摇钻
 铆钉锤
4
4
Add cross strips and lock buttons
Add cross strips and lock buttons
Screw 1/16 in brass strips across the bottom ends of each pair of laths (Fig. 229). Under them screw strips carrying a small brass button riveted at the centre; turned, the button hooks over the strip above and locks the joint open (Fig. 230).
此步骤所需材料:
黄铜板1 cross strips, buttons木螺钉1 个所需工具:
钢锯弓配锯条金属锉一字螺丝刀铆钉锤5
5
Make the top
Make the top
Plane ash to 1/2 in and draw an equilateral triangle with 8 1/2 in sides. Bisect the angles; 2 in from each corner draw a line at right angles, go 1/2 in in along the sides, and mark three rectangles 2 7/8 x 3/4 in; cut the outline (Fig. 231). Fix a 3/16 in brass rod, one end tapered, across each rectangle, bored 3/8 in from the outer edge and projecting about 1/2 in, for the legs to hang on. Bore a 1/4 in hole in the centre for the camera screw and glue felt on top.
此步骤所需材料:
白蜡木板1 top黄铜棒3 3/16 in pins 羊毛毡1 个
 动物胶1 个
所需工具:
短刨夹背锯手摇曲柄钻与钻头手摇钻6
6
Finish
Finish
Glasspaper and varnish the wood, and lacquer the brass.
此步骤所需材料:
 虫胶清漆1 varnish
 未知材料1 brass lacquer
所需工具:
 砂纸
材料
10- 1 top占位符
- 1 cross strips, buttons占位符
- 1 个占位符
- 3 3/16 in pins占位符
- 1 1/8 in, with washers占位符
- 3 iron shoes or steel points占位符
- 1 个占位符
- 1 个占位符
- 1 varnish占位符
- 1 brass lacquer占位符
此蓝图制作

CC0 公共领域
此蓝图以 CC0 协议发布。你可以自由复制、修改、分发和使用此作品,无需征得许可。
通过购买蓝图中的产品支持创客,他们将获得 创客佣金 (由供应商设定),或创建此蓝图的新版本并将其作为连接包含在你自己的蓝图中以分享收入。