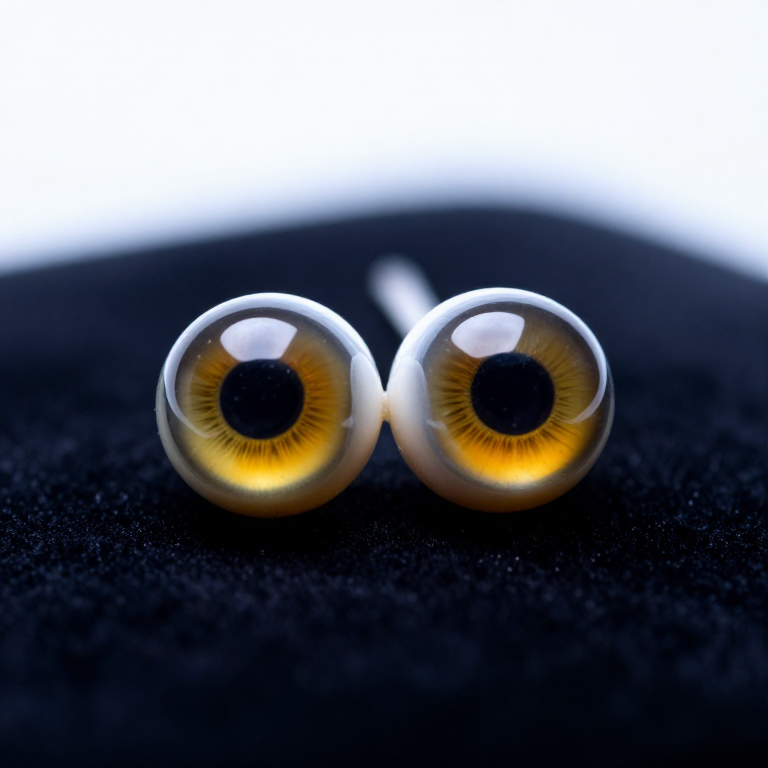


Glass Eye
A taxidermy mount is judged on its eyes. Everything else can be right and a dead eye kills it — which is why glass eyes have been a specialist trade of their own, separate from taxidermy, for two centuries.
The technique is lampworking: a rod of glass softened in a flame, blown to a hollow shell, a dark disc fused on for the iris, and colour laid on in fine drawn threads. The colour goes on the inside of a transparent dome, so it is seen through glass — which is exactly why a glass eye has depth and a painted bead does not.
Hot glass and a torch. Ventilation, eye protection and a clear bench, and never a rushed movement near the flame.
说明
Set up for hot glass properly
Set up for hot glass properly
Work at a bare, non-flammable bench with forced ventilation and nothing loose within reach of the flame. Wear didymium glasses — ordinary safety glasses do not block the sodium flare, and hours of staring into it damages eyes.
所需工具:
 丙烷喷灯
丙烷喷灯 密闭式护目镜
Get reference from a real animal
Get reference from a real animal
Find photographs of the species' eye and note three things: pupil shape, iris colour banding, and how far the eye stands proud of the socket. A goat's horizontal slot pupil and a cat's vertical one are not interchangeable.
Measure the required diameter
Measure the required diameter
Take the eye diameter from a measured specimen or a taxidermy reference table, not by eye. An eye one size too big is the single commonest fault in amateur mounts and it reads as wrong instantly.
所需工具:
 直尺
直尺Warm the rod into the flame slowly
Warm the rod into the flame slowly
Introduce a clear glass rod to the edge of the flame and bring it in gradually. Glass pushed straight into full heat shatters and throws fragments.
此步骤所需材料:
 玻璃棒料1 个
Gather and blow a small bulb
Gather and blow a small bulb
Soften the end into a gather, then blow gently through the rod to open a hollow bulb. Small breaths — a big one blows the wall thin and it collapses.
Keep it turning constantly
Keep it turning constantly
Rotate the rod without stopping the whole time it is soft. Pause and gravity puts a flat on one side, and a lopsided eye cannot be corrected later.
Fuse a dark disc for the iris
Fuse a dark disc for the iris
Melt a small disc of dark glass onto the front of the bulb and let it settle flat. This becomes the iris ground and everything else is built on it.
Lay in the pupil
Lay in the pupil
Add black glass at the centre in the shape the species actually has — round, vertical slot, horizontal slot. Get the orientation right relative to the eye's axis before it sets.
Draw fine threads for the iris fibres
Draw fine threads for the iris fibres
Pull coloured glass into hair-fine threads and lay them radially across the iris. Real irises are radial fibres, not a flat colour, and this step is the difference between an eye and a bead.
Cover the colour with clear glass
Cover the colour with clear glass
Flow a thin clear layer over the whole iris face. The colour must be seen through glass — that overlay is what creates the wet, deep look, and it is why glass beats paint here.
Shape the cornea bulge
Shape the cornea bulge
Work the front into a slight dome standing proud of the sphere. A real cornea bulges; a perfectly spherical eye looks like a marble.
Anneal it — do not skip this
Anneal it — do not skip this
Put the finished eye straight into a kiln at annealing temperature and cool slowly. An unannealed eye holds internal stress and can crack apart weeks later, in the mount.
Make the pair together
Make the pair together
Make both eyes in one session while your hand and flame are set. Eyes made a week apart differ in colour and size, and a mismatched pair is more obvious than a wrong colour.
Judge it in the socket, not in the hand
Judge it in the socket, not in the hand
Set the eye in clay in a mount and look at it from two metres in normal light. An eye that looks superb on the bench can look wrong once the lids and set are around it — and the set is half the effect.
History & Context
History & Context
A separate trade. Glass eyes for taxidermy and glass eyes for people came from the same workshops and the same technique. The centre of it was Lauscha in Thuringia, a glassmaking town better known now for its blown Christmas ornaments, and the craft passed down through families of lampworkers rather than through schools.
The cryolite breakthrough. In 1868 Lauscha glassmakers developed a glass containing cryolite (Na₃AlF₆), which is opaque white when cool and becomes translucent when heated. It made prosthetic eyes that were smooth, natural-looking and resistant to corrosion by tears, and it contains no lead. That single formulation is why Lauscha dominated the trade.
Why glass rather than paint. An eye is a transparent dome over a coloured iris. Painting an opaque bead puts the colour on the outside, where it reads flat and reflects light in one plane. Building colour inside clear glass reproduces the real optical arrangement, so the eye has depth and catches light the way a living one does. Modern acrylic prosthetics do the same thing with a clear layer over painted detail — the material changed, the principle did not.
Set matters as much as the eye. Taxidermists talk about eye set — the angle, depth and lid shape around the glass — and a perfect eye set badly looks dead while an average eye set well looks alive. It is a useful reminder that a component is only as good as its installation.
A craft at risk. Hand glass-eye making is now practised by very few people; in Britain it has been listed among endangered crafts. This is a technique preserved by a handful of workshops, which is precisely the sort of knowledge worth writing down while it is still possible to ask someone.

此蓝图制作
CC0 公共领域
此蓝图以 CC0 协议发布。你可以自由复制、修改、分发和使用此作品,无需征得许可。
通过购买蓝图中的产品支持创客,他们将获得 创客佣金 (由供应商设定),或创建此蓝图的新版本并将其作为连接包含在你自己的蓝图中以分享收入。