艺术
美容与健康
工艺
文化与历史
娱乐
环境
食品与饮料
逆向工程
科学
体育
技术
可穿戴设备
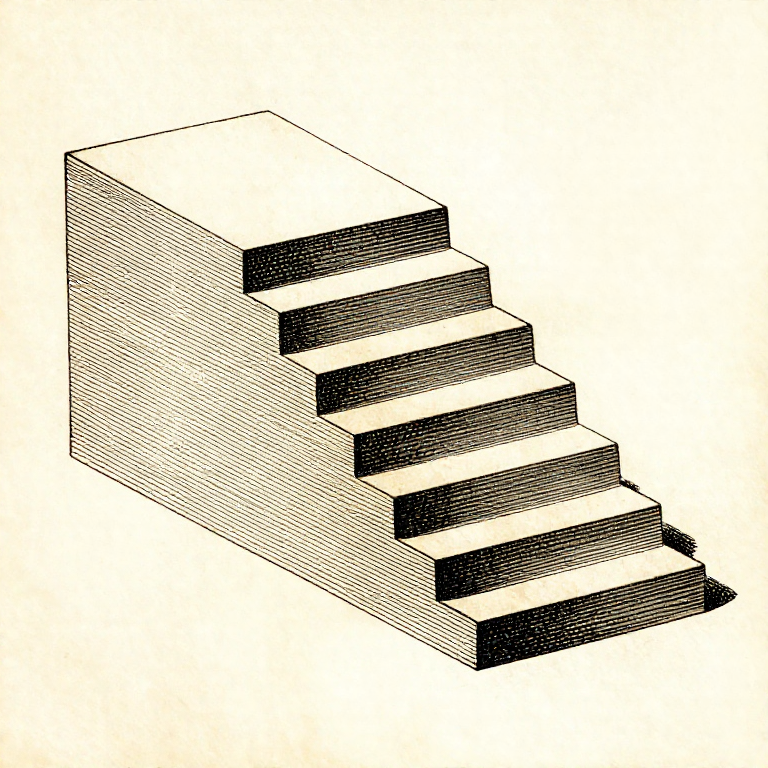


Overhangs, Bridges and Support: What the Machine Can Print Over Thin Air
Each layer is laid on the one below it. Where there is no layer below, the plastic has nothing to sit on — so the question for every sloping surface is how much of each line is still supported by the line under it.
The rule of thumb is 45 degrees, and it is not arbitrary: at 45 degrees each line overhangs the one below by exactly half its width, and half a line is enough to hold. Past that the overhang grows quickly and the plastic droops.
A BRIDGE is the other case: a flat span between two supported ends, printed as a stretched thread across the gap. Bridges work far better than most people expect, and designing to use them is how supports get avoided.
中级
3 hours
说明
1
1
Why 45 degrees, in numbers
Why 45 degrees, in numbers
正在加载 Jupyter 笔记本…
此步骤所需材料:
 3D 打印线材(PLA)1 个
所需工具:
 台式电脑
台式电脑 3MF 文件切片软件
 3D 打印机喷嘴组
2
2
Bridges: flat spans print better than slopes
Bridges: flat spans print better than slopes
A bridge is printed as a single stretched line pulled tight between two anchored ends. Because it is in tension it stays straight, and a well-cooled bridge of 50 mm or more comes out flat.
The first bridging layer is printed FAST and with full cooling, so the line is drawn thin and sets before it can sag. Slicers detect bridges and do this automatically, which is why a bridge often succeeds where a gentler slope fails.
So a square hole printed with a flat top is often better than one with an arch, and a teardrop-shaped horizontal hole is better than a round one because it turns the unsupported top into a self-supporting point. Designing the shape to suit the process is the last rung of this batch.
此步骤所需材料:
3D 打印线材(PLA)1 个所需工具:
 FDM 3D 打印机3MF 文件切片软件
 6 英寸数显卡尺
3
3
Support is a cost, so spend it deliberately
Support is a cost, so spend it deliberately
Support material is printed, then thrown away, and it leaves a rough scar on every surface it touched. So it costs time, filament and finish — three things at once.
Use SUPPORT ON BUILD PLATE ONLY where possible. Support that grows from the part itself marks the part; support that rises from the plate marks nothing except where it meets the overhang.
Increase the Z gap between support and part until it releases by hand. A gap of one layer height is usually right: smaller and it fuses on, larger and the overhang above it droops into the gap. It is worth finding your printer's number once and writing it down.
此步骤所需材料:
3D 打印线材(PLA)1 个所需工具:
3MF 文件切片软件 去毛刺刀
去毛刺刀 3D 打印机工具套装
4
4
Print a test tower before trusting a part
Print a test tower before trusting a part
An overhang test is a small model with faces at a range of angles, printed once per filament and per layer height. Twenty minutes, and it tells you exactly where your machine stops coping.
Keep them, labelled with the filament and settings. A drawer of test prints is the same thing as a shelf of glaze test tiles: a physical record that answers questions faster than any table.
Re-test when anything changes — a new filament, a new nozzle, a different cooling duct. Overhang performance is one of the most machine-specific things in printing, and a number from somebody else's printer is a starting guess.
此步骤所需材料:
3D 打印线材(PLA)1 个 ABS 线材1 个
所需工具:
FDM 3D 打印机 放大目镜
放大目镜相关蓝图
这些蓝图共享知识——技术、材料或原理


CC0 公共领域
此蓝图以 CC0 协议发布。你可以自由复制、修改、分发和使用此作品,无需征得许可。
通过购买蓝图中的产品支持创客,他们将获得 创客佣金 (由供应商设定),或创建此蓝图的新版本并将其作为连接包含在你自己的蓝图中以分享收入。