艺术
美容与健康
工艺
文化与历史
娱乐
环境
食品与饮料
逆向工程
科学
体育
技术
可穿戴设备
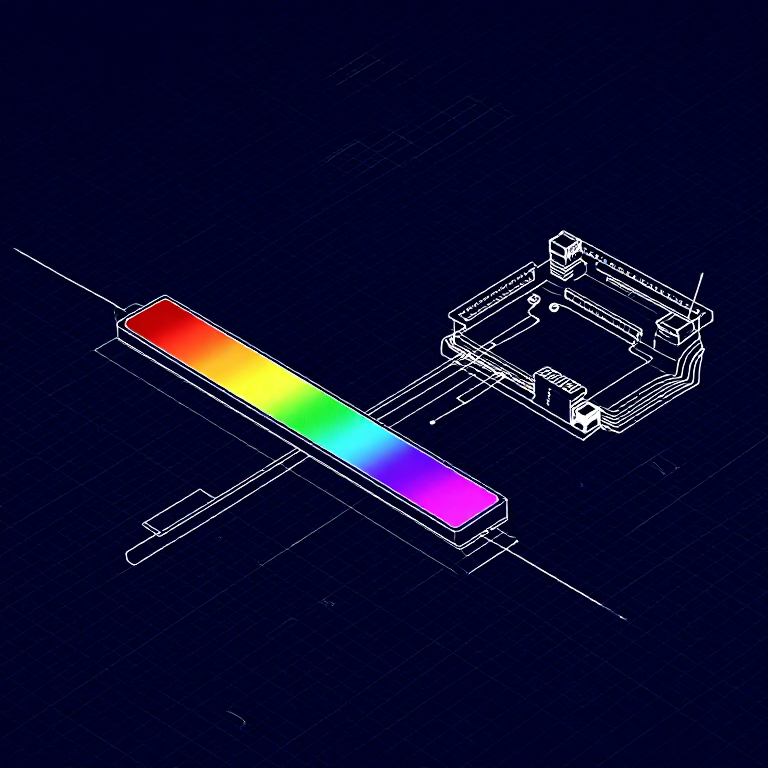
Reading a Soft Potentiometer — SIK Circuit 10
Use a soft potentiometer (touch strip) to control RGB LED color. Slide your finger along the strip to smoothly transition through the color spectrum.
说明
1
1
Parts & Introduction
Parts & Introduction
A soft potentiometer is a thin, flexible strip that acts as a variable resistor based on where you press. Combined with an RGB LED, you can create an intuitive color picker — slide your finger to change colors!
Parts Needed
- 1x Arduino Uno + USB cable
- 1x Breadboard
- 1x Soft Potentiometer
- 1x RGB LED (Common Cathode)
- 3x 330Ω Resistors
- 1x 10KΩ Resistor (pull-down)
- 9x Jumper Wires
此步骤所需材料:
 SparkFun Inventors Kit - V3.21 套件
Arduino Uno R31 个
Breadboard1 个
Soft Potentiometer1 个
 RGB LED (Common Cathode)1 个
 330 Ohm Resistor3 个10K Ohm Resistor1 个
 Jumper Wires8 个
所需工具:
Computer with Arduino IDE
2
2
Hardware Hookup
Hardware Hookup
Wiring Instructions
Soft Potentiometer
- Connect the middle pin to Analog Pin A0.
- Connect one side pin to 5V.
- Connect the other side pin to GND.
- Add a 10K pull-down resistor from Analog Pin A0 to GND.
RGB LED (pin order from flat edge: Red, GND, Green, Blue)
- Connect Red through 330Ω resistor to Pin 9.
- Connect GND (longest pin) to GND rail.
- Connect Green through 330Ω resistor to Pin 10.
- Connect Blue through 330Ω resistor to Pin 11.
此步骤所需材料:
Soft Potentiometer1 个
RGB LED (Common Cathode)1 个330 Ohm Resistor3 个10K Ohm Resistor1 个Breadboard1 个
Jumper Wires8 个3
3
Arduino Code
Arduino Code
Open the Arduino IDE and upload the following sketch to your Arduino board.
soft_potentiometer.inoarduino
此步骤所需材料:
Arduino Uno R31 个
所需工具:
Computer with Arduino IDE
4
4
Test & Experiment
Test & Experiment
What You Should See
The RGB LED changes color as you slide your finger along the soft potentiometer strip. The color smoothly transitions through the spectrum: red → green → blue → red.
Troubleshooting
- LED dark or wrong color: Four pins close together are easy to misplace. Verify each RGB LED connection.
- Bizarre color jumps: Pressing the soft pot in multiple spots simultaneously gives unpredictable results. Use one finger.
Experiments to Try
- Add Serial output to see the raw sensor values as you slide.
- Map the soft pot to servo position instead of color.
材料
8- $105.00
估计总额
$162.00CC0 公共领域
此蓝图以 CC0 协议发布。你可以自由复制、修改、分发和使用此作品,无需征得许可。
通过购买蓝图中的产品支持创客,他们将获得 创客佣金 (由供应商设定),或创建此蓝图的新版本并将其作为连接包含在你自己的蓝图中以分享收入。