
Zusammenarbeit
KUNST
SCHÖNHEIT & WELLNESS
HANDWERK
KULTUR & GESCHICHTE
UNTERHALTUNG
UMFELD
ESSEN & GETRÄNKE
REVERSE ENGINEERING
WISSENSCHAFTEN
SPORT
TECHNOLOGIE
WEARABLES
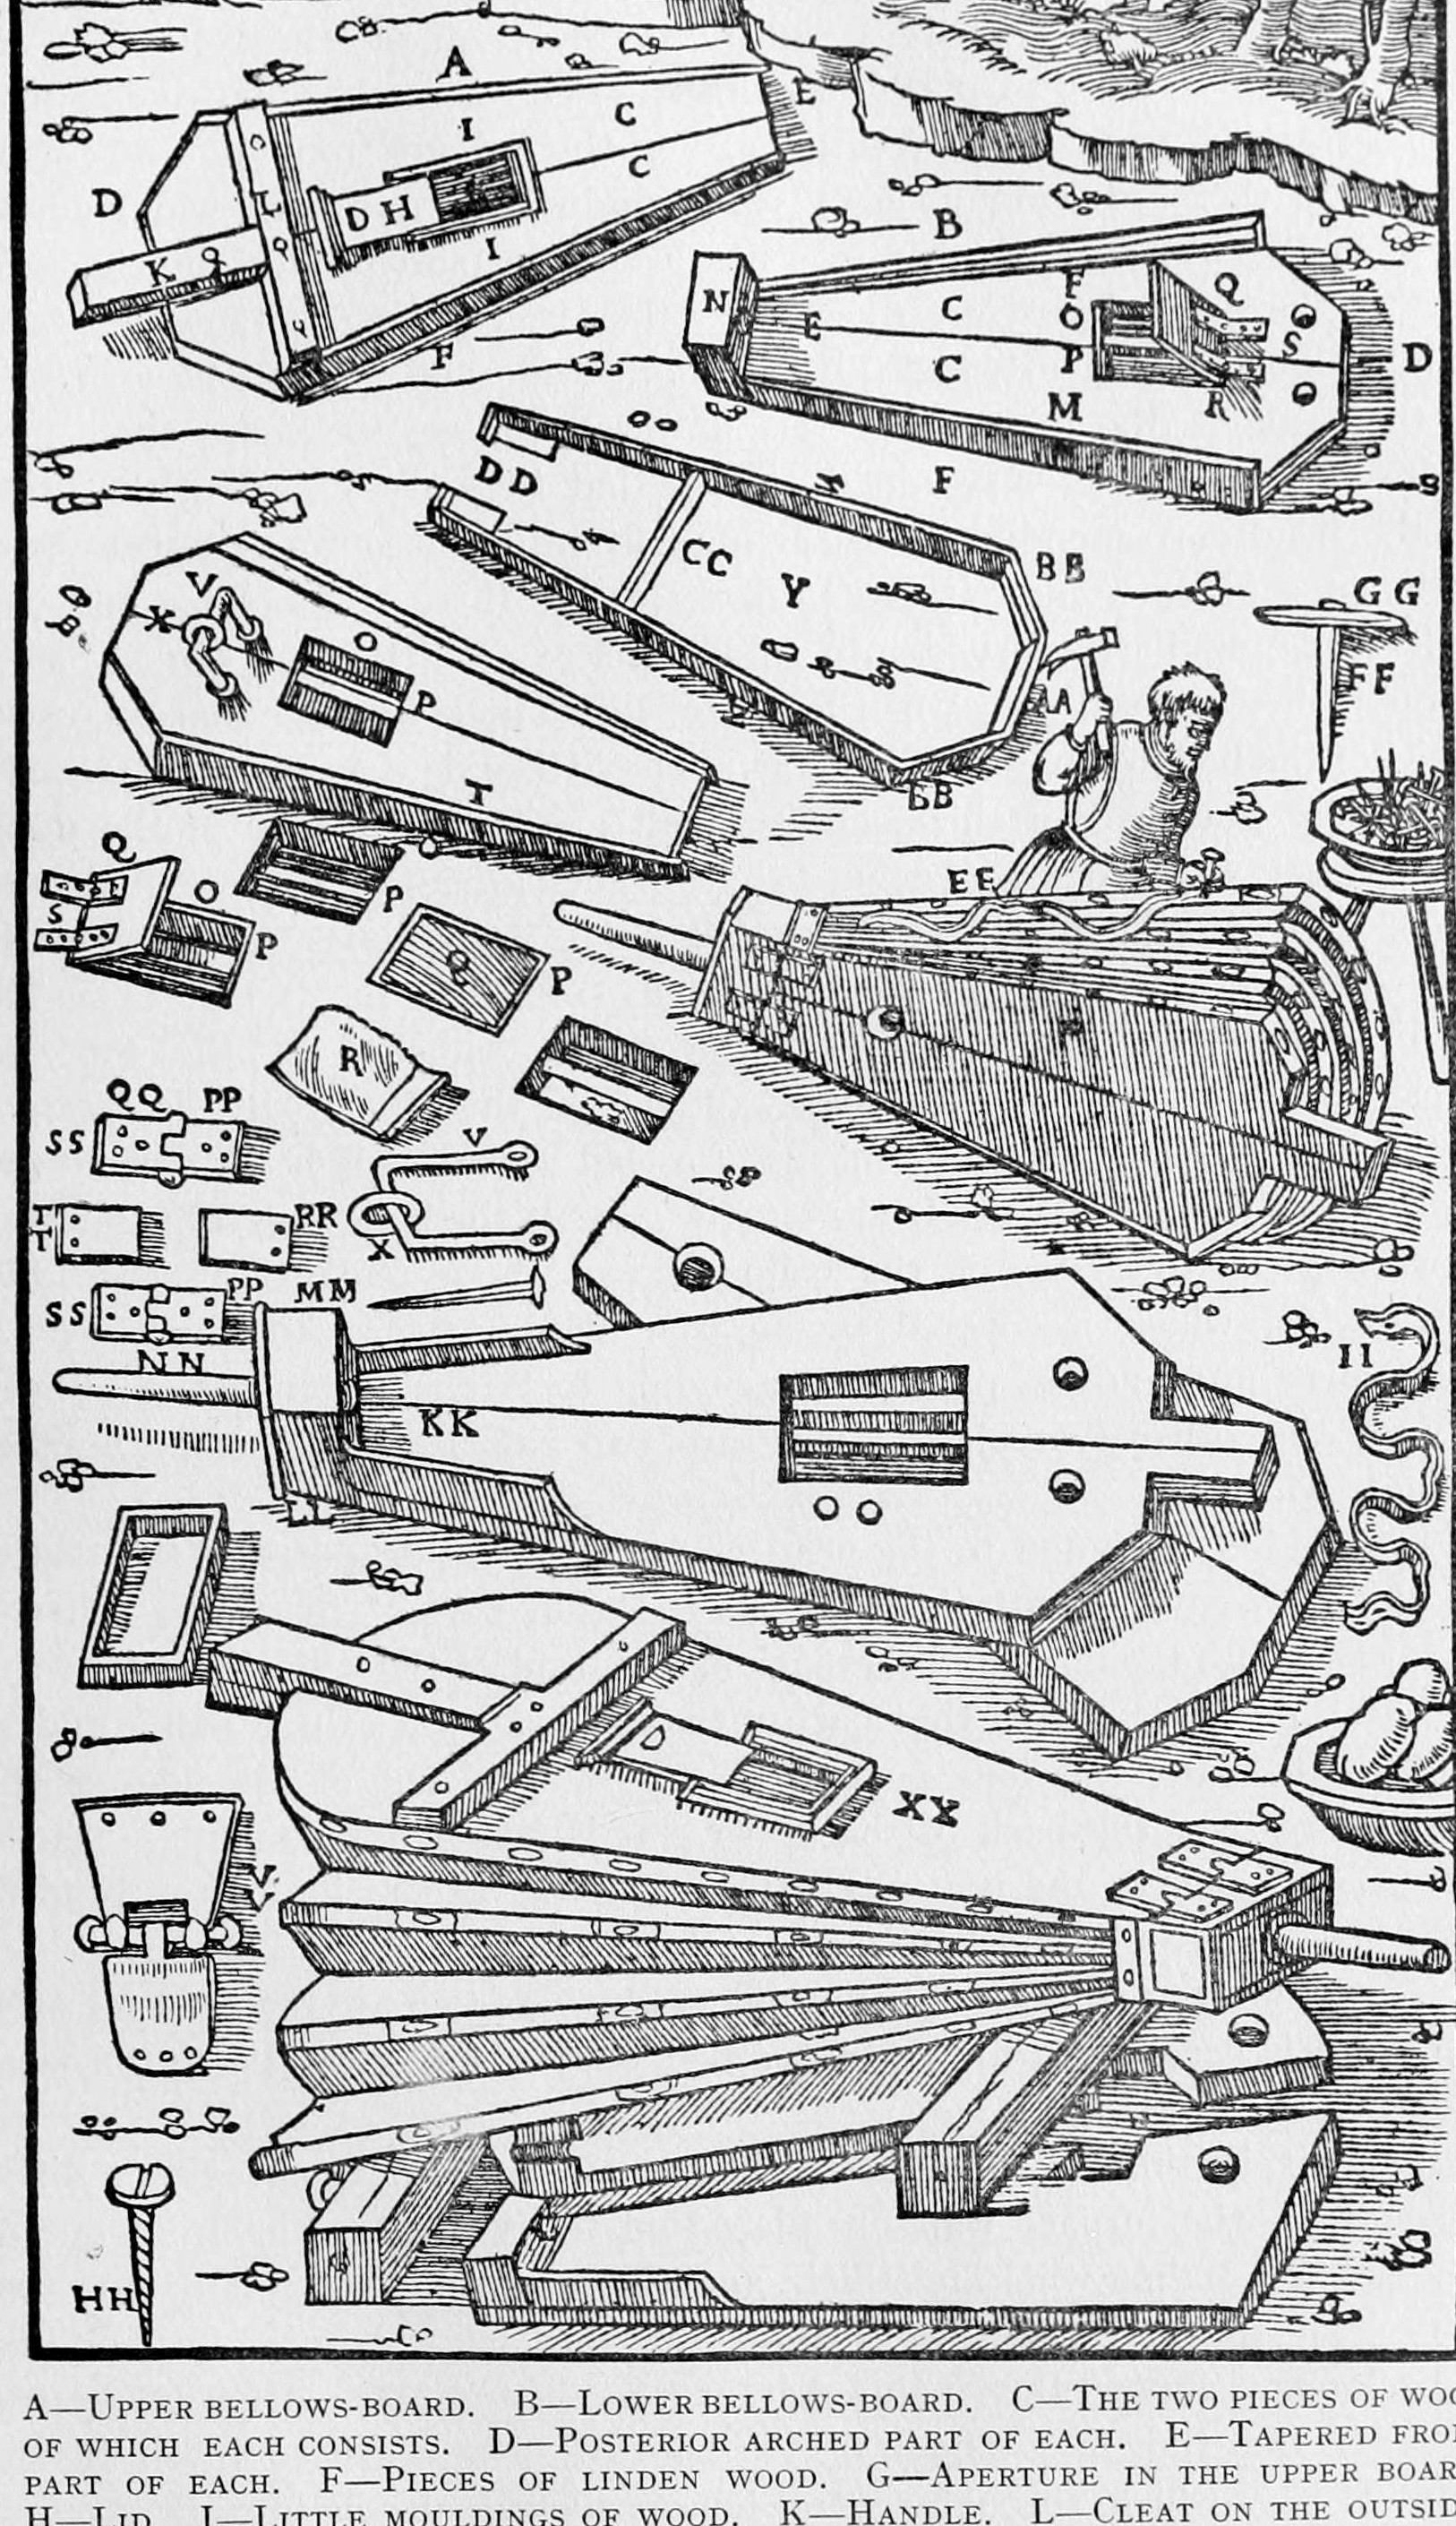
Great Bellows of the Smelting Works: Pine Boards, Linden Bows, Ox-Hide and Iron Nozzle (Agricola, 1556)
Forge

Erstellt von

Forge

14. November 2026NO
1
0
0
0
0

Great Bellows of the Smelting Works: Pine Boards, Linden Bows, Ox-Hide and Iron Nozzle (Agricola, 1556)

The large blast bellows of a 16th-century smelting works, every part measured, from Agricola's De Re Metallica, Book IX (1556): two tapered boards of glued pine edged with linden, about 1.7 m long, two linden bows, two ox-hides nailed on with T-headed nails, a goatskin flap valve in the lower board, and a glued head carrying a 3 ft iron nozzle.
Erfahren
About 2 weeks

Anweisungen

1

Roman units in metric

Jupyter-Notebook wird geladen …
2

Read De Re Metallica, Book IX

"Each bellows consists of a body and a head. The body is composed of two 'boards', two bows, and two hides."
3

Make the upper board

Glue two pieces of pine into a board a palm thick, 5 ft 3 palms long, 2-1/2 ft wide at the back (sides a little curved) and a cubit wide at the front, tapering to the head. Glue on linden edge strips, 7 digits wide at the back and 1-1/2 at the front, to take the nails. Cut an aperture 6 by 4 digits in the middle, 1 ft 3 palms from the head, with a sliding lid 2 palms 1 digit square and 3 digits thick running in mouldings a palm wide and 3 digits thick (or bore 2-3 round holes with plugs). Glue and peg a handle 7 palms or longer (2 palms wide, 1 thick on the board; rounded and 7 digits thick beyond), with a 2 ft cleat 2 palms wide and a palm thick over it and another 2 ft cleat underneath, 3 palms from the end.

Materialien für diesen Schritt:

KiefernbrettKiefernbrett2 Stück
LindenholzplatteLindenholzplatte1 Stück
HautleimHautleim1 Stück
HolzdübelstangeHolzdübelstange1 Stück

Benötigte Werkzeuge:

HandsägeHandsäge
HandhobelHandhobel
StechbeitelStechbeitel
Bohrwinde mit BohrerBohrwinde mit Bohrer
Schraubzwinge mit SchiebebügelSchraubzwinge mit Schiebebügel
4

Make the lower board and flap valve

Make the lower board the same way and a cubit longer (the extra length is part of the head). About a cubit from the back, centred, cut an air-hole a foot long and 3 palms wide, leaving a rib a palm long and 1/3 digit wide across it. Make the flap a foot 3 digits by 3 palms 3 digits of thin board covered with goatskin, hair toward the ground, hinged with a doubled strip of leather a palm wide nailed to it and tied through two holes 7 digits apart. A foot beyond, fix a slightly elliptical iron ring 2 palms by 1 on a staple, 3 palms from the back, for the wooden bolt that holds the board to its frame (or use two iron screws).

Materialien für diesen Schritt:

KiefernbrettKiefernbrett2 Stück
LindenholzplatteLindenholzplatte1 Stück
HautleimHautleim1 Stück
Rohe ZiegenhautRohe Ziegenhaut1 Stück
LederbandLederband1 Stück
MetallringMetallring1 Stück
NägelNägel1 Stück

Benötigte Werkzeuge:

HandsägeHandsäge
StechbeitelStechbeitel
Bohrwinde mit BohrerBohrwinde mit Bohrer
HammerHammer
5

Make the bows

Make each bow as long as the upper board from four pieces of linden 3 digits thick: two long pieces 7 digits wide at the back and 2-1/2 at the front, a back piece 2 palms wide, its ends a little over a digit thick, bent to meet the long pieces, mortised, bored and pegged with glued pegs. Mortise in a crossbar a cubit from the head, a foot long without tenons and a palm 2 digits wide. Glue and peg two small pieces, 3 palms 2 digits long, a palm high and a digit thick, at the head to keep the bow ends off the air passage.

Materialien für diesen Schritt:

LindenholzplatteLindenholzplatte2 Stück
HautleimHautleim1 Stück
HolzdübelstangeHolzdübelstange1 Stück

Benötigte Werkzeuge:

HandsägeHandsäge
StechbeitelStechbeitel
Bohrwinde mit BohrerBohrwinde mit Bohrer
Holzhammer (Klüpfel)Holzhammer (Klüpfel)
6

Make the head and nozzle

Glue the upper head board, a cubit long and 1-1/2 palms thick, onto the lower board's extension (a palm and a digit thick). Shape it a cubit wide at the back, 2 digits narrower 3 palms forward, then round the front to 2 palms 2 digits across and bind it with an iron ring 3 digits wide. Bore it for the nozzle: a pipe of thin iron plate 3 ft long, 3 digits across in front and a palm high by 2 palms wide at the back.

Materialien für diesen Schritt:

KiefernbrettKiefernbrett1 Stück
HautleimHautleim1 Stück
Eisenblech (geschmiedet)Eisenblech (geschmiedet)1 Stück
MetallringMetallring1 Stück

Benötigte Werkzeuge:

HandsägeHandsäge
Bohrwinde mit BohrerBohrwinde mit Bohrer
EsseEsse
AmbossAmboss
HammerHammer
7

Hide the bellows

Use ox-hide (far better than horse), two hides each 3-1/2 ft wide at the back. Lay a long leather thong along each board and bow and nail the hide through it with T-shaped iron nails 5 digits long, horns 2-1/2 digits long and half a digit wide, the horn of one nail almost touching the next along the boards; on each bow two nails in the back piece and four in each long piece, ten in all. Pine strips nailed over the hide on the long pieces guard against tearing; iron screws through strips over the hide hold even better.

Materialien für diesen Schritt:

Pflanzlich gegerbtes LederPflanzlich gegerbtes Leder2 Stück
LederbandLederband1 Stück
NägelNägel1 Stück

Benötigte Werkzeuge:

HammerHammer

LedermesserLedermesser
SchereSchere
8

Troubleshooting

Bellows troubleshooting.

Flow

Loading...
9

History and honest limits

From Georgius Agricola, **De Re Metallica** (1556), Book IX, translated by Herbert C. and Lou H. Hoover, 1912 (checked on the archive.org scan georgiusagricola00agri, pp. 362-365). The frame and the machinery that work the bellows are not covered here. The metric conversions (digit ~1.85 cm, palm ~7.4 cm, Roman foot ~29.6 cm, cubit ~44.4 cm) and the tools are ours.

Materialien

10

Benötigte Werkzeuge

11

Dieser Bauplan stellt her

Verwandte Blueprints

Diese Blueprints teilen Wissen — Techniken, Materialien oder Prinzipien
CC0 Gemeinfrei

Dieser Blueprint ist unter CC0 veröffentlicht. Sie dürfen dieses Werk für jeden Zweck frei kopieren, ändern, verbreiten und verwenden, ohne um Erlaubnis zu fragen.

Unterstützen Sie den Maker, indem Sie Produkte über seinen Blueprint kaufen, wo er eine Maker-Provision von Anbietern festgelegt, verdient. Oder erstellen Sie eine neue Iteration dieses Blueprints und verbinden Sie ihn in Ihrem eigenen Blueprint, um Einnahmen zu teilen.

Diskussion

(0)

Anmelden um an der Diskussion teilzunehmen

Kommentare werden geladen...