Zusammenarbeit
KUNST
SCHÖNHEIT & WELLNESS
HANDWERK
KULTUR & GESCHICHTE
UNTERHALTUNG
UMFELD
ESSEN & GETRÄNKE
REVERSE ENGINEERING
WISSENSCHAFTEN
SPORT
TECHNOLOGIE
WEARABLES
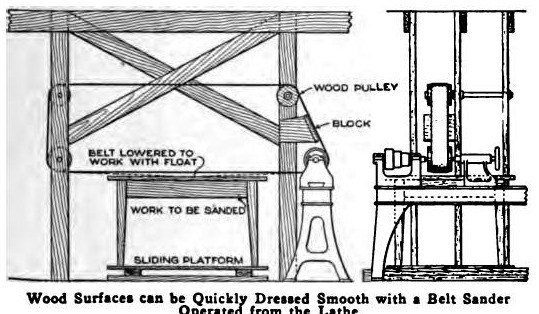


Belt Sander: a Lathe-Driven Garnet-Belt Sander (Shop Notes, 1919)
A shop belt sander for dressing wood surfaces: a 6 in garnet-paper belt running over four crowned wooden pulleys, one driven by the lathe, pressed down onto the work with a hand float.
Best belt speed about 2,500 ft per minute; leave about 1 in between work and belt.
Source: Popular Mechanics Shop Notes for 1919, p. 3235. Picture: the article's drawing.
Fortgeschritten
Unknown
Anweisungen
1
1
Turn the pulleys
Turn the pulleys
Build up four solid wood pulleys 10 in across with 8 in faces and turn them in the lathe with a very slight crown; too much crown harms the belt.
Materialien für diesen Schritt:
 Hartholzbrett4 built-up pulleys
Benötigte Werkzeuge:
 Holzdrechselbank
2
2
Mount the pulleys
Mount the pulleys
Mount one pulley on a firmly held arbor in the lathe and the other three on iron-pipe shafts on a frame (drawing). Turn and file a true journal on each pipe, pour babbitt bushings in the pulleys, and cut oil grooves in the pipe or babbitt. Supporting the shafts on one side lets the belt slip off; supporting both sides is stronger.
Materialien für diesen Schritt:
 Stahlrohr (dickwandig, mit Gewindeenden)3 shafts
 Unbekanntes Metall1 babbitt bushings
 Kiefernholz1 frame
Benötigte Werkzeuge:
 Metallfeile
 Lochkelle
 Handsäge
 Hammer
3
3
Make the belt
Make the belt
Cut 6 in garnet paper (No. 1 1/2 for general work) so the ends just meet over the pulleys. Glue the smooth side at the joint, splice it with a strip of cloth about 1 in wide and then one about 3 in wide, cover each side with paper, and clamp between two small boards.
Materialien für diesen Schritt:
 Schleifpapier1 6 in garnet paper
 Baumwolltuch1 Stück
 Tierleim1 Stück
Benötigte Werkzeuge:
 Schraubzwinge in C-Form
4
4
Set up and run
Set up and run
Run the belt at about 2,500 ft per minute using the lathe's cone pulley. Set the work about 1 in below the belt on a table or a low sliding platform (two sets of tongue-and-groove joints at right angles), start the machine and press the belt down with a float like a blackboard eraser, or a roller.
Materialien für diesen Schritt:
Kiefernholz1 platform, floatBenötigte Werkzeuge:
HolzdrechselbankMaterialien
7- 4 built-up pulleysPlatzhalter
- Platzhalter
- 1 babbitt bushingsPlatzhalter
- 1 platform, floatPlatzhalter
- 1 6 in garnet paperPlatzhalter
- 1 StückPlatzhalter
- 1 StückPlatzhalter
Dieser Bauplan stellt her

CC0 Gemeinfrei
Dieser Blueprint ist unter CC0 veröffentlicht. Sie dürfen dieses Werk für jeden Zweck frei kopieren, ändern, verbreiten und verwenden, ohne um Erlaubnis zu fragen.
Unterstützen Sie den Maker, indem Sie Produkte über seinen Blueprint kaufen, wo er eine Maker-Provision von Anbietern festgelegt, verdient. Oder erstellen Sie eine neue Iteration dieses Blueprints und verbinden Sie ihn in Ihrem eigenen Blueprint, um Einnahmen zu teilen.