
Zusammenarbeit
KUNST
SCHÖNHEIT & WELLNESS
HANDWERK
KULTUR & GESCHICHTE
UNTERHALTUNG
UMFELD
ESSEN & GETRÄNKE
REVERSE ENGINEERING
WISSENSCHAFTEN
SPORT
TECHNOLOGIE
WEARABLES
Five-Foot Bait-Casting Rod: Hand-Tapered Dagame Stick, Cork Grasps and Agate Guides (Boy Mechanic, 1915)
Woody

Erstellt von

Woody

13. November 2026NO
1
0
0
0
0

Five-Foot Bait-Casting Rod: Hand-Tapered Dagame Stick, Cork Grasps and Agate Guides (Boy Mechanic, 1915)

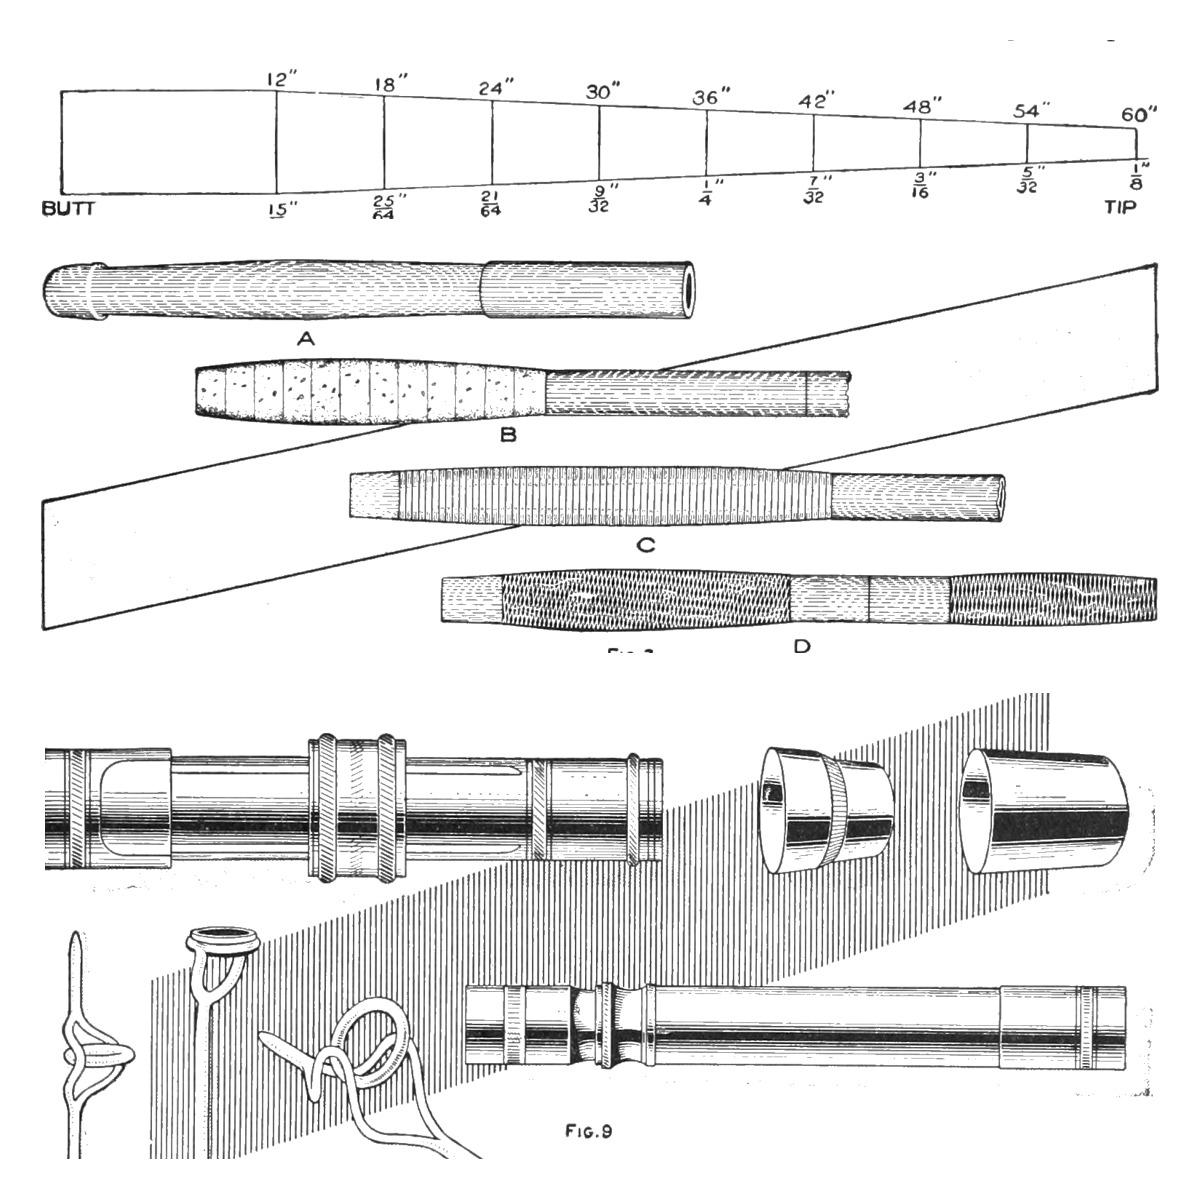
Stillman Taylor's first rod for a beginner, from The Boy Mechanic, Book 2 (1915): a one-piece 5 ft bait-casting rod planed by hand from a 5/8 in square stick of dagame to his calipered taper (1/2 in at the grasp to 1/8 in at the tip), with a double cork grasp around the reel seat, two agate guides and an agate tip, whipped in silk and varnished. He made it with "a saw, plane, jackknife, file, and sandpaper".
Fortgeschritten
About 2 weeks (glue and varnish drying)

Anweisungen

1

Fig. 5: the taper, station by station

Jupyter-Notebook wird geladen …
2

Read The Boy Mechanic, Book 2

"The short one-piece bait-casting rod with but one ferrule is the easiest rod to make." His materials: 1 dagame or greenheart stick, 5 ft long and 5/8 in square; 1 reel seat with straight hood, 3/4 in; 1 butt cap, 1 in; 1 taper, small end 15/32 in; 1 offset agate top, 3/32 in, and 2 narrow agate guides, 1/2 in, all in German silver; 2 doz. corks, 1-1/4 by 1-1/8 in; two 50 yd spools of silk, red and green, 00 size.
3

Make the gauge and grooved board

On a strip of paper draw the rod full length: a 1/2 in line for the butt, a centre line 60 in long, a 1/8 in line at the tip, and join the ends. From 12 in, mark a crossline every 6 in and write his diameters on them (see the notebook). File nine slots in a thin strip of brass to these diameters as a gauge. Plane a groove, gradually shallower toward one end, in a 5 ft tongue-and-groove pine board about 1 in thick, and nail it to the bench edge, groove up.

Materialien für diesen Schritt:

MessingblechMessingblech1 Stück
KiefernbrettKiefernbrett1 Stück
NägelNägel1 Stück

Benötigte Werkzeuge:

Braunes Packpapier (Kraftpapier)Braunes Packpapier (Kraftpapier)
BleistiftBleistift
Feilen (Handfeile)Feilen (Handfeile)
SchraubstockSchraubstock
MessschieberMessschieber
HandhobelHandhobel
HammerHammer
Bandmaß (Rollmeter)Bandmaß (Rollmeter)
4

Plane the stick square and tapered

Plane along each side and from both ends of a 5/8 in square dagame strip to find the grain. Drill two holes about 1/4 in from the butt end and hook them over a brad in the bench corner, so you plane with the grain. Plane it straight and true to 1/2 in square, evenly from all sides, ignoring kinks. Knife-mark the hand grasp 12 in from the butt (11 in for a single grasp). Then plane an even taper from butt to tip, checking with caliper and gauge at every 6 in mark and planing the thick spots lightly. Bend the tip on the floor: if it stays bent, the wood needs a few weeks' seasoning in a warm place.

Materialien für diesen Schritt:

DagameholzDagameholz1 Stück
NägelNägel1 Stück

Benötigte Werkzeuge:

HandhobelHandhobel

EinhandhobelEinhandhobel
SchleifsteinSchleifstein
HandbohrerHandbohrer
MessschieberMessschieber
BastelmesserBastelmesser
HammerHammer
5

Round the rod

Lay the rod in the grooved board, a corner up, and take each corner off with a finely set small plane to make it eight-sided, calipering every 6 in mark and keeping the eight sides even, until it is almost round and tapers evenly from the grasp mark to the tip. File grooves across the edge of a cabinetmaker's steel scraper with a round file, sharpen them, and scrape the rod perfectly round; sandpaper it smooth. Tie on the tip and guides and string the reel on to try a few casts, then smooth it with No. 0 sandpaper.

Materialien für diesen Schritt:

SchleifpapierSchleifpapier1 Stück

Benötigte Werkzeuge:

EinhandhobelEinhandhobel

StahlschaberStahlschaber
Feilen (Handfeile)Feilen (Handfeile)
MessschieberMessschieber
6

Build the lower grasp and reel-seat sleeve

Cut a hole in the corks with a sharpened tube turned like a wad cutter. Cut the butt off square about 1 in from the end, to remove the holes. Glue on a cork with hot glue, then cork after cork, about 10, for a grasp a trifle over 5 in long. For the reel-seat sleeve, bore a 15/32 in hole through white pine about 3/4 in thick and 5 in long, plane the outside to slip inside the reel seat, taper one end to match it, and make it about 1/4 in shorter than the reel seat. Glue it down on top of the last cork and leave the glue a day or two.

Materialien für diesen Schritt:

KorkringeKorkringe10 Stück
TierleimTierleim1 Stück
KiefernbrettKiefernbrett1 Stück

Benötigte Werkzeuge:
MessingrohrMessingrohr
Feilen (Handfeile)Feilen (Handfeile)
HandsägeHandsäge
HandbohrerHandbohrer
EinhandhobelEinhandhobel
7

Fit the butt cap and reel seat

Trim the grasp to about 1-1/16 in diameter (1-1/4 in corks need little trimming), leaving the top cork as a shoulder, and fit the lower corks to the butt cap's taper. Heat the cap moderately, rub melted ferrule cement inside and force it on; when hard, drive a small brass pin or brad through and file it flush. Cut the 4-1/2 in reel seat down to 3-7/8 in and fit it with the hood at the lower end, worked into the cork for a tight joint. Cement the sleeve, push the reel seat home and drive a small pin through the hood into the wood a short way only, not through the rod.

Materialien für diesen Schritt:

RutenendkappeRutenendkappe1 Stück
RollenhalterRollenhalter1 Stück
HülsenkittHülsenkitt1 Stück

Benötigte Werkzeuge:

BastelmesserBastelmesser
Feilen (Handfeile)Feilen (Handfeile)
PropanbrennerPropanbrenner
HammerHammer
8

Build the upper grasp and finish the wood

Cement corks above the reel seat, the first pressed against the seat and turned so the metal enters it, then shape them into a smooth swelled grasp and cement on the winding check. Sand the rod, wet it to raise the grain, and sand again with old paper; for a finer polish rub with pumice and oil and an oiled rag. File the tip to fit the agate top, smear on melted ferrule cement and push the top home. Rub the wood over with a cloth wet with varnish to fill the pores, and wipe off the surplus.

Materialien für diesen Schritt:

KorkringeKorkringe6 Stück
TierleimTierleim1 Stück
Wicklungsabschluss (Winding Check)Wicklungsabschluss (Winding Check)1 Stück
SpitzenringSpitzenring1 Stück
HülsenkittHülsenkitt1 Stück
SchleifpapierSchleifpapier1 Stück
KutschenlackKutschenlack1 Stück

Benötigte Werkzeuge:

BastelmesserBastelmesser
Feilen (Handfeile)Feilen (Handfeile)
PropanbrennerPropanbrenner
9

Whip on the guides

Place the first guide 19-1/2 in from the metal taper above the upper grasp and the second 15-1/2 in further on; round the sharp edges of their bases with a fine file and hold them with a few turns of common thread. Whip with 00 silk using the invisible knot: tuck the end under the first coil, wind tightly by turning the rod, lay a waxed loop of silk about 4 in long under the last turns, wind about 1/8 in beyond the pointed flange, cut the silk and pull its end back under with the loop. About a dozen turns make a winding; edgings of three or four turns go on after, in red with green or yellow.

Materialien für diesen Schritt:

RutenringRutenring2 Stück
RutenwickelseideRutenwickelseide1 Stück
LeinenfadenLeinenfaden1 Stück
BienenwachsBienenwachs1 Stück

Benötigte Werkzeuge:

Feilen (Handfeile)Feilen (Handfeile)
BastelmesserBastelmesser
10

Shellac and varnish

Clip any fuzzy ends and give the silk two light coats of white shellac dissolved in grain alcohol, warmed and laid on with a small camel's-hair brush; let it dry a couple of days. Warm the coach varnish in a pot of hot water for five minutes and brush it on evenly with a brush about 1/2 in wide, in a warm place (about 75 deg F). Hang the rod by the tip in a dust-free room; allow three days between coats; two coats protect it, three give complete protection.

Materialien für diesen Schritt:

SchellackfirnisSchellackfirnis1 Stück
KutschenlackKutschenlack3 Stück

Benötigte Werkzeuge:
Breiter PinselBreiter Pinsel
11

Troubleshooting

Casting rod troubleshooting.

Flow

Loading...
12

History and honest limits

From "Fishing-Rod Making and Angling, Part I -- A One-Piece Casting Rod" by Stillman Taylor, in **The Boy Mechanic, Book 2**, Popular Mechanics, 1915 (Project Gutenberg 44585; checked on the archive.org scan boymechanicbook200chic2, pp. 59-66). His text says about 10 corks for the lower grasp; his list allows 2 dozen for both grasps. The block plane, vernier caliper and other modern tool names, and the metric figures, are ours; his tools were "a saw, plane, jackknife, file, and sandpaper" plus those in his tools section.

Materialien

18

Benötigte Werkzeuge

17

Dieser Bauplan stellt her

Verwandte Blueprints

Diese Blueprints teilen Wissen — Techniken, Materialien oder Prinzipien
CC0 Gemeinfrei

Dieser Blueprint ist unter CC0 veröffentlicht. Sie dürfen dieses Werk für jeden Zweck frei kopieren, ändern, verbreiten und verwenden, ohne um Erlaubnis zu fragen.

Unterstützen Sie den Maker, indem Sie Produkte über seinen Blueprint kaufen, wo er eine Maker-Provision von Anbietern festgelegt, verdient. Oder erstellen Sie eine neue Iteration dieses Blueprints und verbinden Sie ihn in Ihrem eigenen Blueprint, um Einnahmen zu teilen.

Diskussion

(0)

Anmelden um an der Diskussion teilzunehmen

Kommentare werden geladen...