
Zusammenarbeit
KUNST
SCHÖNHEIT & WELLNESS
HANDWERK
KULTUR & GESCHICHTE
UNTERHALTUNG
UMFELD
ESSEN & GETRÄNKE
REVERSE ENGINEERING
WISSENSCHAFTEN
SPORT
TECHNOLOGIE
WEARABLES
Four-Passenger Coasting Bobsled: Iron-Shod Ash Runners, Hinged Rear Sled and Hoop Steering Wheel (Boy Mechanic, 1915)
Woody

Erstellt von

Woody

13. November 2026NO
2
0
0
0
0

Four-Passenger Coasting Bobsled: Iron-Shod Ash Runners, Hinged Rear Sled and Hoop Steering Wheel (Boy Mechanic, 1915)

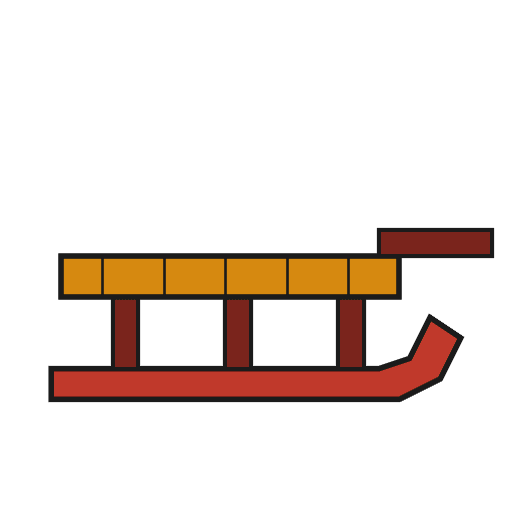
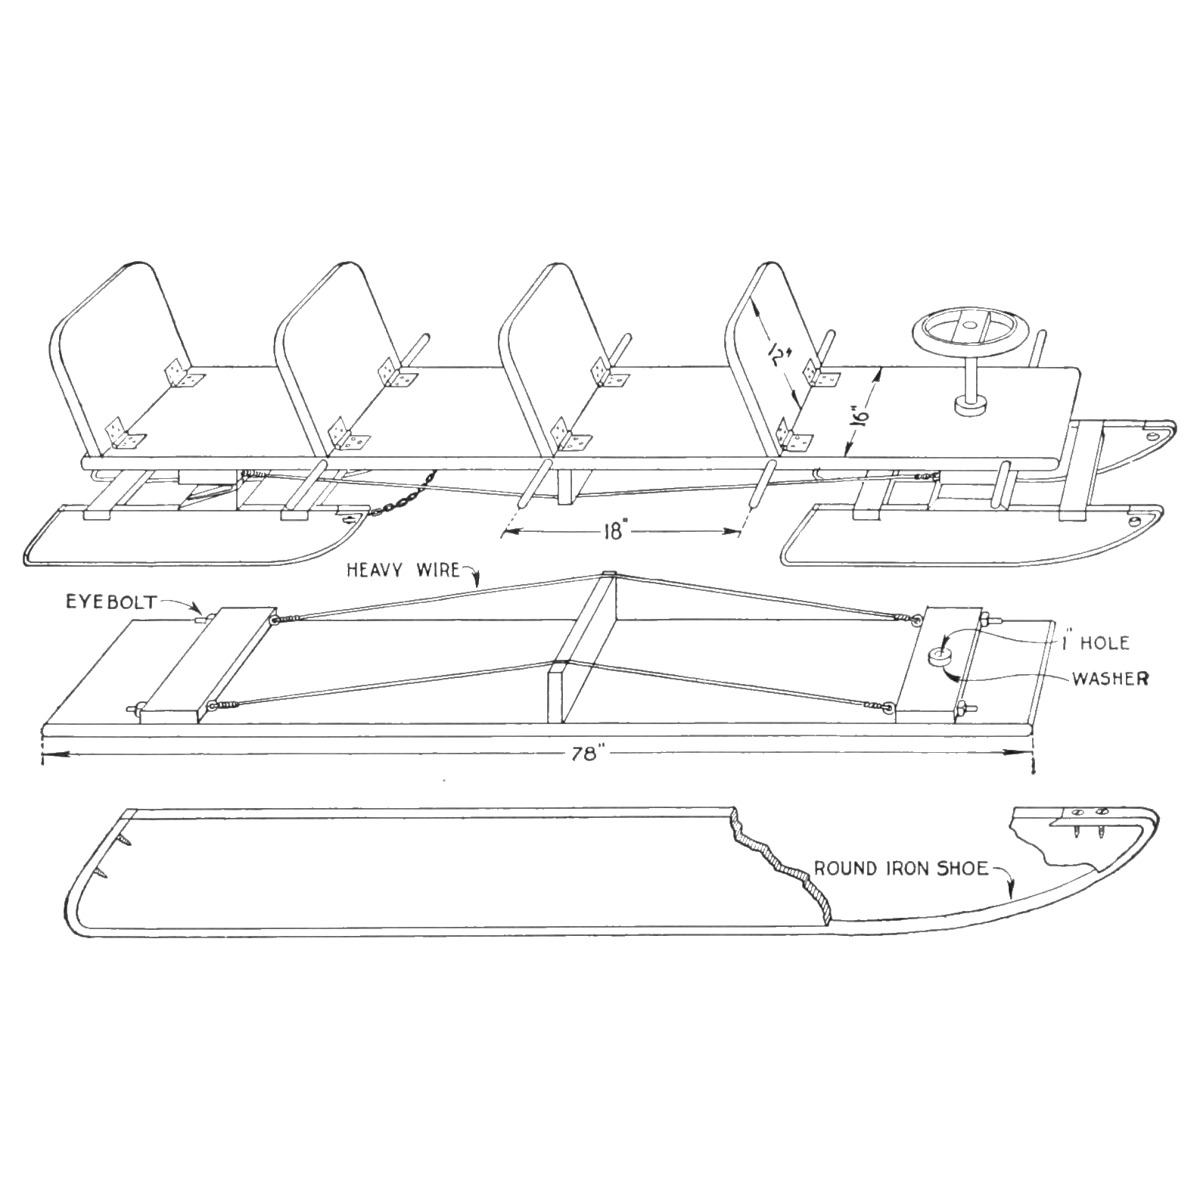
R. H. Allen's four-passenger coasting bob from The Boy Mechanic, Book 2 (1915): a 6-1/2 ft top board with four hinged seat backs, carried on two short sleds with ash runners shod in 5/8 in round iron. The rear sled rocks on a wedge and hinges to follow the ground; the front sled steers by a broom-handle post and a wheel made from a nail-keg hoop. Every size is his.
Fortgeschritten
About 3 days

Anweisungen

1

His list of materials in centimetres

Jupyter-Notebook wird geladen …
2

Read The Boy Mechanic, Book 2

"Any wood may be used for the sled, except for the runners, which should be made of ash." His list of materials: 1 top 6-1/2 ft x 16 in x 1-1/4 in; 4 runners 22 x 4 x 1 in; 4 crosspieces 16 x 3 x 1 in; 3 pieces 16 x 5 x 2 in; 1 piece 16 x 5 x 1 in; 1 shore 16 x 3 x 1 in; 4 seat backs 12 x 16 x 1 in; 1 dowel 3 ft x 1 in; 4 rods 5/8 in x 30 in; 4 eyebolts 1/2 x 6 in; 3 hinges 5 in strap; 8 hinges 3 in strap.
3

Shape and shoe the runners

Cut one ash runner to shape and use it as the pattern for the other three. Cut a groove about 1/4 in deep along the under edge to take the curve of a 5/8 in round iron rod. Bend each rod to fit in the groove, up the back of the runner and over the top at the front; flatten the ends and drill two holes in each for wood screws (a blacksmith can flatten them, he says). Screw the irons on.

Materialien für diesen Schritt:

HartholzbrettHartholzbrett1 Stück
EisenstabEisenstab4 Stück
HolzschraubenHolzschrauben1 Stück

Benötigte Werkzeuge:

HandsägeHandsäge

Laubsäge (Schweifsäge)Laubsäge (Schweifsäge)
StechbeitelStechbeitel
KohleesseKohleesse
AmbossAmboss
SchmiedehammerSchmiedehammer
SchraubstockSchraubstock
HandbohrerHandbohrer
BleistiftBleistift
4

Build the two sleds

Notch the top edges of each pair of runners for the 16 x 3 in crosspieces, near the ends, so the crosspieces lie flush with the runner tops and the notches of each pair line up. Fit them snugly, fasten with long, slim wood screws, and stiffen each joint inside with a small metal brace.

Materialien für diesen Schritt:

KiefernbrettKiefernbrett1 Stück
HolzschraubenHolzschrauben1 Stück
EckwinkelEckwinkel8 Stück

Benötigte Werkzeuge:

HandsägeHandsäge
StechbeitelStechbeitel
HandbohrerHandbohrer
5

Make the rocking rear joint

Cut a heavy 2 x 5 in crosspiece sloping across its width, from 2 in thick at one edge to a feather edge at the other. Fix the three large strap hinges to the sloping face, and fasten the piece solidly on the rear sled's runners with its centre 8 in from their front ends. This lets the rear sled rock but not turn sideways.

Materialien für diesen Schritt:

KiefernbrettKiefernbrett1 Stück
Eisernes LangbandEisernes Langband3 Stück
HolzschraubenHolzschrauben1 Stück

Benötigte Werkzeuge:

HandsägeHandsäge
HandhobelHandhobel
HandbohrerHandbohrer
6

Mount the front sled crosspiece

Fasten the supporting crosspiece on top of the front sled's runners with its centre 11 in from their front ends.

Materialien für diesen Schritt:

KiefernbrettKiefernbrett1 Stück
HolzschraubenHolzschrauben1 Stück

Benötigte Werkzeuge:

HandbohrerHandbohrer
Bandmaß (Rollmeter)Bandmaß (Rollmeter)
7

Brace the top board

Round both ends of the top board and plane it smooth. Underneath, fit two crosspieces, each with two 1/2 in holes bored through its width near the ends for the eyebolts: one with its centre 12 in from the rear end, the other 8 in from the front. Screw them on. Set the shore in the centre of the board, run wires over it between the eyebolts, and draw the eyebolts up until the wire is taut over the shore, so the long board cannot sag.

Materialien für diesen Schritt:

KiefernbrettKiefernbrett1 Stück
RingschraubeRingschraube4 Stück
EisendrahtEisendraht1 Stück
HolzschraubenHolzschrauben1 Stück

Benötigte Werkzeuge:

HandsägeHandsäge
HandhobelHandhobel
Bohrwinde mit BohrerBohrwinde mit Bohrer
Bandmaß (Rollmeter)Bandmaß (Rollmeter)
8

Fit the seat backs and foot rests

Round the top corners of the four backs and cut the bottom ends at a slight angle for a slant. Hinge them to the top board with the small strap hinges every 18 in, starting at the rear. Bore 1 in holes about 1 in deep in the edges of the top board every 18 in, beginning about 5 in from the front, and drive in pins 4 in long cut from the dowel, as foot rests.

Materialien für diesen Schritt:

KiefernbrettKiefernbrett1 Stück
Eisernes LangbandEisernes Langband8 Stück
HartholzdübelHartholzdübel1 Stück
HolzschraubenHolzschrauben1 Stück

Benötigte Werkzeuge:

HandsägeHandsäge
Bohrwinde mit BohrerBohrwinde mit Bohrer
Bandmaß (Rollmeter)Bandmaß (Rollmeter)
9

Make the steering

Cut a broom handle to 18 in and fasten one end in a hole bored centrally in the 5 in crosspiece of the front sled. Bore a hole in the top board through the centre of the crosspiece underneath; put two metal washers on the stick and run it up through the hole, then fasten a hardwood collar to it just above the board so the top cannot lift off the sled. For the wheel, fasten a piece of wood across a nail-keg hoop, cover the hoop with garden hose and wrap it with twine; bore the centre of the crosspiece to fit the broom handle and screw it on.

Materialien für diesen Schritt:

BesenBesen1 Stück
UnterlegscheibeUnterlegscheibe2 Stück
HartholzbrettHartholzbrett1 Stück
EisenreifenEisenreifen1 Stück
Gummischlauch mit GewebeeinlageGummischlauch mit Gewebeeinlage1 Stück
JutegarnJutegarn1 Stück
HolzschraubenHolzschrauben1 Stück

Benötigte Werkzeuge:

HandsägeHandsäge
Bohrwinde mit BohrerBohrwinde mit Bohrer
HandbohrerHandbohrer
10

Join the sleds and fit the ropes

Fasten the rear sled to the top board with screws through the free wings of the hinges into the crosspiece. Bore holes in the front ends of all runners and attach a chain or rope: the rear one's loop to the underside of the top board, the front one for drawing the sled.

Materialien für diesen Schritt:

HolzschraubenHolzschrauben1 Stück
EisenketteEisenkette1 Stück

Benötigte Werkzeuge:

Bohrwinde mit BohrerBohrwinde mit Bohrer
HandbohrerHandbohrer
11

Troubleshooting

Bobsled troubleshooting.

Flow

Loading...
12

History and honest limits

From "Four-Passenger Coasting Bobsled" by R. H. Allen, in **The Boy Mechanic, Book 2**, Popular Mechanics, 1915 (Project Gutenberg 44585; checked on the archive.org scan boymechanicbook200chic2, pp. 24-26). The runner shape comes from his drawing, not from figures. The scan calls the steering collar a hardwood collar; the Gutenberg text drops "hardwood". The tools and metric figures are ours.

Materialien

15

Benötigte Werkzeuge

12

Dieser Bauplan stellt her

Verwandte Blueprints

Diese Blueprints teilen Wissen — Techniken, Materialien oder Prinzipien
CC0 Gemeinfrei

Dieser Blueprint ist unter CC0 veröffentlicht. Sie dürfen dieses Werk für jeden Zweck frei kopieren, ändern, verbreiten und verwenden, ohne um Erlaubnis zu fragen.

Unterstützen Sie den Maker, indem Sie Produkte über seinen Blueprint kaufen, wo er eine Maker-Provision von Anbietern festgelegt, verdient. Oder erstellen Sie eine neue Iteration dieses Blueprints und verbinden Sie ihn in Ihrem eigenen Blueprint, um Einnahmen zu teilen.

Diskussion

(0)

Anmelden um an der Diskussion teilzunehmen

Kommentare werden geladen...