Zusammenarbeit
KUNST
SCHÖNHEIT & WELLNESS
HANDWERK
KULTUR & GESCHICHTE
UNTERHALTUNG
UMFELD
ESSEN & GETRÄNKE
REVERSE ENGINEERING
WISSENSCHAFTEN
SPORT
TECHNOLOGIE
WEARABLES
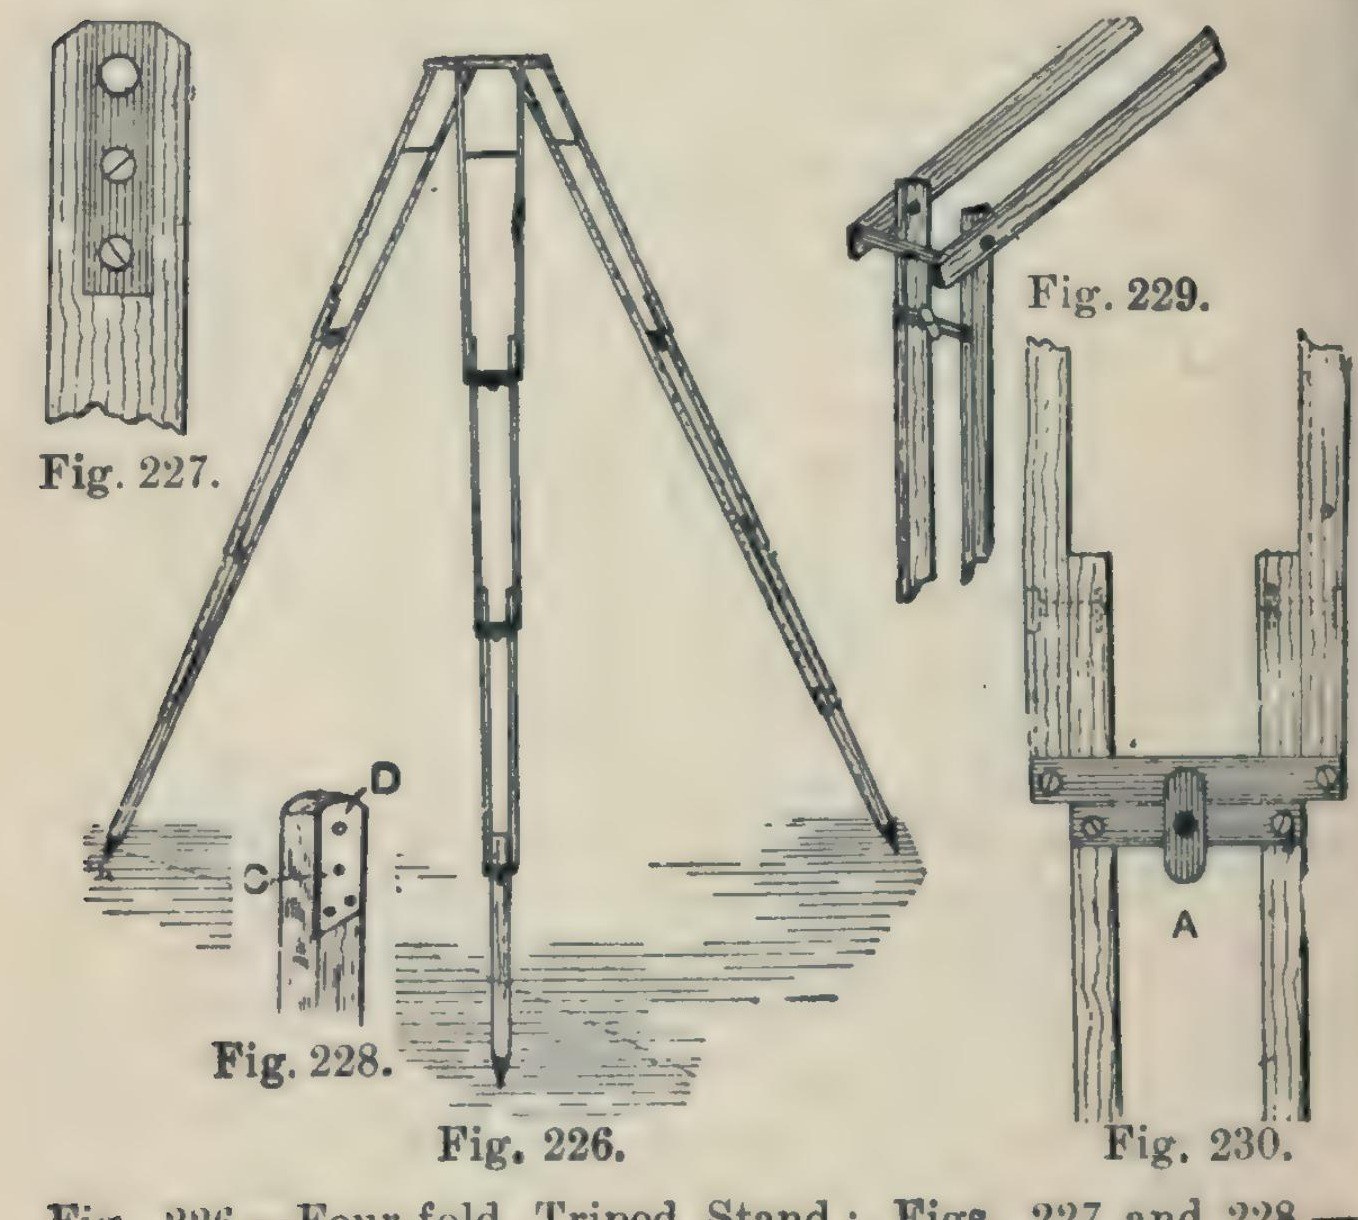


Camera Tripod: a Four-Fold Ash Tripod Stand (Hasluck, 1902)
A light, compact folding camera stand: three legs, each of seven ash laths riveted so it folds in four, locked open by brass buttons, on a triangular ash top with brass pins and a hole for the camera screw.
Hasluck says the same method makes stands that fold in three or two.
Source: Paul N. Hasluck, Photographic Cameras and Accessories (1902), pp. 153-157. Picture: Figs. 226-230 of the book.
Fortgeschritten
Unknown
Anweisungen
1
1
Cut the ash laths
Cut the ash laths
Cut laths of good ash, true and square or the stand won't be rigid, and round the edges slightly: six 17 1/4 x 5/8 x 3/8 in, six 16 x 5/8 x 3/8 in, six 15 1/2 x 5/8 x 3/8 in, and three 14 x 5/8 x 5/8 in.
Materialien für diesen Schritt:
 Eschenbrett1 21 laths
Benötigte Werkzeuge:
 Feinsäge mit Rückensteg
 Einhandhobel
2
2
Fit the top ends and stretcher
Fit the top ends and stretcher
On each 17 1/4 in lath let in flush a 1/16 in brass plate, 1 1/4 in long, with a 3/16 in hole 1/4 in from the top, held by two countersunk brass screws; bore the wood to match and take off the top corners. On one lath of each pair cut a groove inside, about 3/16 in deep and 3 1/2 in long, starting 2 in from the top, and hinge a 1/8 in brass rod stretcher in it on a pin. On the other lath cut a curved groove 1 1/2 in long, 3/16 in wide, with a small hole at the bottom where the rod catches.
Materialien für diesen Schritt:
 Messingblech1 1/16 in plates
 Holzschrauben1 small brass screws
 Messingstange1 1/8 in stretcher
Benötigte Werkzeuge:
 Sägebügel mit Sägeblättern
 Metallfeile
 Handbohrer
 Stechbeitel
 Schlitzschraubendreher
3
3
Bore and rivet the legs
Bore and rivet the legs
Bore the rivet holes: in the long laths 1 3/4 in from the lower end, counterbored so the copper rivet head sits flush, then 1/8 in through; in the 16 in and 15 1/2 in laths 1/2 in and 1 3/4 in from the ends; in each 14 in piece 1/2 in from one end, and taper its other end for a pointed iron shoe or a steel point and ferrule. Rivet the 21 laths into three legs with 1/8 in copper rivets and washers: a 16 in lath inside each 17 1/4 in one, a 15 1/2 in lath inside that, the 14 in foot between the last pair. Rivets flush, just tight enough to fold but not loose.
Materialien für diesen Schritt:
 Kupfernieten1 1/8 in, with washers
 Unbekanntes Metall3 iron shoes or steel points
Benötigte Werkzeuge:
 Bohrwinde mit BohrerHandbohrer
 Niethammer
4
4
Add cross strips and lock buttons
Add cross strips and lock buttons
Screw 1/16 in brass strips across the bottom ends of each pair of laths (Fig. 229). Under them screw strips carrying a small brass button riveted at the centre; turned, the button hooks over the strip above and locks the joint open (Fig. 230).
Materialien für diesen Schritt:
Messingblech1 cross strips, buttonsHolzschrauben1 StückBenötigte Werkzeuge:
Sägebügel mit SägeblätternMetallfeileSchlitzschraubendreherNiethammer5
5
Make the top
Make the top
Plane ash to 1/2 in and draw an equilateral triangle with 8 1/2 in sides. Bisect the angles; 2 in from each corner draw a line at right angles, go 1/2 in in along the sides, and mark three rectangles 2 7/8 x 3/4 in; cut the outline (Fig. 231). Fix a 3/16 in brass rod, one end tapered, across each rectangle, bored 3/8 in from the outer edge and projecting about 1/2 in, for the legs to hang on. Bore a 1/4 in hole in the centre for the camera screw and glue felt on top.
Materialien für diesen Schritt:
Eschenbrett1 topMessingstange3 3/16 in pins Wollfilz1 Stück
 Tierleim1 Stück
Benötigte Werkzeuge:
EinhandhobelFeinsäge mit RückenstegBohrwinde mit BohrerHandbohrer6
6
Finish
Finish
Glasspaper and varnish the wood, and lacquer the brass.
Materialien für diesen Schritt:
 Schellackfirnis1 varnish
 Unbekanntes Material1 brass lacquer
Benötigte Werkzeuge:
 Schleifpapier
Materialien
10- 1 topPlatzhalter
- 1 cross strips, buttonsPlatzhalter
- 1 StückPlatzhalter
- 3 3/16 in pinsPlatzhalter
- 1 1/8 in, with washersPlatzhalter
- 3 iron shoes or steel pointsPlatzhalter
- 1 StückPlatzhalter
- 1 StückPlatzhalter
- 1 varnishPlatzhalter
- 1 brass lacquerPlatzhalter
Benötigte Werkzeuge
10- Platzhalter
- Platzhalter
- Platzhalter
- Platzhalter
- Platzhalter
- Platzhalter
- Platzhalter
- Platzhalter
- Platzhalter
- Platzhalter
Dieser Bauplan stellt her

CC0 Gemeinfrei
Dieser Blueprint ist unter CC0 veröffentlicht. Sie dürfen dieses Werk für jeden Zweck frei kopieren, ändern, verbreiten und verwenden, ohne um Erlaubnis zu fragen.
Unterstützen Sie den Maker, indem Sie Produkte über seinen Blueprint kaufen, wo er eine Maker-Provision von Anbietern festgelegt, verdient. Oder erstellen Sie eine neue Iteration dieses Blueprints und verbinden Sie ihn in Ihrem eigenen Blueprint, um Einnahmen zu teilen.