Zusammenarbeit
KUNST
SCHÖNHEIT & WELLNESS
HANDWERK
KULTUR & GESCHICHTE
UNTERHALTUNG
UMFELD
ESSEN & GETRÄNKE
REVERSE ENGINEERING
WISSENSCHAFTEN
SPORT
TECHNOLOGIE
WEARABLES
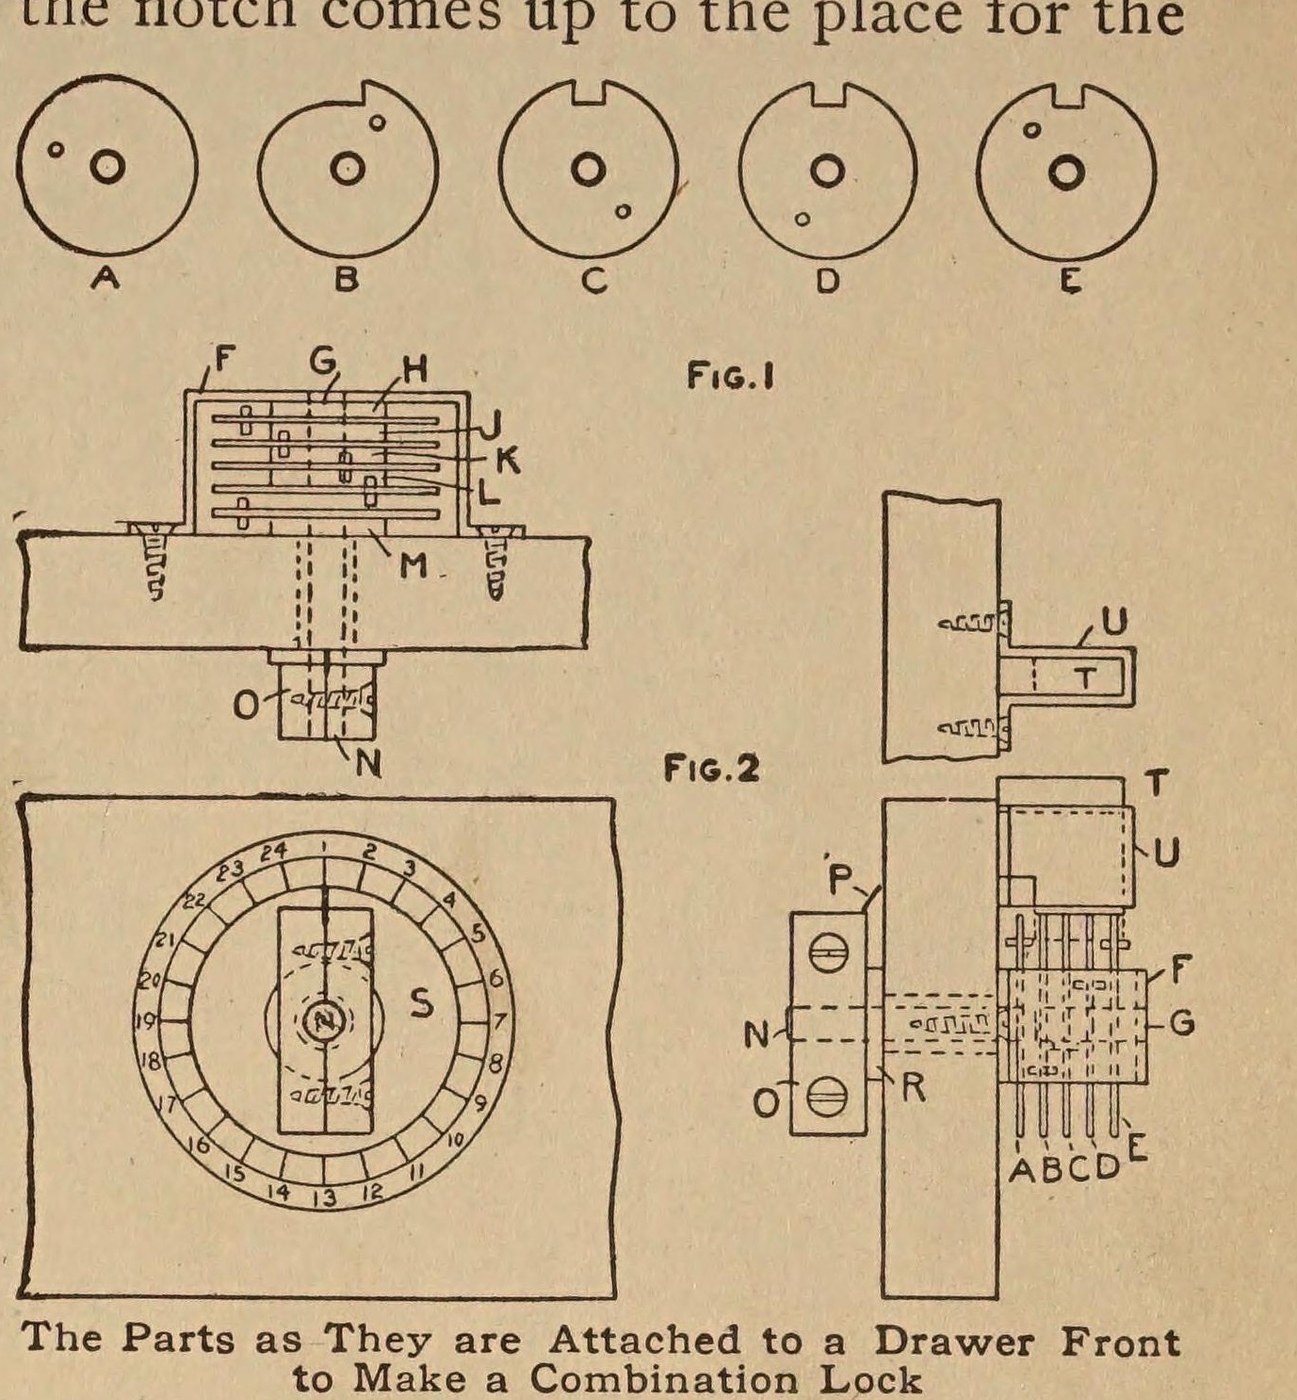


Combination Lock: a Five-Disc Drawer Lock (Boy Mechanic, 1915)
A keyless lock fitted inside a drawer front: five brass discs on a pin, turned by pins from a knob and dial outside. When the notches line up the latch drops; turning back raises it into its keeper.
The combination is changed by moving the pins in the discs.
Source: The Boy Mechanic, Book 2 (1915), p. 169. Picture: Figs. 1-2 of the book.
Fortgeschritten
Unknown
Anweisungen
1
1
Cut the five discs
Cut the five discs
Cut five discs of sheet brass about 1/16 in thick and 1 1/2 in across. Drill each for a driving pin 15/32 in from the centre and press the pin in. Notch discs C, D and E for the latch; shape disc B as a cam to lift the latch into its keeper; leave disc A plain with only its pin (Fig. 1).
Materialien für diesen Schritt:
 Messingblech1 discs
 Unbekanntes Metall1 driving pins
Benötigte Werkzeuge:
 Stechzirkel
 Blechschere
 Metallfeile
 Handbohrer
 Hammer
2
2
Mount the discs
Mount the discs
Inside the drawer front fit a U-shaped metal bracket F carrying a 1/4 in pin G. Thread the discs on it with rubber washers H to M between them so they don't turn too freely. Fix disc A tight on the end of a 1/4 in rod N that passes out through the front.
Materialien für diesen Schritt:
 Stahlblech1 U-bracket F
 Rundstahl (Baustahl)1 pin G, rod N
 Unbekanntes Material5 rubber washers
Benötigte Werkzeuge:
Handbohrer Bohrwinde mit BohrerBlechschere
3
3
Fit knob, dial and latch
Fit knob, dial and latch
Make the knob of two pieces of wood screwed together with a pointer between them, fit it on rod N with a washer against the drawer. Paste on a paper dial with division marks and numbers. Fit the latch T in a U-shaped metal piece U inside the drawer end so its heel rests on the disc edges, with its keeper above. To find the combination, open the drawer and turn the knob until each notch comes under the latch heel, noting the number under the pointer each time.
Materialien für diesen Schritt:
 Hartholzblock2 knobUnbekanntes Metall1 pointer, latch, keeper
 Unterlegscheibe1 Stück
 Papier1 dialStahlblech1 U-piece
 Holzschrauben1 Stück
Benötigte Werkzeuge:
 SchlitzschraubendreherBlechschere
Materialien
9- 1 discsPlatzhalter
- 1 pointer, latch, keeperPlatzhalter
- 1 U-piecePlatzhalter
- 1 pin G, rod NPlatzhalter
- 5 rubber washersPlatzhalter
- 2 knobPlatzhalter
- 1 StückPlatzhalter
- 1 dialPlatzhalter
- 1 StückPlatzhalter
Benötigte Werkzeuge
7- Platzhalter
- Platzhalter
- Platzhalter
- Platzhalter
- Platzhalter
- Platzhalter
- Platzhalter
Dieser Bauplan stellt her

CC0 Gemeinfrei
Dieser Blueprint ist unter CC0 veröffentlicht. Sie dürfen dieses Werk für jeden Zweck frei kopieren, ändern, verbreiten und verwenden, ohne um Erlaubnis zu fragen.
Unterstützen Sie den Maker, indem Sie Produkte über seinen Blueprint kaufen, wo er eine Maker-Provision von Anbietern festgelegt, verdient. Oder erstellen Sie eine neue Iteration dieses Blueprints und verbinden Sie ihn in Ihrem eigenen Blueprint, um Einnahmen zu teilen.