Zusammenarbeit
KUNST
SCHÖNHEIT & WELLNESS
HANDWERK
KULTUR & GESCHICHTE
UNTERHALTUNG
UMFELD
ESSEN & GETRÄNKE
REVERSE ENGINEERING
WISSENSCHAFTEN
SPORT
TECHNOLOGIE
WEARABLES
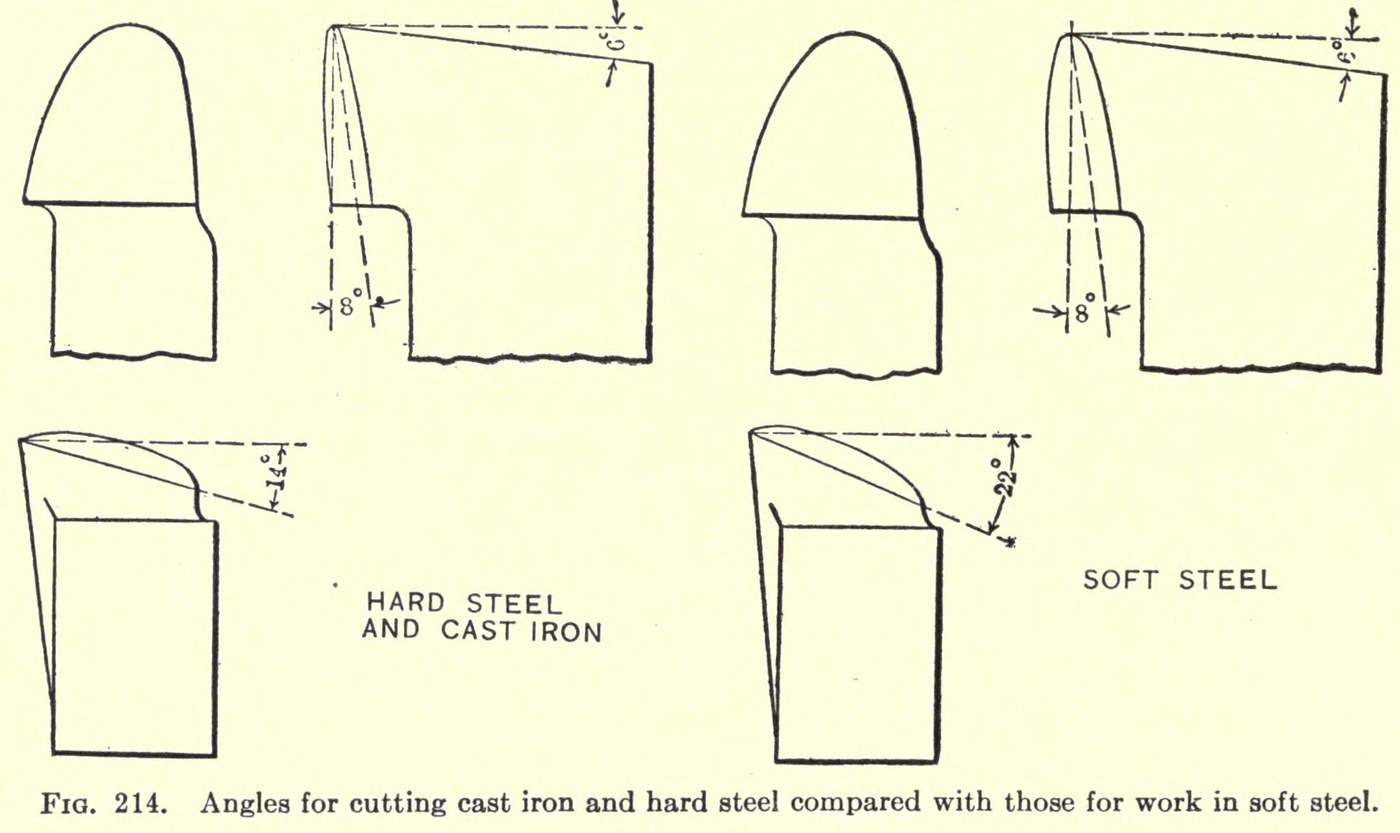


High-Speed Steel Lathe Tools: Hardened White-Hot and Ground to Taylor's Angles (Becker, 1910)
Turning tools of high-speed steel, made from annealed tool-holder stock: sawn off, rough-ground, heated until the surface just starts to melt, cooled in an air blast and ground to F. W. Taylor's standard round-nose shape. The angles change with the metal the tool will cut (see the last step).
Not given: the length of the pieces, or the time per tool.
Source: O. M. Becker, High-Speed Steel (1910), pp. 65, 91-98, 127, 136-148 and 255-257. Picture: Becker's Fig. 214, Taylor's angles for hard steel and cast iron against those for soft steel.
Fortgeschritten
Not given in the source
Anweisungen
1
1
Saw off the pieces
Saw off the pieces
Use annealed tool-holder stock: unannealed bar got its hardness from the rolls, not from proper hardening. Saw the pieces off (a band saw is better than a circular saw). Do not nick and break them: the break can start fine cracks that spoil the tool later.
Materialien für diesen Schritt:
 Schnellstahl-Stahlhalterstahl1 one piece per tool
Benötigte Werkzeuge:
 Metallbandsäge
2
2
Rough-grind to shape
Rough-grind to shape
Before hardening, grind each piece close to its final shape on a dry emery wheel. Leave a little to grind off afterwards, to remove the burnt skin and restore the edge.
Benötigte Werkzeuge:
 Doppelschleifer
 Schleifscheibe
3
3
Heat to a dazzling white
Heat to a dazzling white
In a forge fire covered with a firebrick hood, bring the tool slowly to a bright red, about 1,000 °C (1,800 °F). Then heat it quickly to a dazzling white, above 1,200 °C (2,200 °F), until the surface begins to flux and the corners start to melt. For roughing and medium cuts go as hot as you can without actually melting it; most high-speed steels do not melt below 1,400 °C (2,550 °F). Red to white takes no more than about two minutes for a one-inch tool. Heat the nose right through, but keep the white heat out of the neck.
Benötigte Werkzeuge:
 Koksesse
 Hüttenkoks
 Schamottesteine
 Schmiedezange
 Pyrometer
 Getönte Schmiedeschutzbrille
4
4
Cool in an air blast
Cool in an air blast
Hold the tool in a stream of cool compressed air, reduced to 2-3 lb pressure at the nozzle, and keep turning it until it is cold enough to handle. Then lay it aside in a dry place. Avoid cold water. Leave lathe roughing tools untempered.
Benötigte Werkzeuge:
 Industrie-Luftkompressor
 LuftdüseSchmiedezange
5
5
Grind the round nose
Grind the round nose
For roughing tools use a coarse wheel: Taylor used grits 24 and 30 mixed, and a 20-combination also does. For finishing tools use about a 60-grit J-grade alundum wheel. Run the wheel at the speed its maker gives. Never let the edge get hot: high-speed steel starts to soften at about 550 °C (1,100 °F), and a hot face meeting cold water cracks. Grind the nose radius from the tool width A. Blunt tool: R = ½A − 5/32 in. Sharp tool: R = ½A − 3/16 in. Taylor's sizes run from ½ to 2 in wide.
Benötigte Werkzeuge:
DoppelschleiferSchleifscheibe6
6
Grind the angles for the metal
Grind the angles for the metal
Keep the clearance small, about 6°, as on all of Taylor's standard tools. Choose the rest by the metal to be cut:
- Cast iron and harder steels (about 0.45 % carbon and up): lip angle 68°, back slope 8°, side slope 14°.
- Softer steels: lip angle 61°, back slope 8°, side slope 22°.
- Tire steel and similar hard steels: lip angle 74°, back slope 5°, side slope 9°.
- Chilled iron: lip angle 86-90°.
- Extremely soft steels (0.10-0.15 % carbon): lip angle about 61° or less.
The harder the metal, the blunter the angle. The steep side slope lets the tool be reground more often without weakening it. Check the angles with a protractor.
Benötigte Werkzeuge:
DoppelschleiferSchleifscheibe Winkelmesser
Materialien
1- 1 one piece per toolPlatzhalter
Benötigte Werkzeuge
12- Platzhalter
- Platzhalter
- Platzhalter
- Platzhalter
- Platzhalter
- Platzhalter
- Platzhalter
- Platzhalter
- Platzhalter
- Platzhalter
- Platzhalter
- Platzhalter
Materialien verbundener Blueprints

Dieser Bauplan stellt her

CC0 Gemeinfrei
Dieser Blueprint ist unter CC0 veröffentlicht. Sie dürfen dieses Werk für jeden Zweck frei kopieren, ändern, verbreiten und verwenden, ohne um Erlaubnis zu fragen.
Unterstützen Sie den Maker, indem Sie Produkte über seinen Blueprint kaufen, wo er eine Maker-Provision von Anbietern festgelegt, verdient. Oder erstellen Sie eine neue Iteration dieses Blueprints und verbinden Sie ihn in Ihrem eigenen Blueprint, um Einnahmen zu teilen.