Zusammenarbeit
KUNST
SCHÖNHEIT & WELLNESS
HANDWERK
KULTUR & GESCHICHTE
UNTERHALTUNG
UMFELD
ESSEN & GETRÄNKE
REVERSE ENGINEERING
WISSENSCHAFTEN
SPORT
TECHNOLOGIE
WEARABLES
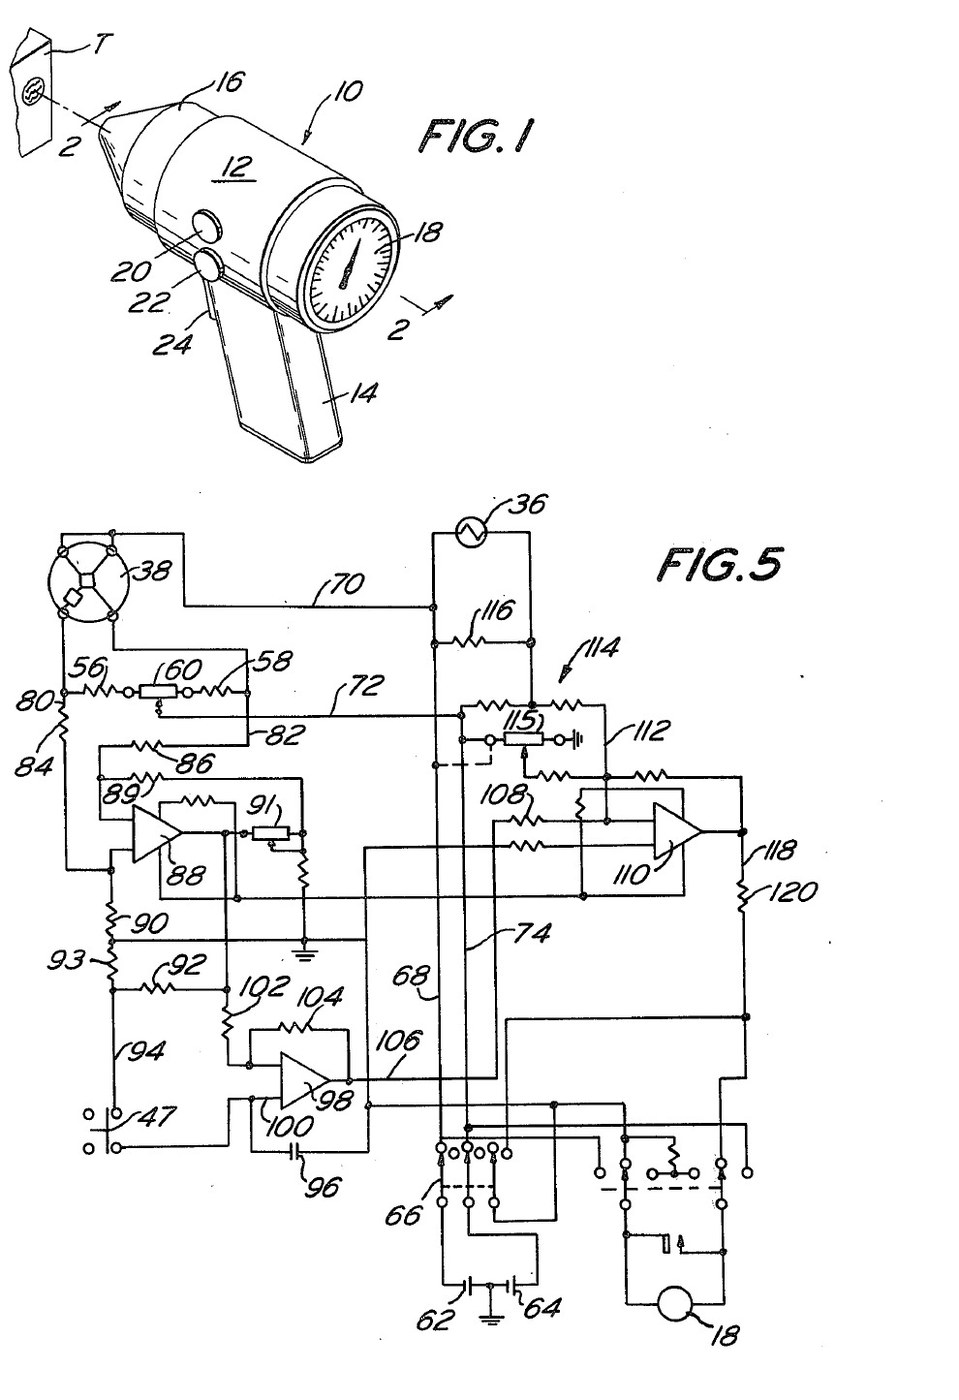


Infrared Thermometer: Pistol Grip with a Trigger-Swung Mirror That Zeroes on the Cavity (Michael, US 4,005,605, 1977)
A pistol-grip thermometer that reads a surface's temperature from its infrared radiation, without touching it. Inside, a concave mirror on a pivot first looks at the instrument's own cavity and a thermistor there, so the circuit stores a zero; pulling the trigger swings the mirror to the nose opening and focuses the target's radiation on a thermistor bolometer. The meter shows the difference, corrected for the cavity's temperature.
Result: a non-contact thermometer reading -20 to 60 °C, built for veterinary use.
Source: D. S. Michael (Mikron Instrument), US 4,005,605 (1977). Unknown: sizes, component values and most materials. Picture: the patent drawing.
Erfahren
Unknown
Anweisungen
1
1
Build the housing and nose
Build the housing and nose
Make a housing with a pistol handle, in three pieces for easy assembly. Fix a cone-shaped nose to its front, cut off at the tip to leave a round opening about one tenth of the cavity's inside diameter, so little stray radiation gets in or out. Paint the inside of the nose and cavity flat black. An infrared-transparent sheet may close the nose to keep out dirt and draughts. Not given: sizes, the materials.
Materialien für diesen Schritt:
 Unbekanntes Material1 housing, nose, window
 Mattschwarze Farbe1 as needed
Benötigte Werkzeuge:
 Breiter Pinsel
 Unbekannte Maße
2
2
Fit the detector, mirror and ambient thermistor
Fit the detector, mirror and ambient thermistor
Hold the thermistor bolometer on the housing's axis with a spider. Mount a concave mirror in a gimbal ring on two trunnions in bearings in the housing wall, with the detector at its focus when it faces the nose. Put a bead thermistor inside the cone. A leaf spring holds the ring tilted so the mirror faces the thermistor. Not given: the mirror's focal length, the metals.
Materialien für diesen Schritt:
 Thermistor-Bolometer1 Stück
 Hohlspiegel1 Stück
 Unbekanntes Metall1 gimbal ring, trunnions, spider
 NTC-Thermistorsatz1 bead thermistor
 Blattfeder1 Stück
Benötigte Werkzeuge:
 Schraubendreher-SatzUnbekannte Maße
3
3
Fit the trigger
Fit the trigger
Pivot a trigger in the handle. A finger on it pushes the gimbal ring against the spring, so the mirror turns to face the nose opening, and at the same moment opens a small switch beside the trigger. Fit the off-on switch and two control knobs on the housing, and the meter in its back. Ours: a microswitch and a moving-coil meter.
Materialien für diesen Schritt:
Unbekanntes Metall1 trigger, finger, pivot Mikroschalter1 Stück
 Kippschalter1 multipole off-on
 Drehspul-Einbaumessgerät1 Stück
Benötigte Werkzeuge:
Schraubendreher-Satz4
4
Wire the circuit and measure
Wire the circuit and measure
Wire the bolometer's active and passive elements as two arms of a Wheatstone bridge, with two resistors and a balancing potentiometer as the others; batteries in the handle feed it through the off-on switch. The bridge feeds a differential preamplifier with a gain potentiometer. Through the trigger switch its output charges a capacitor on the + input of a FET-input op-amp whose input bias current is under 1 pA; match the divider resistors to the op-amp's resistors within 0.1 %. Feed that op-amp's output into a summing amplifier together with an ambient correction from the bead thermistor (a fixed resistor across it, and a potentiometer to set the starting reading), and drive the meter from the sum. To use, switch on and balance the bridge; with the trigger released the mirror faces the cavity and the capacitor stores that reading. Aim at the target and pull the trigger: the meter shows the target minus the stored cavity reading, plus the ambient correction, so detector and preamplifier drift cancel. Not given: the component values.
Materialien für diesen Schritt:
 Leiterplatte1 Stück
 Operationsverstärker-IC3 preamplifier, FET-input store, summing
 Widerstand1 set, incl. 0.1 % matched pairs
 Potentiometer4 Stück
 Kondensatorsortiment1 storage capacitor
 Batterie2 Stück
 Lötdraht1 as needed
Benötigte Werkzeuge:
 Lötkolben
Materialien
17- 1 housing, nose, windowPlatzhalter
- 1 as neededPlatzhalter
- 1 StückPlatzhalter
- 1 StückPlatzhalter
- 1 trigger, finger, pivotPlatzhalter
- 1 bead thermistorPlatzhalter
- 1 StückPlatzhalter
- Platzhalter
- Platzhalter
- 1 StückPlatzhalter
- 1 StückPlatzhalter
- 3 preamplifier, FET-input store, summingPlatzhalter
- 1 set, incl. 0.1 % matched pairsPlatzhalter
- Platzhalter
- 1 storage capacitorPlatzhalter
- 2 StückPlatzhalter
- 1 as neededPlatzhalter
Materialien verbundener Blueprints

Dieser Bauplan stellt her

CC0 Gemeinfrei
Dieser Blueprint ist unter CC0 veröffentlicht. Sie dürfen dieses Werk für jeden Zweck frei kopieren, ändern, verbreiten und verwenden, ohne um Erlaubnis zu fragen.
Unterstützen Sie den Maker, indem Sie Produkte über seinen Blueprint kaufen, wo er eine Maker-Provision von Anbietern festgelegt, verdient. Oder erstellen Sie eine neue Iteration dieses Blueprints und verbinden Sie ihn in Ihrem eigenen Blueprint, um Einnahmen zu teilen.