

Kodachrome
Two professional musicians — Leopold Mannes and Leopold Godowsky Jr., who met in a school orchestra — spent years on colour photography as a side pursuit, were hired by Kodak's research director Kenneth Mees in 1930, and produced the first commercially successful multi-layer colour film.
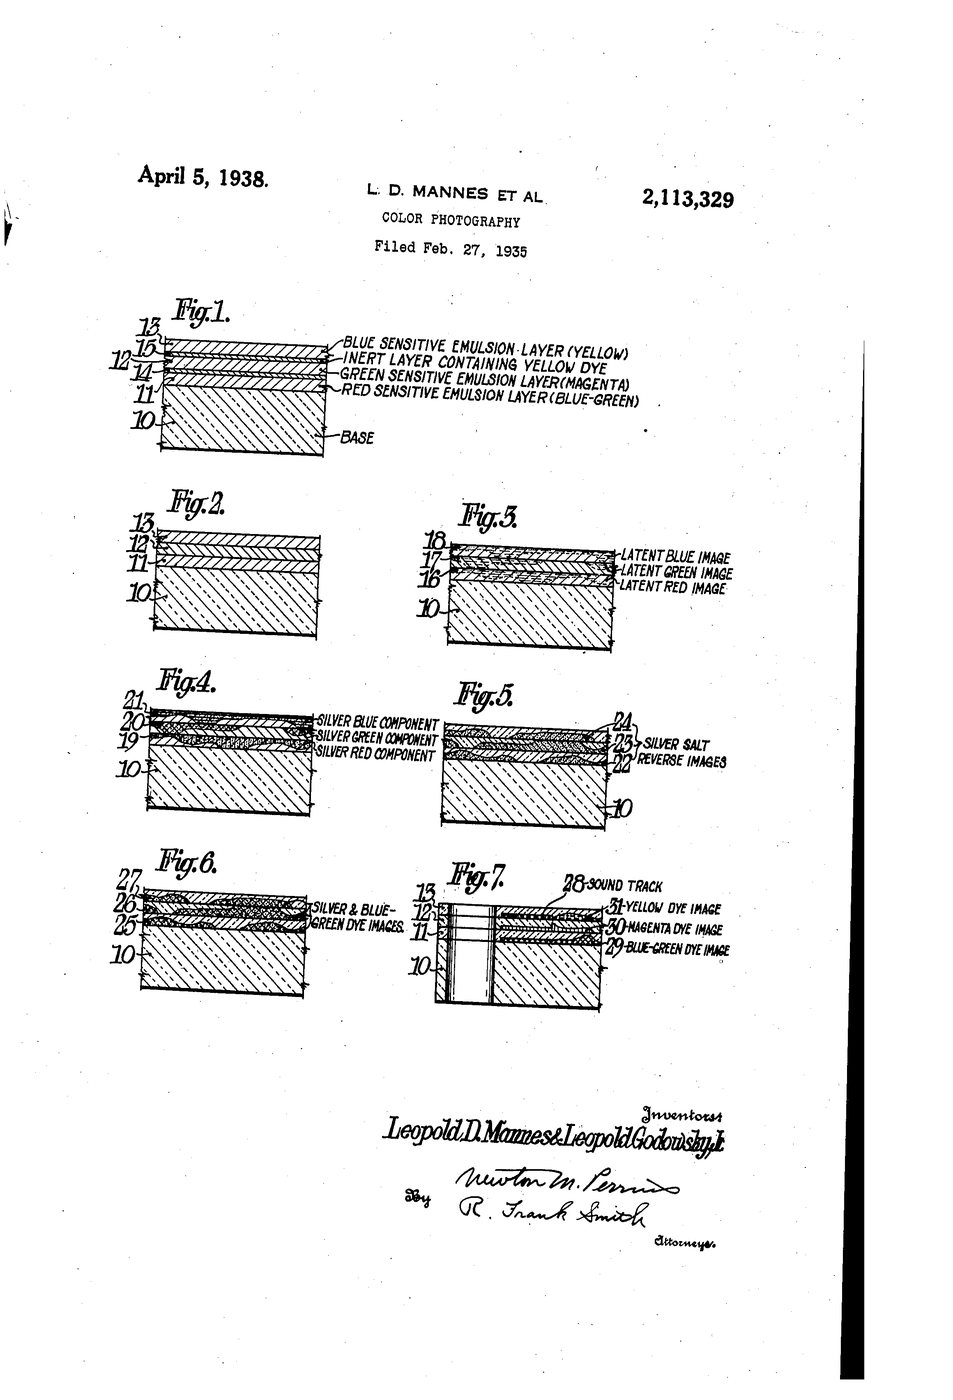
US 2,113,329, “Color photography”, granted 5 April 1938 (filed 27 February 1935, assigned to Eastman Kodak). The film carries three emulsion layers on one transparent base: red-sensitive innermost, green-sensitive in the middle, blue-sensitive outermost, separated by inert gelatin.
The claim that matters is chemical, not optical: the dyes are not in the film. “No coloring matter or color-forming substances is mixed with the emulsion prior to exposure”; each dye is formed in situ, simultaneously with development of that layer's image. This blueprint builds the three-layer subtractive stack and proves why the order of the layers is not arbitrary.
Anweisungen
Get the three colours right first
Get the three colours right first
The dye colours are cyan, magenta and yellow — the subtractive primaries — and each records the opposite additive colour: cyan records red, magenta records green, yellow records blue. Write that pairing down; it is the single thing people get wrong.
Prepare a gelatin stock
Prepare a gelatin stock
Bloom 12 g gelatin in 80 ml cold water for 10 minutes, then warm to about 50 °C until clear.
Materialien für diesen Schritt:
 Gelatinepulver12 g
Benötigte Werkzeuge:
 Digitale Küchenwaage
 Stoppuhr
Split into three portions
Split into three portions
Divide the warm gelatin into three equal portions.
Benötigte Werkzeuge:
 Pipette
Tint the three layers
Tint the three layers
Tint one cyan, one magenta, one yellow with food colouring. Keep them pale — you are stacking three, and density multiplies.
Materialien für diesen Schritt:
 Lebensmittelfarbe6 Tropfen
Benötigte Werkzeuge:
PipetteCast the first layer
Cast the first layer
Pour the cyan layer thinly onto watercolour paper or a flat sheet. Let it gel 10 minutes.
Materialien für diesen Schritt:
 Aquarellpapier1 Blatt
Benötigte Werkzeuge:
StoppuhrCast the inert separator — and note it is not clear
Cast the inert separator — and note it is not clear
Cast a thin gelatin separator over it. The patent's Figure 1 labels this an “inert layer containing yellow dye”, not a clear one: it is a yellow filter that stops blue light reaching the layers below, which would otherwise fog them. Tint this separator faintly yellow and note why.
Materialien für diesen Schritt:
Gelatinepulver2 gLebensmittelfarbe1 TropfenCast the magenta layer
Cast the magenta layer
Add the magenta layer, then another inert separator.
Materialien für diesen Schritt:
Gelatinepulver2 gCast the yellow layer
Cast the yellow layer
Add the yellow layer last, on top. You now have the Kodachrome stack in order.
Dry flat and inspect
Dry flat and inspect
Dry flat, then hold to the light. The stack should read as a dark neutral where all three overlap — subtractive mixing removes, it does not add.
Benötigte Werkzeuge:
 Lupe
LupeProve subtraction with pairs
Prove subtraction with pairs
Cast three small two-layer test patches: cyan+yellow, cyan+magenta, magenta+yellow. Predict each result before you look. Record predictions and outcomes.
Materialien für diesen Schritt:
Gelatinepulver6 gLebensmittelfarbe6 TropfenTest layer order
Test layer order
Make a second stack with the yellow layer at the bottom. Compare against the first under the same light. Kodachrome puts blue-sensitive on top because blue light is absorbed first and never reaches the lower layers otherwise.
Materialien für diesen Schritt:
Gelatinepulver6 gLebensmittelfarbe6 TropfenMeasure how much light gets through
Measure how much light gets through
Photograph a bright window through one, two and three layers at fixed camera settings. Compare brightness. Each layer subtracts.
Benötigte Werkzeuge:
StoppuhrSketch the real processing sequence
Sketch the real processing sequence
The patent's method treats each layer differently, selectively bleaching and redeveloping one stratum without disturbing the others. Draw the three-layer stack and mark which layer is being worked at each stage. Kodachrome development ran to roughly 27 steps.
History & Context
History & Context
US 2,113,329, “Color photography”, Leopold D. Mannes AND Leopold Godowsky Jr., assigned to Eastman Kodak, filed 27 February 1935, granted 5 April 1938. Two inventors — do not credit one.
The date everyone quotes is the wrong one. Kodachrome is universally dated to 1935; that is the filing date and the market launch — the first product, a 16 mm movie film, went on sale 15 April 1935. The patent grant is 1938.
Mannes and Godowsky were working musicians, not staff chemists, when they began. Kenneth Mees, Kodak's research director, hired them in 1930 and gave them a laboratory. Their solution used a controlled-diffusion bleach process and a development procedure of roughly 27 steps — which is why Kodachrome could never be home-processed and had to be returned to a Kodak laboratory.
Why dye-in-development was the breakthrough. Putting dyes or couplers into the emulsion before exposure degrades sensitivity and shelf life. Forming the dye at the moment of development, in place, alongside the silver image, keeps the unexposed film simple and stable. Kodak also filed in Europe, including the German applications DRP 723388 and DRP 631324.
Kodachrome's archival stability was exceptional — properly stored transparencies from the 1940s still hold their colour, outlasting many later films. Processing ended in 2010 when the last laboratory closed, which is the practical death of a film: not when it stops being made, but when nothing can develop it.
Materialien
3- 28 gPlatzhalter
- 19 TropfenPlatzhalter
- 1 BlattPlatzhalter
Materialien verbundener Blueprints

Verwandte Blueprints
Diese Blueprints teilen Wissen — Techniken, Materialien oder Prinzipien


CC0 Gemeinfrei
Dieser Blueprint ist unter CC0 veröffentlicht. Sie dürfen dieses Werk für jeden Zweck frei kopieren, ändern, verbreiten und verwenden, ohne um Erlaubnis zu fragen.
Unterstützen Sie den Maker, indem Sie Produkte über seinen Blueprint kaufen, wo er eine Maker-Provision von Anbietern festgelegt, verdient. Oder erstellen Sie eine neue Iteration dieses Blueprints und verbinden Sie ihn in Ihrem eigenen Blueprint, um Einnahmen zu teilen.