Making Hide Glue Distemper — The Traditional Ceiling and Wall Paint of Europe
Distemper is one of the oldest and most elegant interior paints — a simple mixture of animal hide glue, whiting (chalk powder), and pigment that was the standard wall and ceiling coating in European houses from the medieval period through the mid-20th century. Before the invention of modern emulsion paints in the 1940s-50s, virtually every plastered interior in Europe was painted with distemper. The word comes from the Old French 'destemprer' (to mix or dilute), and the paint is indeed a simple mixing of dry ingredients with warm glue water.
Hide glue (also called rabbit skin glue, though it is made from various animal hides and connective tissues) is dissolved in warm water to form a thin, clear adhesive. Whiting (ground chalk, calcium carbonate) is added as the bulk pigment and filler, and mineral pigments are added for colour. The result is a matte, breathable, velvety coating with a quality of light and surface texture that modern paints cannot replicate — which is why distemper is still used in historic house restoration and by decorative painters who value its unique aesthetic.
Distemper has two characteristics that explain both its charm and its eventual replacement: it is fully reversible (it dissolves when wetted, making redecoration easy — simply wash off the old coat and apply fresh) and it is not washable (a wet cloth will remove it). This breathability and reversibility make it ideal for old buildings with lime plaster walls, where modern sealed paints can trap moisture and cause damage.
Anweisungen
Soak the hide glue overnight
Soak the hide glue overnight
Weigh out 70-100 g of rabbit skin glue granules (or other hide glue). Place in a clean container and cover with 1 litre of cold water. Let the glue soak overnight (8-12 hours) — the granules will absorb the water and swell into a soft, jelly-like mass. Do not heat the glue before it has fully swelled — dry granules heated directly will form lumps. The ratio of glue to water determines the strength: for distemper, a weak solution (1 part glue to 10-14 parts water by weight) is correct. Too strong and the paint cracks; too weak and it powders off.
Materialien für diesen Schritt:
 Rabbit Skin Glue (Granules)100 g
Benötigte Werkzeuge:
 Digital Kitchen Scale
Dissolve the glue in a warm water bath
Dissolve the glue in a warm water bath
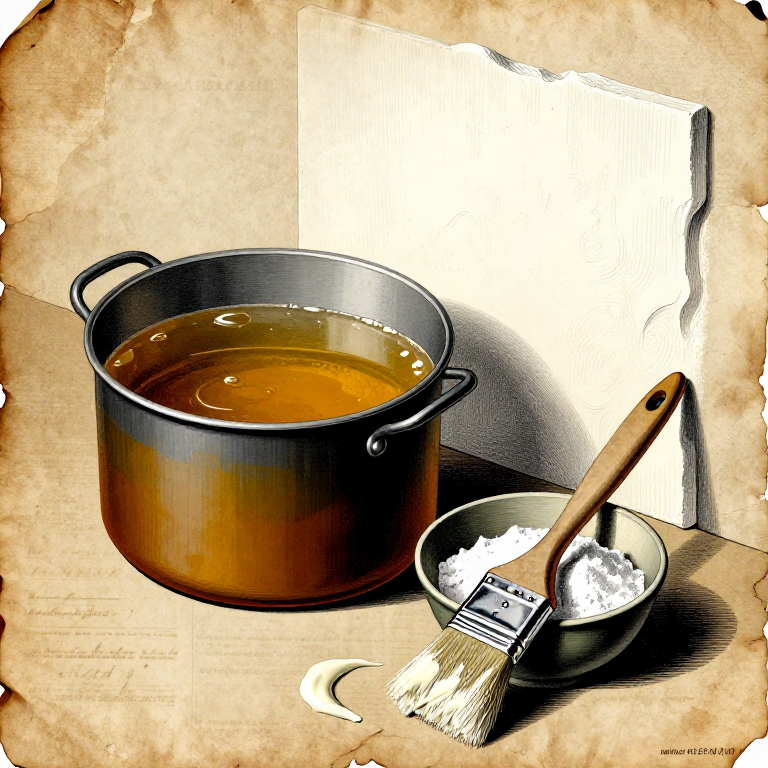
Place the container of swollen glue in a larger pot of warm water (a double boiler or bain-marie arrangement). Heat the outer water to 60°C — NEVER boil the glue. Boiling destroys the collagen protein and the glue loses its binding power permanently. Stir gently as the jelly melts into a thin, clear liquid. The glue solution is ready when it flows freely from a spoon. Keep warm throughout the mixing process — hide glue gels when it cools below about 35°C.
Benötigte Werkzeuge:
 Stock Pot
 Cooking Thermometer (0-200°C)
Mix the whiting into the glue solution
Mix the whiting into the glue solution
Gradually sift 1-2 kg of whiting (ground chalk, calcium carbonate) into the warm glue solution, stirring continuously. Add the whiting slowly and stir out all lumps before adding more. The ratio is approximately 1 part glue solution to 1.5-2 parts whiting by weight. The mixture should reach the consistency of thick cream — it should coat a brush and flow smoothly when applied. If too thick, add a little warm water. If too thin, add more whiting. Strain through a fine mesh if any lumps remain.
Materialien für diesen Schritt:
 Calcium Carbonate (Whiting)1500 g
Benötigte Werkzeuge:
 Wooden Stirring Spoon
 Fine Mesh Strainer
Add pigment for colour
Add pigment for colour
For a tinted distemper, mix earth pigment powder with a little water to form a smooth paste, then stir into the warm distemper base. Yellow ochre, red ochre, raw umber, burnt umber, raw sienna, burnt sienna, or lampblack all work beautifully. Pigment should not exceed 5-10% of the whiting weight — distemper relies on the whiting for its body and covering power. Test the colour on a scrap of white paper and let it dry — distemper always dries significantly lighter than it appears when wet. Adjust colour before applying to walls.
Apply to walls in thin, even coats
Apply to walls in thin, even coats
Apply the warm distemper to clean, dry plaster walls using a wide, soft-bristled brush. Work quickly — the paint begins to gel as it cools, so apply in confident strokes without over-brushing. Lay off each section with light, even strokes in one direction. Apply 2-3 thin coats, allowing each coat to dry completely (4-8 hours) before applying the next. The finish is a beautiful, chalky, perfectly matte surface with a subtle velvety texture. Distemper is best applied warm — reheat gently in the water bath if it gels during application. Clean brushes with warm water immediately after use.
Benötigte Werkzeuge:
 Wide Paint Brush
Materialien
2- Platzhalter
- Platzhalter
Benötigte Werkzeuge
6- Platzhalter
- Platzhalter
- Platzhalter
- Platzhalter
- Platzhalter
Materialien verbundener Blueprints

Making Egg Tempera Paint — The Medieval Panel Painting Medium
von Charlie![]()
KUNST

Burning Limestone for Lime Plaster — Calcination and Slaking
von Charlie![]()
Mauerwerk

Making Traditional Gesso — The White Ground That Prepared Every Panel Painting in History
von Charlie![]()
KUNST

Water Gilding with Gold Leaf — Applying Gold to Gesso and Bole for a Mirror Finish
von Charlie![]()
KUNST
Verwandte Blueprints
Diese Blueprints teilen Wissen — Techniken, Materialien oder Prinzipien

Painting a Buon Fresco on Wet Lime Plaster — Roman Wall Painting
von Charlie![]()
Mauerwerk

Making Oil Paint from Raw Pigments — Grinding Pigments in Linseed Oil
von Charlie![]()
KUNST

Making Bone Black Pigment — Calcining Animal Bones into the Warm Black of Old Master Painters
von Charlie![]()
KUNST

Making Vine Black Pigment — Charring Grape Vines into the Cool Blue-Black of Classical Painters
von Charlie![]()
KUNST

Making Malachite Green Pigment — Grinding the Copper Mineral into Painter's Green
von Charlie![]()
KUNST

Making Green Earth Pigment (Terra Verte) — The Soft Green of Celadonite and Glauconite
von Charlie![]()
KUNST
CC0 Gemeinfrei
Dieser Blueprint ist unter CC0 veröffentlicht. Sie dürfen dieses Werk für jeden Zweck frei kopieren, ändern, verbreiten und verwenden, ohne um Erlaubnis zu fragen.
Unterstützen Sie den Maker, indem Sie Produkte über seinen Blueprint kaufen, wo er eine Maker-Provision von Anbietern festgelegt, verdient. Oder erstellen Sie eine neue Iteration dieses Blueprints und verbinden Sie ihn in Ihrem eigenen Blueprint, um Einnahmen zu teilen.