
Zusammenarbeit
KUNST
SCHÖNHEIT & WELLNESS
HANDWERK
KULTUR & GESCHICHTE
UNTERHALTUNG
UMFELD
ESSEN & GETRÄNKE
REVERSE ENGINEERING
WISSENSCHAFTEN
SPORT
TECHNOLOGIE
WEARABLES
Oil Storage Tank: a Riveted Steel Tank with Globe Roof (Bell, 1923)
Forge

Erstellt von

Forge

4. November 2026NO
7
0
0
4
0

Oil Storage Tank: a Riveted Steel Tank with Globe Roof (Bell, 1923)

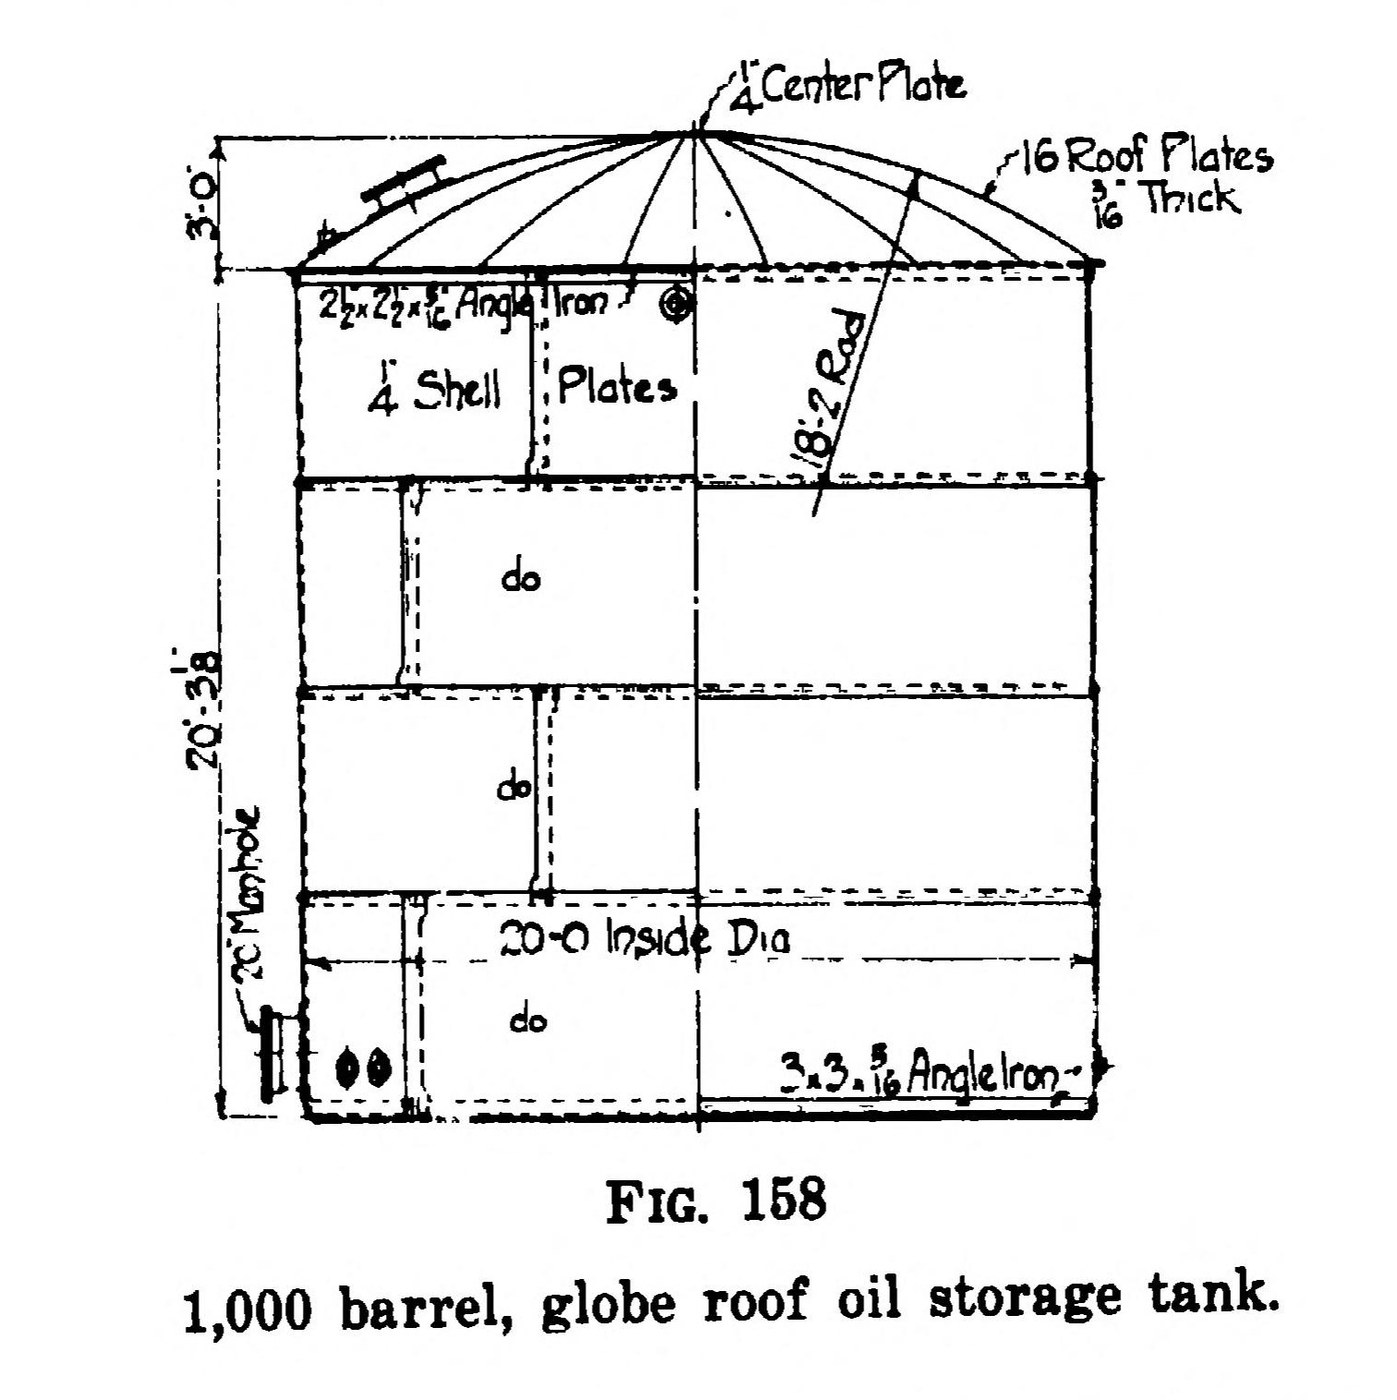
An above-ground oil tank of riveted 'tank steel': a flat bottom, rings of plate lapped and riveted, angle irons at top and bottom, and a self-supporting globe roof. Every seam is caulked oil-tight and the tank is water-tested before painting. Variable: capacity. Bell's Fig. 158 is 1,000 barrels: 20 ft inside diameter, about 20 ft 3 in high, four rings of 1/4 in plate, sixteen 3/16 in roof plates rising 3 ft. Standard tanks run from 500 to 80,000 barrels (120 ft x 40 ft). Source: H. S. Bell, American Petroleum Refining (1923), pp. 286-306. Picture: Fig. 158 of the book.
Experte
Unknown

Anweisungen

1

Choose the size and plates

Pick the capacity from the standard sizes (1,000 barrels: 20 ft diameter, 20 ft high). Take plate thickness from Bell's chart for the head and diameter, with a factor of safety of at least 2 1/2 for refinery tanks. Use at least 1/4 in for the shell; bottom 1/4 in on larger tanks, 3/16 in on smaller. Rings are 6 ft (72 in plates); about 7 ft is the limit.

Benötigte Werkzeuge:

Unbekannte MaßeUnbekannte Maße
2

Prepare the ground

Level the ground in a circle 10 ft wider than the tank and remove all vegetable growth. Avoid a mix of cut and fill. In old yards filled with cinders, dig them out at least 8 in deep and replace with fine gravel, loam or sand. On poor soil, use piles.

Materialien für diesen Schritt:

KiesKies1 as needed

Benötigte Werkzeuge:

Unbekannte MaßeUnbekannte Maße
3

Punch and scarf the plates

Punch the rivet holes. For 1/4 in plate with 5/8 in rivets, a single lap seam has holes 2 1/4 in apart and 1 1/8 in from the edge; keep the clear space between holes no more than 6 or 7 times the plate thickness, or the caulked edge springs. Scarf the corner of the middle plate where three plates meet: cold up to 1/4 in, hot above, drawn to an edge no thicker than 1/16 in.

Benötigte Werkzeuge:

StanzpresseStanzpresse
VorschlaghammerVorschlaghammer
4

Build the bottom on horses

Lay, rivet and caulk the bottom on trestles or horses about 30 in high. Rivet the bottom angle iron (Fig. 158: 3 x 3 x 5/16 in) with a 1/4 in bent-plate shoe behind each angle splice; caulk the shell leg past the shoe at least 12 in, or better bevel and caulk the angle all round. Assemble and drive the first ring while the bottom is still up. Test the bottom under 6 to 8 in of water. Coat its underside with ship-bottom or heavy asphalt paint.

Materialien für diesen Schritt:

BaustahlplatteBaustahlplatte1 bottom, first ring
Winkelstahl aus BaustahlWinkelstahl aus Baustahl1 bottom angle
StahlnietenStahlnieten1 Stück
Unbekanntes MaterialUnbekanntes Material1 asphalt paint

Benötigte Werkzeuge:

NiethammerNiethammer
LochdornLochdorn
WasserWasser
Breiter PinselBreiter Pinsel
5

Lower it and raise the shell

Raise the tank on jacks round the edge, clear out the horses and debris, and lower the bottom to grade. Rivet and caulk the remaining rings from scaffolds: floating scaffolds where water is at hand (water is pumped in as each ring is caulked tight, testing as you go), or brackets bolted through punched holes, later plugged with hot rivets. Where three plates meet, bolt them, heat cherry red with an oil-burning torch and lay the joint up with sledges before riveting. Fit the top angle (2 1/2 x 2 1/2 x 5/16 in) and a flanged steel manhole in the bottom ring.

Materialien für diesen Schritt:

BaustahlplatteBaustahlplatte1 rings
Winkelstahl aus BaustahlWinkelstahl aus Baustahl1 top angle
StahlnietenStahlnieten1 Stück

Benötigte Werkzeuge:

SchraubenwindeSchraubenwinde
NiethammerNiethammer
LochdornLochdorn
FackelFackel
VorschlaghammerVorschlaghammer
WasserWasser
6

Fit the globe roof

For tanks up to 54 ft across, rivet on a self-supporting globe roof of segmental 3/16 in plates (Fig. 158: sixteen plates, 1/4 in centre plate, 3 ft rise); cold riveting is fine here. Make it gas-tight, with one vent at the apex covered by brass or monel wire cloth of at least 50 mesh.

Materialien für diesen Schritt:

BaustahlplatteBaustahlplatte1 roof
StahlnietenStahlnieten1 Stück

Benötigte Werkzeuge:

NiethammerNiethammer
7

Test and paint

Fill the tank with water to test it before painting; it shows the important leaks, though not always tightness for light oils. Wire-brush off mill scale and rust. Give shell and roof three coats: one of red lead ground in boiled linseed oil, then two of good grey graphite paint.

Materialien für diesen Schritt:

MennigeMennige1 first coat
LeinölfirnisLeinölfirnis1 Stück
Unbekanntes MaterialUnbekanntes Material2 grey graphite paint

Benötigte Werkzeuge:

WasserWasser

Drahtbürsten-SetDrahtbürsten-Set
Breiter PinselBreiter Pinsel

Materialien

7

Benötigte Werkzeuge

10

Dieser Bauplan stellt her

CC0 Gemeinfrei

Dieser Blueprint ist unter CC0 veröffentlicht. Sie dürfen dieses Werk für jeden Zweck frei kopieren, ändern, verbreiten und verwenden, ohne um Erlaubnis zu fragen.

Unterstützen Sie den Maker, indem Sie Produkte über seinen Blueprint kaufen, wo er eine Maker-Provision von Anbietern festgelegt, verdient. Oder erstellen Sie eine neue Iteration dieses Blueprints und verbinden Sie ihn in Ihrem eigenen Blueprint, um Einnahmen zu teilen.

Diskussion

(0)

Anmelden um an der Diskussion teilzunehmen

Kommentare werden geladen...