Zusammenarbeit
KUNST
SCHÖNHEIT & WELLNESS
HANDWERK
KULTUR & GESCHICHTE
UNTERHALTUNG
UMFELD
ESSEN & GETRÄNKE
REVERSE ENGINEERING
WISSENSCHAFTEN
SPORT
TECHNOLOGIE
WEARABLES
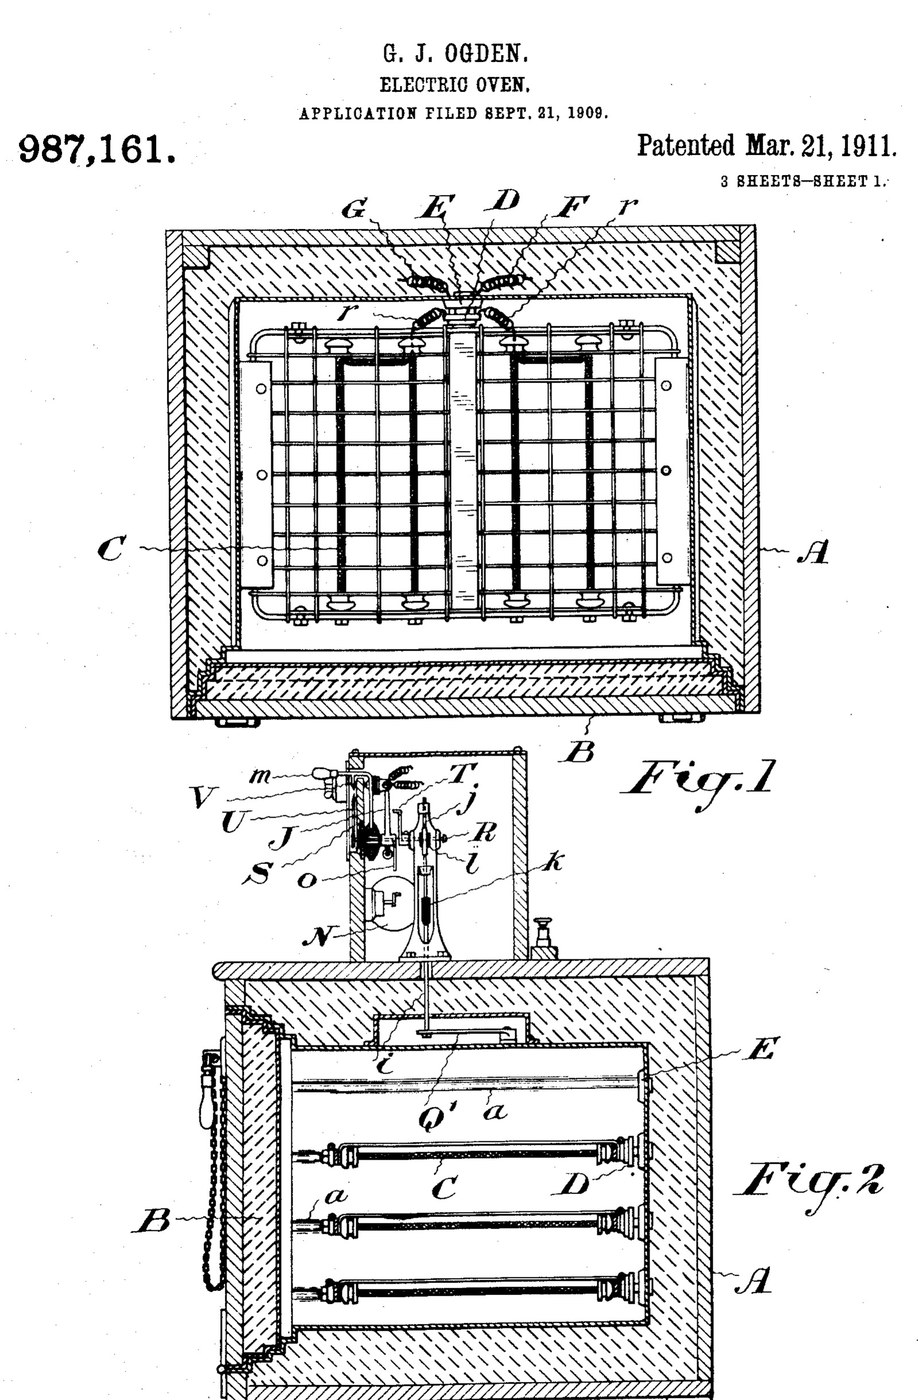


Oven: Insulated Electric Oven with Plug-In Grid Heaters and a Thermostat (Ogden, US 987,161, 1911)
An electric oven built to waste as little heat as possible: a double-walled, packed box with a packed door that seals like a strong-room door. Grid-shaped heating elements slide into grooves in the walls and plug into sockets at the back, and the food rests on them. A thermostat cuts the current when the set temperature is reached and switches it on again as the oven cools.
Result: an oven that bakes, roasts or dries at a set temperature with any number of heating grids.
Source: G. J. Ogden, US 987,161 (1911). Unknown: sizes, metals, packing and temperatures. Picture: the patent drawing.
Erfahren
Unknown
Anweisungen
1
1
Build the insulated casing and door
Build the insulated casing and door
Make the oven chamber as a double-walled casing with packing between the walls, and grooves on the inner side walls to take the heating grids. Fit a door that closes like a fire-proof vault door, also packed, so the casing seals closely. Ours: mild steel sheet. Not given: sizes, the packing.
Materialien für diesen Schritt:
 Baustahlblech1 inner and outer walls, door
 Unbekannter Isolierstoff1 packing
Benötigte Werkzeuge:
 Blechschere
 Standbohrmaschine
 Unbekannte Maße
2
2
Make the plug-in heating grids
Make the plug-in heating grids
Make heating elements in the form of grids that slide into the grooves and on which the food can rest. Fix a porcelain plug to each, carrying spring fingers that push into a socket with matching spring fingers in the back wall. Wire the sockets so all the elements are in parallel; use as many as the temperature and amount of food need. Ours: nichrome wire. Not given: the element type.
Materialien für diesen Schritt:
 Nichromdraht1 heating grids
 Unbekanntes Material1 porcelain plugs and sockets
 Federstahldraht1 spring fingers
 Schaltdraht1 circuit wiring
Benötigte Werkzeuge:
 Lötkolben
3
3
Fit the thermostat control
Fit the thermostat control
Put a thermostat that bends with heat inside the oven, working a contact finger that plays between two contacts a few degrees above and below the set temperature. A switch-changing device, a small rotary motor, throws the main switch off and on as the finger touches one contact or the other. Mount a setting arm with a pointer over a scale marked in degrees, and a second pointer driven by the thermostat. Add a hand switch to turn the current on or off independently, and a lamp with its own switch to light the oven. Ours: a bimetal strip, toggle switches. Not given: temperatures.
Materialien für diesen Schritt:
 Bimetallstreifen1 thermostat
 Elektromotor1 switch-changing motor
 Kippschalter3 main, hand and lamp switches
 Unbekanntes Metall1 contacts, arm, scaleUnbekanntes Material1 incandescent oven lamp
Benötigte Werkzeuge:
Lötkolben Thermometer
Materialien
10- 1 inner and outer walls, doorPlatzhalter
- 1 packingPlatzhalter
- 1 heating gridsPlatzhalter
- 1 incandescent oven lampPlatzhalter
- 1 spring fingersPlatzhalter
- Platzhalter
- 1 thermostatPlatzhalter
- 1 switch-changing motorPlatzhalter
- Platzhalter
- 1 contacts, arm, scalePlatzhalter
Benötigte Werkzeuge
5- Platzhalter
- Platzhalter
- Platzhalter
- 2 vendors sell this, none ship to you yetPlatzhalter
- Platzhalter
Materialien verbundener Blueprints

Dieser Bauplan stellt her

CC0 Gemeinfrei
Dieser Blueprint ist unter CC0 veröffentlicht. Sie dürfen dieses Werk für jeden Zweck frei kopieren, ändern, verbreiten und verwenden, ohne um Erlaubnis zu fragen.
Unterstützen Sie den Maker, indem Sie Produkte über seinen Blueprint kaufen, wo er eine Maker-Provision von Anbietern festgelegt, verdient. Oder erstellen Sie eine neue Iteration dieses Blueprints und verbinden Sie ihn in Ihrem eigenen Blueprint, um Einnahmen zu teilen.