Zusammenarbeit
KUNST
SCHÖNHEIT & WELLNESS
HANDWERK
KULTUR & GESCHICHTE
UNTERHALTUNG
UMFELD
ESSEN & GETRÄNKE
REVERSE ENGINEERING
WISSENSCHAFTEN
SPORT
TECHNOLOGIE
WEARABLES
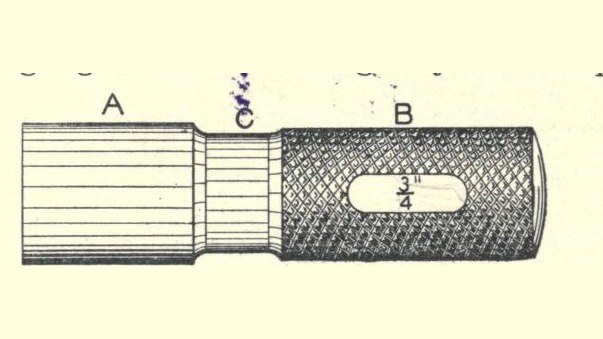


Plug Gauge: Tool Steel Turned, Hardened, Ground and Lapped (Markham, 1908)
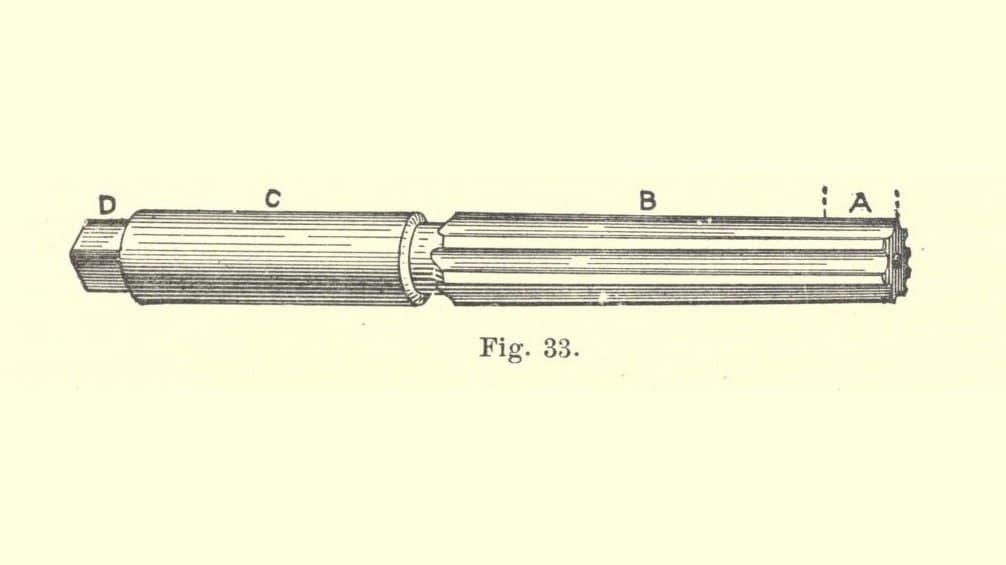
A plug gauge is a hardened, accurately sized pin with a knurled handle, pushed into a hole to check its size. A set has one for each size gauged.
E. R. Markham's Tool Making (1908) shows how to make one of tool steel: turn and stamp it, harden it at as low a heat as will do, grind it with water running on it to just over size, and lap it to size with flour emery and oil in a split cast-iron lap. Tool steel can creep in size after hardening, so for great accuracy he seasons it first.
His figure is a 3/4 in gauge. He does not name the hardening bath. A case-hardened machinery-steel gauge is a separate blueprint.
Source: E. R. Markham, Tool Making (American School of Correspondence, 1908), pp. 178-182. Picture: his Fig. 293.
Erfahren
Two days, plus seasoning if wanted
Anweisungen
1
1
Read Markham
Read Markham
"Plug gauges are used to gauge the size of a hole, while a ring gauge is for measuring a cylindrical piece of work."
2
2
Rough out and anneal
Rough out and anneal
Take tool steel a little larger than the finished gauge (square bar, turned round, is our choice of stock). Remove all the outside skin and block the gauge out close to shape, then anneal it thoroughly.
Materialien für diesen Schritt:
 Werkzeugstahl-Vierkantstab1 bar
Benötigte Werkzeuge:
 Metalldrehmaschine
 Drehmeißel
 Muffelofen
 Schutzbrille
3
3
Turn, knurl and stamp
Turn, knurl and stamp
Rough out the bar, allowing enough to turn off the decarbonised skin. Turn the handle (B in Fig. 293) to size and knurl it, and turn and finish the neck (C). Mill a flat spot in the middle of the handle and stamp on it the size of the gauge and the name or mark of the part it gauges (some shops stamp on C instead). Stamp before finishing any gauging surface, as driving stamps stretches the steel. Then turn the gauging end (A) .010 to .015 in over the finished size to allow for grinding.
Benötigte Werkzeuge:
MetalldrehmaschineDrehmeißel Rändelwerkzeug
 Fräsmaschine
 Stahlschlagbuchstaben und -zahlen
 Hammer
 Mikrometer
4
4
Harden
Harden
Heat the gauge very carefully for hardening: the lower the heat, the finer and more compact the grain, and a fine grain wears better. Quench it; Markham does not name the bath here. For great accuracy, leave the gauging end .0025 to .003 in over size and let it season, laid aside for a few months or a year, before finishing. Where there is no time, many shops draw the temper to a straw colour and let it cool slowly, several times over, brightening the steel each time so the colour shows; this softens the gauge, so it wears out sooner.
Benötigte Werkzeuge:
 Esse
 Unbekanntes MaterialSchutzbrille
5
5
Grind
Grind
Grind on dead centres if you can (a worn lathe spindle copies its own error onto the work), with water running on the work to keep it cool; otherwise heat it as little as possible. Use a coarse wheel free from glaze to within .004 in of size, then a finer wheel to .001 in over. Always measure the gauge cold, since a gauge ground to size while warm will be small when it cools.
Benötigte Werkzeuge:
 RundschleifmaschineMikrometerSchutzbrille
6
6
Lap to size
Lap to size
Make a lap: a piece of cast iron with a hole bored a trifle larger than the gauge, split, and closed by a screw (Fig. 294); for much gauge work, a holder with split ring laps held by a pointed screw (Fig. 295). Lap the gauge to finished size with flour emery mixed with oil. Lapping warms it too much to caliper, so cool it in a dish of water at the temperature of the room where it will be used (about 70 F), not cold water, before each measurement.
Benötigte Werkzeuge:
 Gusseisenstab
 Schmirgelpulver
 Maschinenöl
 Becherglas
 Destilliertes Wasser
 LaborthermometerMikrometer
7
7
History and honest limits
History and honest limits
Markham wrote for shops working on the interchangeable plan, where parts made years apart must still fit, so every piece is checked against gauges. He warns against needless accuracy: a gauge for work that may vary .005 in need not be made to .0001 in.
He does not name the hardening bath or the heat; the 3/4 in size is his Fig. 293, and the heat source is ours.
Materialien
1- Platzhalter
Benötigte Werkzeuge
18- Platzhalter
- Platzhalter
- Platzhalter
- Platzhalter
- Platzhalter
- Platzhalter
- Platzhalter
- Platzhalter
- Platzhalter
- Platzhalter
- Platzhalter
- Platzhalter
- Platzhalter
- Platzhalter
- Platzhalter
- Platzhalter
- Platzhalter
- Platzhalter
Dieser Bauplan stellt her
Verwandte Blueprints
Diese Blueprints teilen Wissen — Techniken, Materialien oder Prinzipien
CC0 Gemeinfrei
Dieser Blueprint ist unter CC0 veröffentlicht. Sie dürfen dieses Werk für jeden Zweck frei kopieren, ändern, verbreiten und verwenden, ohne um Erlaubnis zu fragen.
Unterstützen Sie den Maker, indem Sie Produkte über seinen Blueprint kaufen, wo er eine Maker-Provision von Anbietern festgelegt, verdient. Oder erstellen Sie eine neue Iteration dieses Blueprints und verbinden Sie ihn in Ihrem eigenen Blueprint, um Einnahmen zu teilen.