The Slip-Stitch Heel — Reinforced Double-Thick Knitting for Sock Heels That Last
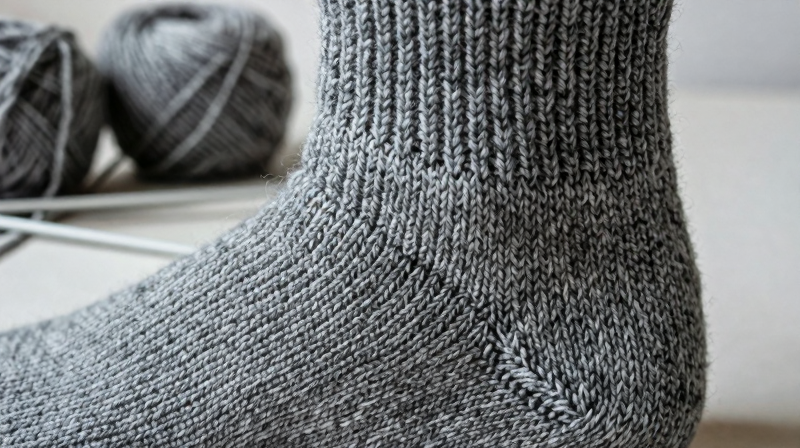
Every hand-knitted sock has a weak point: the heel. The heel cup takes more abrasion than any other part of the sock — it grinds against the inside of the shoe with every step, bears the full weight of the body at heel strike, and stretches over the sharpest curve of the foot. Experienced sock knitters have known for centuries that a standard stockinette heel wears through in weeks of daily use. The solution is the slip-stitch heel, also called the heel stitch or reinforced heel — a technique where every other stitch is slipped instead of knitted, creating a fabric that is effectively double-thick.
The mechanism is simple: on right-side rows, you alternate between knitting one stitch and slipping the next stitch with the yarn held behind. The slipped stitch is not worked — it sits as a float across two rows, carried on the wrong side. This creates a dense, woven-looking fabric where the slipped stitches pack the knit stitches closer together and the carried yarn forms a second layer on the back of the fabric. The result is a heel that is thicker, more cushioned, and dramatically more durable than plain stockinette. Grandmothers who knitted socks for working families knew this technique by heart — it is one of those pieces of practical knowledge passed from hand to hand across generations, rarely written in books but always taught at the kitchen table.
The slip-stitch pattern also creates a distinctive visual texture: a grid of tiny indentations on the right side, sometimes called a waffle or chain pattern. Many knitters find it beautiful enough to use decoratively in scarves and cowls, but its origin is purely functional — it was invented to make heels that survive hard use.
Anweisungen
Set up the heel flap stitches
Set up the heel flap stitches
This technique is worked on a sock that has been knitted in the round to the desired leg length. The heel flap is worked back and forth on half the total stitches — if your sock has 64 stitches in the round, the heel flap uses 32. Place the other 32 stitches (the instep stitches) on hold on two DPNs or a stitch holder. The heel flap stitches remain on one needle. You will now work flat rows (back and forth) on these 32 stitches only.
Materialien für diesen Schritt:
 Wool Yarn Skein (Undyed)1 Stück
 Knitting Needles1 Set
Work the slip-stitch pattern — right side row
Work the slip-stitch pattern — right side row
Row 1 (right side): Slip 1 stitch purlwise with yarn in back, knit 1. Repeat across the entire row — slip 1, knit 1, slip 1, knit 1 — until all 32 stitches are worked. The slipped stitches are NOT knitted — the needle passes through them without wrapping yarn, and they float over two rows. The yarn carried behind the slipped stitch creates the second layer of fabric. Pull the yarn snug after each slipped stitch to keep the fabric dense.
Work the wrong-side row
Work the wrong-side row
Row 2 (wrong side): Slip 1 stitch purlwise with yarn in front, purl across all remaining stitches to the end of the row. Only the first stitch is slipped — the rest are purled normally. The slipped first stitch on each row creates a neat chain selvedge edge that you will later use to pick up stitches for the gusset. This selvedge is not decorative — it is structural, and the number of chain loops along the edge determines how many gusset stitches you pick up.
Repeat for 30-32 rows
Repeat for 30-32 rows
Alternate Row 1 (slip 1, knit 1 across) and Row 2 (slip 1, purl across) for 30-32 rows — or until the heel flap is roughly square. Count the chain selvedge loops along one edge: for a 32-row heel flap, you should have 16 chain loops (one per 2 rows). This number matters: you will pick up one stitch per chain loop when constructing the gusset. A heel flap that is too short will make the sock tight across the instep; too long and it will bag. A square heel flap (as tall as it is wide) fits most feet.
Feel the double thickness
Feel the double thickness
Fold the heel flap in half and pinch it. Compare its thickness to the stockinette leg of the sock. The heel flap is noticeably thicker — roughly 1.5 to 2 times the thickness of plain stockinette. The slipped stitches compress the fabric horizontally while the carried yarn floats add a second layer vertically. This is why the slip-stitch heel outlasts a plain stockinette heel many times over. Some knitters add a strand of reinforcing thread (thin nylon or linen) alongside the wool for even more durability — the thread carries the abrasion while the wool provides cushion and warmth.
Turn the heel with short rows
Turn the heel with short rows
The heel flap is flat — it needs to be shaped into a cup that wraps around the bottom of the heel. This is done with short rows: you knit partway across the row, then turn and work back, gradually adding one more stitch from the edges each time. For a 32-stitch heel: knit 18, SSK (slip slip knit — a left-leaning decrease), knit 1, turn. Slip 1, purl 5, purl 2 together, purl 1, turn. Slip 1, knit to 1 stitch before the gap, SSK across the gap, knit 1, turn. Continue until all edge stitches have been consumed. You now have a cupped heel with roughly 18-20 stitches remaining on the needle.
Pick up the gusset stitches
Pick up the gusset stitches
With the right side of the heel facing you, pick up and knit one stitch through each chain selvedge loop along the side of the heel flap — 16 stitches from 16 chain loops. Knit across the held instep stitches (which have been resting on hold). Pick up 16 stitches along the other side of the heel flap. You now have more stitches than you started with — the extras form a triangular gusset on each side of the foot. Over the next several rounds, decrease the gusset stitches by knitting two together at the end of each gusset section every other round until you are back to the original stitch count.
Continue the foot
Continue the foot
Once the gusset decreases are complete, you are back to knitting a plain tube in the round — the foot of the sock. Knit every round in stockinette until the sock reaches the base of the toes (typically 5 cm shorter than total foot length). The heel is behind you: a reinforced, double-thick cup that will outlast every other part of the sock. The rest of the foot is plain stockinette because the sole of the foot, while weight-bearing, does not take the focused grinding that the heel does inside a shoe.
Apply the slip-stitch technique beyond socks
Apply the slip-stitch technique beyond socks
The slip-stitch reinforcement pattern is not limited to sock heels. Use it anywhere you need durable fabric: the soles of knitted slippers, the palms of mittens, the elbows of sweaters, or the bottom of knitted bags. Some knitters work an entire slipper sole in slip stitch for maximum floor wear. The pattern also creates a fabric with reduced stretch — useful for bag handles, straps, and any element that needs to hold its shape under tension. The slip-stitch technique turns regular knitting yarn into a semi-woven fabric with the durability of a much heavier material.
Understand why this knowledge matters
Understand why this knowledge matters
The slip-stitch heel is a piece of practical engineering passed down through generations of knitters — mostly women, mostly undocumented, mostly learned by watching and doing rather than from printed instructions. Your grandmother did not call it a 'slip-stitch heel pattern' — she just knew that you knit one, slip one across the back of the heel, and the socks lasted. This is exactly the kind of knowledge that disappears when the last person who does it stops teaching it. Industrial sock machines do not use slip-stitch heels — they use terry-loop reinforcement or different yarn blends. The hand-knitted slip-stitch heel is a technique that belongs to the craft tradition, not the factory, and it works better than any machine alternative for a hand-made sock.
Materialien
2- 1 StückPlatzhalter
- 1 SetPlatzhalter
Materialien verbundener Blueprints
You can swap these in
Can't get one of the materials? Swap it for an equivalent — these work just as well.
- Instead of Knitting Needles, try:
 Hand Sewing Needles (Assorted, 30-Pack)
 - Instead of Wool Yarn Skein (Undyed), try:
 Yarn Skein
Verwandte Blueprints
Diese Blueprints teilen Wissen — Techniken, Materialien oder Prinzipien
Related blueprints
Other builds that share materials, tools, or techniques with this one.

CC0 Gemeinfrei
Dieser Blueprint ist unter CC0 veröffentlicht. Sie dürfen dieses Werk für jeden Zweck frei kopieren, ändern, verbreiten und verwenden, ohne um Erlaubnis zu fragen.
Unterstützen Sie den Maker, indem Sie Produkte über seinen Blueprint kaufen, wo er eine Maker-Provision von Anbietern festgelegt, verdient. Oder erstellen Sie eine neue Iteration dieses Blueprints und verbinden Sie ihn in Ihrem eigenen Blueprint, um Einnahmen zu teilen.