Zusammenarbeit
KUNST
SCHÖNHEIT & WELLNESS
HANDWERK
KULTUR & GESCHICHTE
UNTERHALTUNG
UMFELD
ESSEN & GETRÄNKE
REVERSE ENGINEERING
WISSENSCHAFTEN
SPORT
TECHNOLOGIE
WEARABLES
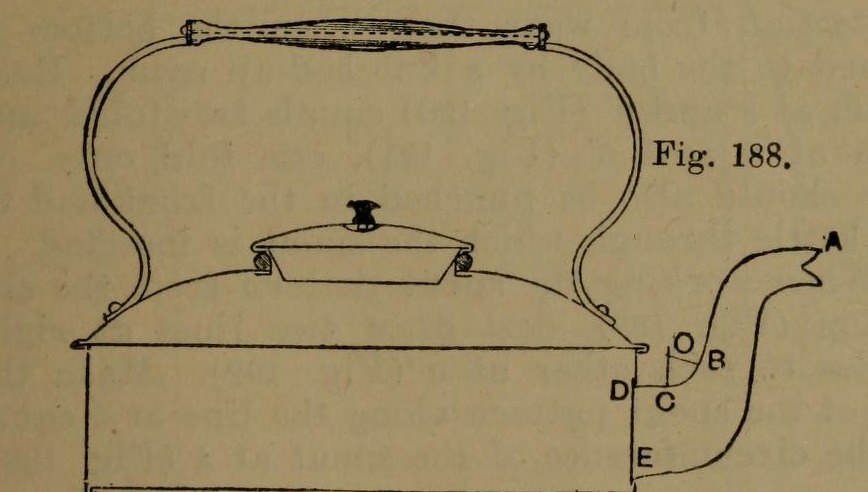


Stovetop Kettle: a Square Copper Kettle (Hasluck, 1907)
A tinsmith's square kettle in sheet copper, 9 x 9 in and 3 5/8 in deep: a box body with folded corner seams, a hollowed top pened on, a brazed and bent spout, a small cover, and a wooden handle on brass uprights.
Hasluck prefers copper; tinplate also works and is a separate route.
Source: Paul N. Hasluck, Tinplate Work (1907), pp. 91-98. Unknown: copper gauge, solder. Picture: Figs. 188-189 of the book.
Erfahren
Unknown
Anweisungen
1
1
Cut the patterns
Cut the patterns
For a body 9 x 9 x 3 5/8 in, cut two ends 9 1/2 x 4 in and two sides 9 1/4 x 4 in, notched for box seams at the corners (Figs. 190-191), with allowances to fold at top and bottom. Punch the spout hole in the front. Cut the bottom 9 1/2 in square, notched for a 1/4 in edge. Set out the top as a 10 1/2 in square with curved allowances for hollowing and a 4 in circle for the cover hole (Fig. 193); set out the spout from the elevation (Fig. 192), the cover and its cone-shaped rim (Figs. 194-195).
Materialien für diesen Schritt:
 Kupferblech1 body, bottom, top, spout, cover
Benötigte Werkzeuge:
 Stechzirkel
 Reißnadel
 Blechschere
2
2
Braze and shape the spout
Braze and shape the spout
Thin the long edges by hammering. Set in the throat with a stretching hammer on a beak iron, bend the spout round until the edges overlap, bind it with wire, lay spelter and borax along the inside of the seam and braze it; then close and braze the under seam. Fill it with lead and bend the neck with a round-faced hammer on the hollowing block; file off spare spelter and smooth it. Run out the lead, throw off a seating round the large end, trim the top with snips and tin the inside.
Materialien für diesen Schritt:
 Unbekanntes Metall1 spelter
 Zinn1 tinning
Benötigte Werkzeuge:
 Planierhammer
 Pflock
 Eisendraht
 Boraxpulver
 Hartlötbrenner
 Blei
 Lochkelle
 Hartholzblock
 MetallfeileBlechschere
3
3
Fold and seam the body
Fold and seam the body
Fold the top edges square, the front and back outwards and the sides likewise; fold the bottom edges right over inwards to take the bottom (Fig. 188). Hook each side's end over the front's and work the corner seam on a straight-edged tool (Figs. 198-199). Turn up the bottom's 1/4 in edge, push it edge-down into the bottom folds, and solder the bottom and seams.
Materialien für diesen Schritt:
 Zinn-Blei-Lot1 Stück
Benötigte Werkzeuge:
 Holzhammer (Klüpfel)Pflock
 Elektrischer Lötkolben
 Flussmittel
4
4
Hollow the top and make the cover
Hollow the top and make the cover
Hollow the top on the block: sink the four sides a little, hollow the corners with a bullet-faced hammer, flatten each side along the block edge, even the shoulder and smooth it all over. Pare the edges, mark the flange with an edging machine, set it down square with a hatchet stake and mallet, and take up an edge to fit over the body. Cut the cover hole with circular snips and fit a narrow wired rim, worked over inside. Make the cover: solder its cone rim to fit the wired rim, throw off a flange, hollow the cover disc and seam it on, and fix the knob.
Materialien für diesen Schritt:
Eisendraht1 rimZinn-Blei-Lot1 StückUnbekanntes Metall1 cover knobBenötigte Werkzeuge:
PlanierhammerHartholzblockPflockHolzhammer (Klüpfel)BlechschereElektrischer LötkolbenFlussmittel5
5
Handle, top and spout
Handle, top and spout
Cut two handle uprights from stout brass or copper band (Fig. 196), drill them for rivets and for the spindle that carries the wooden handle, and bend them to shape. Rivet them to the top and solder over the rivet heads inside. Pene the top down onto the body and solder along each edge. Push the spout through its hole from inside until its large end butts against the front, and solder it strongly from inside.
Materialien für diesen Schritt:
 Messingblech1 handle uprights
 Messingstange1 spindle
 Stiel1 wood
 Kupfernieten1 number not givenZinn-Blei-Lot1 Stück
Benötigte Werkzeuge:
 Handbohrer
 NiethammerHolzhammer (Klüpfel)Elektrischer LötkolbenFlussmittel
Materialien
9- 1 body, bottom, top, spout, coverPlatzhalter
- 1 cover knobPlatzhalter
- 1 tinningPlatzhalter
- 3 StückPlatzhalter
- 1 rimPlatzhalter
- 1 handle uprightsPlatzhalter
- 1 spindlePlatzhalter
- 1 woodPlatzhalter
- 1 number not givenPlatzhalter
Benötigte Werkzeuge
17- Platzhalter
- Platzhalter
- Platzhalter
- Platzhalter
- Platzhalter
- Platzhalter
- Platzhalter
- Platzhalter
- Platzhalter
- Platzhalter
- Platzhalter
- Platzhalter
- Platzhalter
- Platzhalter
- Platzhalter
- Platzhalter
- Platzhalter
Materialien verbundener Blueprints


Dieser Bauplan stellt her

CC0 Gemeinfrei
Dieser Blueprint ist unter CC0 veröffentlicht. Sie dürfen dieses Werk für jeden Zweck frei kopieren, ändern, verbreiten und verwenden, ohne um Erlaubnis zu fragen.
Unterstützen Sie den Maker, indem Sie Produkte über seinen Blueprint kaufen, wo er eine Maker-Provision von Anbietern festgelegt, verdient. Oder erstellen Sie eine neue Iteration dieses Blueprints und verbinden Sie ihn in Ihrem eigenen Blueprint, um Einnahmen zu teilen.