Zusammenarbeit
KUNST
SCHÖNHEIT & WELLNESS
HANDWERK
KULTUR & GESCHICHTE
UNTERHALTUNG
UMFELD
ESSEN & GETRÄNKE
REVERSE ENGINEERING
WISSENSCHAFTEN
SPORT
TECHNOLOGIE
WEARABLES
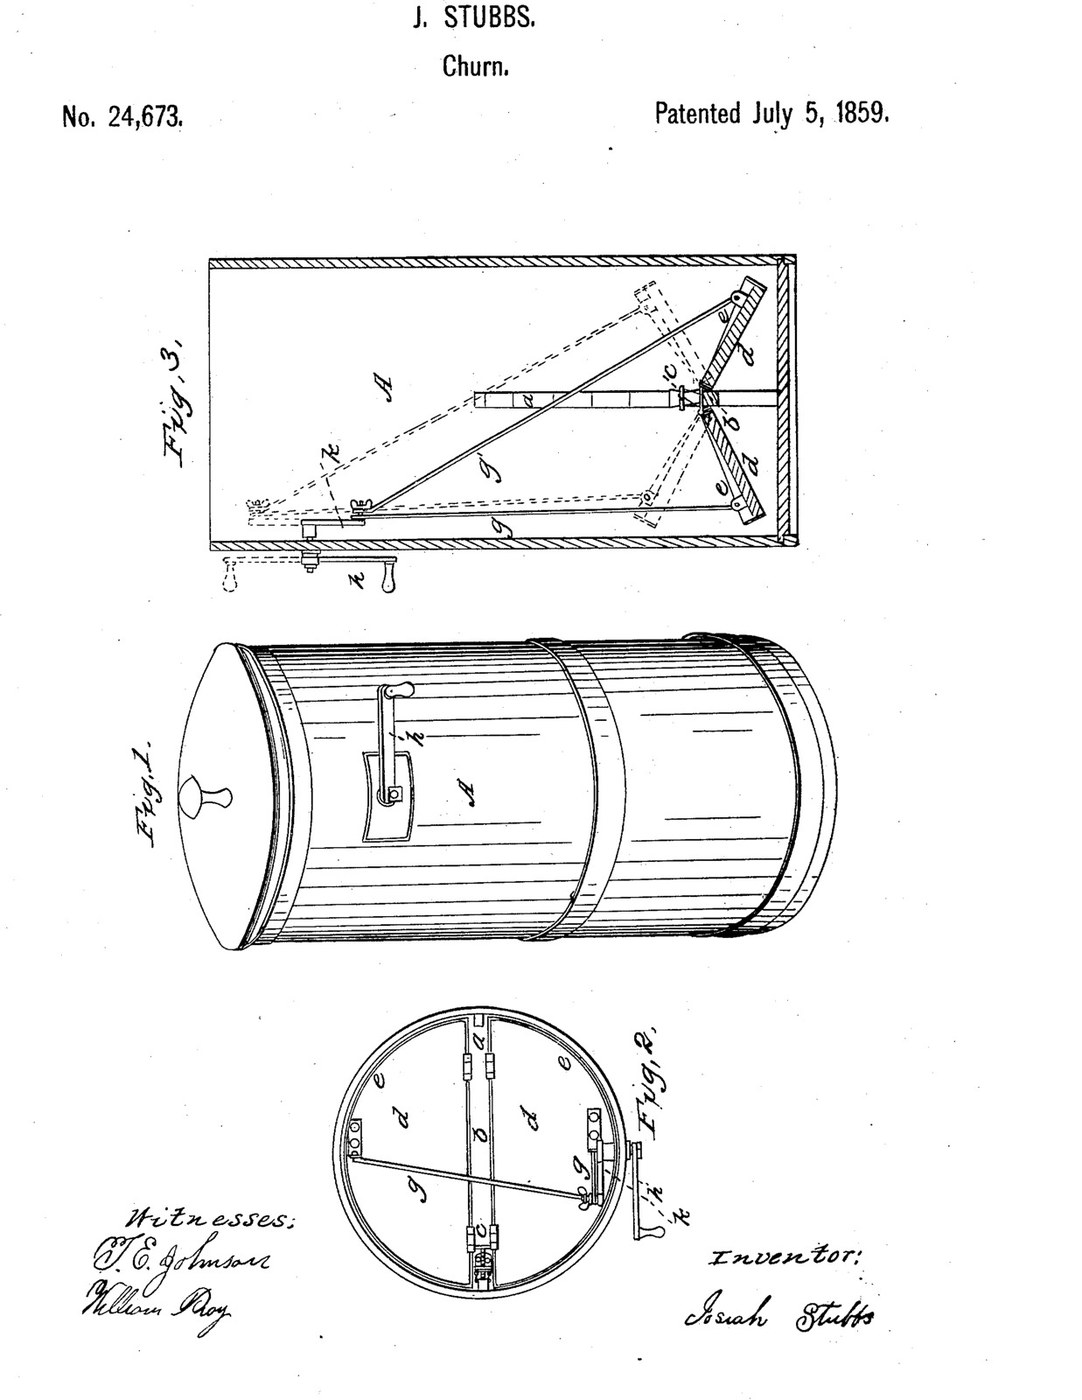


Butterfly-Wing Churn: Two Dashers Hinged to an Adjustable Bar Flap Together From One Crank
Josiah Stubbs of Dublin, Indiana, received US 24,673, dated 5 July 1859, for a churn with two dashers hinged to a central bar like a butterfly's wings. The bar slides on notched stays inside the shell and is set so the cream barely covers it. One crank on the side works both dashers through two rods, one crossing the churn on a slant. Going down, the cream rushes round the dashers' edges against the shell; going up, flanges on the dashers carry cream up and throw it together.
This rung builds it in a 20-litre bucket.
Fortgeschritten
About 6 hours, plus printing
Anweisungen
1
1
Setting the bar for the cream you have
Setting the bar for the cream you have
Jupyter-Notebook wird geladen …
2
2
Hinged, flapping dashers, before it
Hinged, flapping dashers, before it
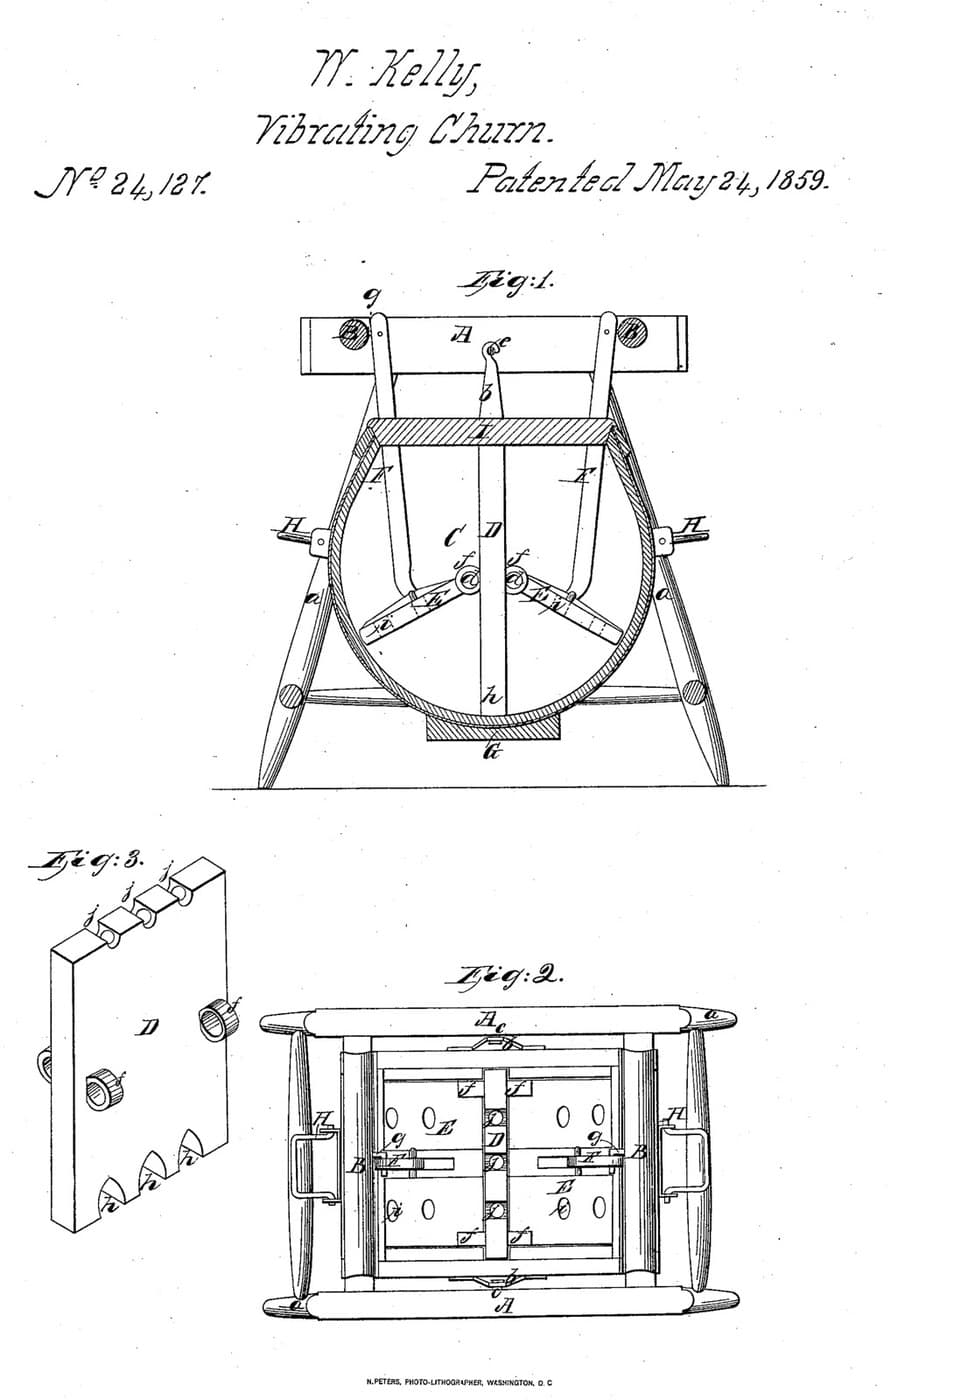
Kelly flapped hinged dashers by swinging the tub. Stubbs keeps the shell still and flaps them from a crank.
3
3
Read US 24,673
Read US 24,673
"As the dashers are drawn upwardly, a portion of the fluid will be retained upon them, by means of the flanges (e) and thrown violently together as the dashers reach their upper extremity of motion".
4
4
Print the flange
Print the flange
A quarter of a dasher's flange e. Print four. PETG, 0.2 mm layers, 40 % infill, 4 walls; wash before first use.
5
5
Stays and bar b
Stays and bar b
Screw two hardwood stays a 24 x 15 mm, 337 mm long, upright inside the bucket on opposite sides, and saw notches a' 6 mm wide and 4 mm deep in their inner faces every 20 mm from 60 to 220 mm up. Cut a hardwood bar b 272 x 20 x 16 mm with a slotted block 44 mm wide at each end to slide on the stays, and fit an M5 set screw c with a wing nut through one block to hold it in a notch.
Materialien für diesen Schritt:
 20-Liter-Eimer1 Stück
 Hartholzbrett1 Stück
 Holzschrauben6 Stück
 Holzleim1 Stück
 Maschinenschrauben1 Stück
 Handflügelmutter1 Stück
 Silikondichtmasse1 Stück
Benötigte Werkzeuge:
 Handsäge
 Stechbeitel
 Akkubohrschrauber
 Bohrersatz
 Schraubendreher-Satz
 Bandmaß (Rollmeter)
6
6
Dashers d d
Dashers d d
Cut two half-discs 244 mm across from 12 mm plywood and trim each to 220 mm along its straight edge. Glue the printed flanges e round their curved edges, standing 15 mm up. Hinge each dasher's straight edge to one side of the bar with two stainless butt hinges, 4 mm clear of the bar. Screw a small hardwood eye block on each dasher 100 mm out from the bar's middle, the right one 30 mm toward the front, the left one 40 mm toward the back.
Materialien für diesen Schritt:
 Sperrholzplatte1 Stück
 PETG-Filament1 StückHolzleim1 Stück
 Scharnier4 StückHolzschrauben16 StückHartholzbrett1 Stück
Benötigte Werkzeuge:
 FDM-3D-Drucker
 StichsägeAkkubohrschrauberBohrersatz
 SchleifpapierSchraubendreher-Satz
7
7
Crank h k and rods g g'
Crank h k and rods g g'
Drill the bucket's wall 13 mm 315 mm up, 30 mm toward the front, and fit a 12 mm stainless shaft through a hardwood bearing block outside, sealed. Fix a hardwood crank arm h 35 mm between centres on the inner end with a 8 mm pin pointing inward, and a crank handle k outside. Bend two 6 mm stainless rods with an eye at each end: g 185 mm between eyes from the pin to the right dasher, g' 262 mm from the pin across the churn on a slant to the left dasher.
Materialien für diesen Schritt:
 Edelstahlstab1 StückHartholzbrett1 Stück
 Hartholzdübel1 StückSilikondichtmasse1 StückMaschinenschrauben2 Stück
 Sicherungsmutter mit Kunststoffeinsatz2 Stück
Benötigte Werkzeuge:
AkkubohrschrauberBohrersatz Schraubstock
 Bügelsäge (Metallsäge)
 Feilen (Handfeile)Schraubendreher-Satz
8
8
The build in 3D
The build in 3D
FreeCAD model of this build, the near side of the bucket cut away: the notched stays, bar b, the two hinged dashers with their flanges, the crank inside the wall and the two rods, one crossing on a slant. It was checked at eight crank angles.
9
9
Churn
Churn
Pour in about 8 litres of heavy cream at about 15 °C, checked with the thermometer, and set the bar in the notch the notebook gives so the cream barely covers it. Put the lid on and turn the crank steadily; time it. When the butter comes, lift the bar and dashers out, pour off the buttermilk, wash the butter in cold water until it runs clear, work in a pinch of salt and weigh it.
Materialien für diesen Schritt:
 Schlagsahne8 l
 Grobes Meersalz1 Stück
 Wasser1 Stück
Benötigte Werkzeuge:
 Einsteck-Fühlerthermometer
 Stoppuhr
 Digitale Küchenwaage
 Große Rührschüssel aus Edelstahl
10
10
Troubleshooting
Troubleshooting
Butterfly-wing churn troubleshooting.
Flow
Loading...
11
11
History and honest limits
History and honest limits
**Josiah Stubbs** of Dublin, Wayne County, Indiana, US 24,673, 5 July 1859, "Churn". He claimed working the butterfly wings with a single crank on one side, the rod g' crossing the cylinder on a slant. He gave no sizes or materials: every size, the notches' spacing and the crank's throw are ours.
Materialien
16- 1 StückPlatzhalter
- 1 StückPlatzhalter
- 22 StückPlatzhalter
- 2 StückPlatzhalter
- 3 StückPlatzhalter
- 1 StückPlatzhalter
- 2 StückPlatzhalter
- 1 StückPlatzhalter
- 1 StückPlatzhalter
- 4 StückPlatzhalter
- 1 StückPlatzhalter
- 1 StückPlatzhalter
- Platzhalter
- 8 lPlatzhalter
- 1 StückPlatzhalter
- 1 StückPlatzhalter
Benötigte Werkzeuge
16- Platzhalter
- Platzhalter
- 1 vendor sell this, none ship to you yetPlatzhalter
- Platzhalter
- Platzhalter
- 1 vendor sell this, none ship to you yetPlatzhalter
- Platzhalter
- 1 vendor sell this, none ship to you yetPlatzhalter
- Platzhalter
- Platzhalter
- Platzhalter
- Platzhalter
- Platzhalter
- Platzhalter
- Platzhalter
- Platzhalter
Designdateien
2Dieser Bauplan stellt her


Verwandte Blueprints
Diese Blueprints teilen Wissen — Techniken, Materialien oder Prinzipien


CC0 Gemeinfrei
Dieser Blueprint ist unter CC0 veröffentlicht. Sie dürfen dieses Werk für jeden Zweck frei kopieren, ändern, verbreiten und verwenden, ohne um Erlaubnis zu fragen.
Unterstützen Sie den Maker, indem Sie Produkte über seinen Blueprint kaufen, wo er eine Maker-Provision von Anbietern festgelegt, verdient. Oder erstellen Sie eine neue Iteration dieses Blueprints und verbinden Sie ihn in Ihrem eigenen Blueprint, um Einnahmen zu teilen.