Zusammenarbeit
KUNST
SCHÖNHEIT & WELLNESS
HANDWERK
KULTUR & GESCHICHTE
UNTERHALTUNG
UMFELD
ESSEN & GETRÄNKE
REVERSE ENGINEERING
WISSENSCHAFTEN
SPORT
TECHNOLOGIE
WEARABLES
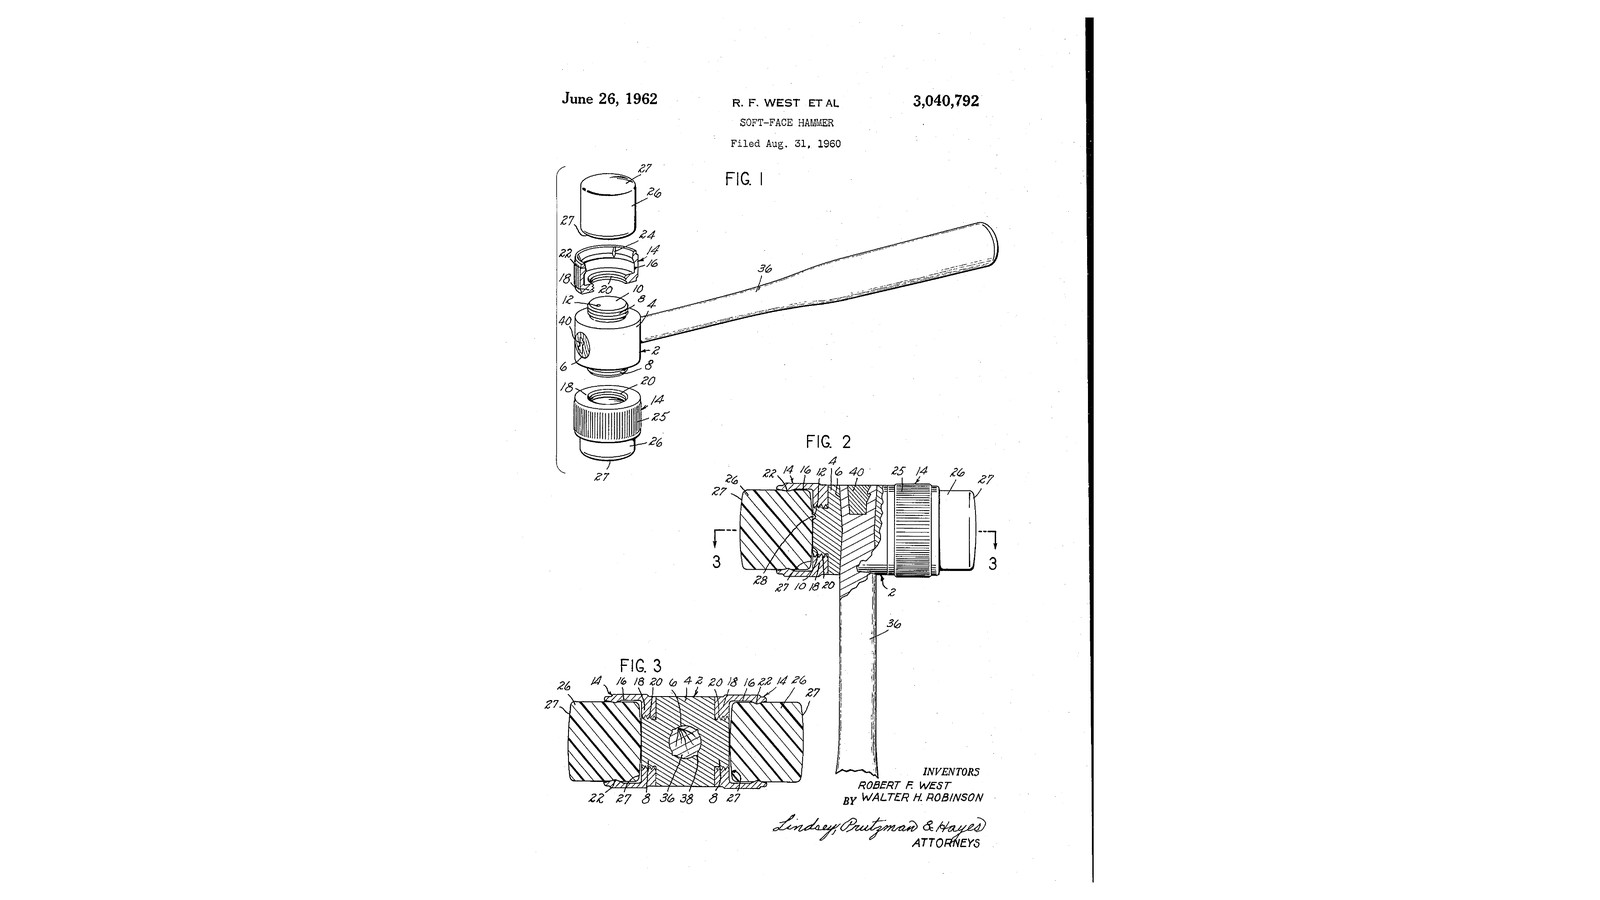


Reversible-Tip Soft-Face Hammer: Domed Rubber Tips Locked in Screw-On Sockets by an Internal Rib (West & Robinson, 1962)
Robert F. West and Walter H. Robinson of Connecticut received US 3,040,792, dated 26 June 1962, for The Stanley Works. A tubular socket screws onto a threaded boss at each end of the hammer's head. A rubber tip, domed at both ends, is pushed into the socket past an internal rib, which bites into it, and its rubber fills short grooves so it cannot turn. The tip can be pulled out and turned round to use its other end. On its first blows the tip's inner face squeezes into an off-centre hole in the boss and forms its own dowel, which stops the socket unscrewing.
The patent gives no sizes; every size here is ours.
Erfahren
About 2 days
Anweisungen
1
1
The tip's proportions
The tip's proportions
Jupyter-Notebook wird geladen …
2
2
Read US 3,040,792
Read US 3,040,792
"Upon being subjected to the percussive forces during initial use, some of the plastic material of the inner face 27 of the striking tip 26 will be extruded or forced into the eccentrically located recess 12 in the boss surface 10 to provide a self-forming dowel pin 28 which effectively prevents inadvertent loosening of the threaded connection between boss and mounting socket during use."
3
3
Turn the head 2
Turn the head 2
From 35 mm steel bar turn a body 4 80 mm long with a boss 8 20 mm across and 15 mm long at each end; cut M20 threads on the bosses with the die. In each boss's end face drill a recess 12 4 mm across and 4 mm deep, 6 mm off centre. Drill a 20 mm handle eye 6 through the middle in a V-block.
Materialien für diesen Schritt:
 Rundstahl aus Baustahl1 Stück
 Schneidöl1 Stück
Benötigte Werkzeuge:
 Metalldrehmaschine
 Dreibackenfutter für die Drehmaschine
 Drehmeißel
 Abstechstahl
 Gewindeschneidsatz
 Schneideisenhalter
 Schraubstock
 Standbohrmaschine
 Prismenblock
 Bohrersatz
 Körner
 Digitaler Messschieber 6 Zoll
 Schutzbrille
4
4
Turn the sockets 14
Turn the sockets 14
From 48 mm bar turn two sockets 30 mm long. Knurl the outside 25. Drill and tap the collar end 18 M20, 8 mm deep. From the other end, before boring, drill four 4 mm holes 20 mm deep centred on a 38 mm circle, for the grooves 24. Bore the aperture 16 38 mm across and 20 mm deep, leaving a rib 22 4 mm wide 10 mm in, turned to 35 mm with 30 degree ramps either side.
Materialien für diesen Schritt:
Rundstahl aus Baustahl2 StückSchneidöl1 StückBenötigte Werkzeuge:
MetalldrehmaschineDreibackenfutter für die DrehmaschineDrehmeißel BohrstangeAbstechstahl
 RändelwerkzeugStandbohrmaschineBohrersatzGewindeschneidsatz
 WindeisenDigitaler Messschieber 6 Zoll
5
5
Make the tips 26
Make the tips 26
For each tip, cut nine discs of 4 mm natural rubber sheet 40 mm across and bond them into a stack with contact cement; clamp it overnight. Grind it round to 38.5 mm on the belt sander, then dome both ends: a large curve over most of the face and a small round where it meets the side, the same at both ends, 36 mm long overall.
Materialien für diesen Schritt:
 Naturkautschukplatte1 Stück
 Kontaktkleber1 Stück
Benötigte Werkzeuge:
 Kompass
 Bastelmesser
 Schraubzwinge mit Schiebebügel
 BandschleiferDigitaler Messschieber 6 Zoll
6
6
Assemble
Assemble
Turn an ash handle to drive into the eye and wedge it. Screw a socket onto each boss hand-tight. Push a tip into each socket, squeezing it past the rib in the vice between soft packing, until its inner dome bears on the boss. Give the first few blows on a wood block: the rubber pushes into the boss's recess and locks the socket. To turn a tip round, pull it out, reverse it and push it back.
Materialien für diesen Schritt:
 Hartholzbrett1 Stück
 Holzleim1 Stück
Benötigte Werkzeuge:
 Holzdrechselbank
 Drechselwerkzeug-Set (HSS)
 Bügelsäge (Metallsäge)
 Schlosserhammer mit KugelfinneSchraubstock
7
7
Troubleshooting
Troubleshooting
Reversible-tip hammer troubleshooting.
Flow
Loading...
8
8
History and honest limits
History and honest limits
**Robert F. West** of Simsbury and **Walter H. Robinson** of West Hartford, Connecticut, assignors to The Stanley Works, US 3,040,792, dated 26 June 1962, filed 31 August 1960. They claimed sockets with an internal portion of reduced cross-section whose surfaces are "inclined to provide ramp surfaces", and symmetrical tips "having end surfaces of convexly curvilinear configuration", removable and "reversible in said sleeves". They list natural rubber, synthetic rubbers, nylon and cellulose esters for the tips; ours are laminated natural rubber. They give proportions but no sizes; every size here is ours.
Materialien
6- 2 StückPlatzhalter
- 2 StückPlatzhalter
- 1 StückPlatzhalter
- 1 StückPlatzhalter
- 1 StückPlatzhalter
- 1 StückPlatzhalter
Benötigte Werkzeuge
24- Platzhalter
- Platzhalter
- Platzhalter
- Platzhalter
- Platzhalter
- Platzhalter
- Platzhalter
- Platzhalter
- Platzhalter
- Platzhalter
- Platzhalter
- Platzhalter
- Platzhalter
- Platzhalter
- Platzhalter
- Platzhalter
- Platzhalter
- Platzhalter
- Platzhalter
- 1 vendor sell this, none ship to you yetPlatzhalter
- Platzhalter
- Platzhalter
- Platzhalter
- Platzhalter
Dieser Bauplan stellt her

Verwandte Blueprints
Diese Blueprints teilen Wissen — Techniken, Materialien oder Prinzipien
CC0 Gemeinfrei
Dieser Blueprint ist unter CC0 veröffentlicht. Sie dürfen dieses Werk für jeden Zweck frei kopieren, ändern, verbreiten und verwenden, ohne um Erlaubnis zu fragen.
Unterstützen Sie den Maker, indem Sie Produkte über seinen Blueprint kaufen, wo er eine Maker-Provision von Anbietern festgelegt, verdient. Oder erstellen Sie eine neue Iteration dieses Blueprints und verbinden Sie ihn in Ihrem eigenen Blueprint, um Einnahmen zu teilen.