Zusammenarbeit
KUNST
SCHÖNHEIT & WELLNESS
HANDWERK
KULTUR & GESCHICHTE
UNTERHALTUNG
UMFELD
ESSEN & GETRÄNKE
REVERSE ENGINEERING
WISSENSCHAFTEN
SPORT
TECHNOLOGIE
WEARABLES
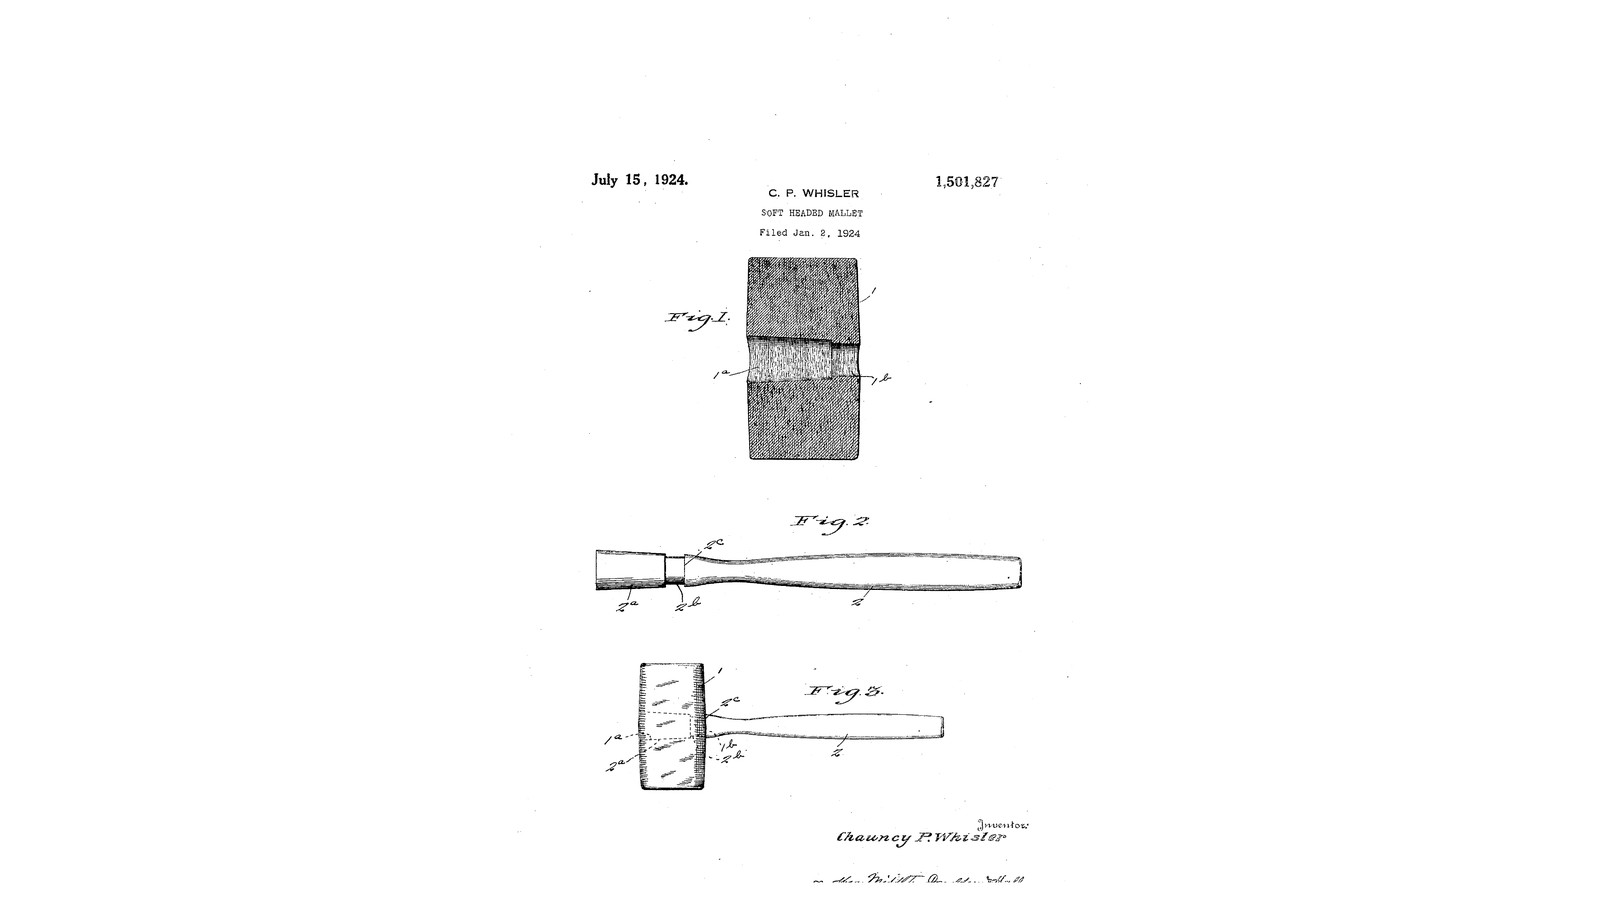


Laminated Rubber Mallet: A Rubber-and-Canvas Head Locked on a Flared Handle by an Internal Rib (Whisler, 1924)
Chauncy P. Whisler of Kenmore, Ohio, received US 1,501,827, dated 15 July 1924, for The Miller Rubber Company of Akron. It solves how to fix a handle in a head that is itself elastic. The rubber-and-fabric head has an eye that flares outwards, with a narrow rib at the handle side. The handle has a matching flared end, a groove for the rib and a shoulder. It is pushed right through the warm head from the outer face until the rib snaps into the groove. The flare stops the head flying off and the rib stops it sliding up the handle.
We build the head from rubber sheet and canvas, ply by ply, as his "stepped conical eye". The sizes are ours.
Anfänger
About 2 days
Anweisungen
1
1
The stepped eye and the stretch at the rib
The stepped eye and the stretch at the rib
Jupyter-Notebook wird geladen …
2
2
Read US 1,501,827
Read US 1,501,827
"When in position, the flared end 1a of the handle absolutely precludes the head from flying off when delivering blows and the rib and groove engagement prevents any inward displacement of the head."
3
3
Print the ply template
Print the ply template
Full-size A4 template: the 110 x 60 mm ply and the hole circle for each of the 17 plies, largest at the outer face. Print at 100 %; its 50 mm bar must measure 50 mm.
4
4
Cut the plies
Cut the plies
Cut 17 plies of 3 mm natural rubber sheet 110 x 60 mm and 14 of cotton canvas the same size. Glue each paper circle from the template in the middle of its ply, numbered 1 to 17, and cut the hole round it with a sharp craft knife, holding the blade upright. Cut the same hole in a canvas ply for each of plies 1 to 14.
Materialien für diesen Schritt:
 Naturkautschukplatte2 Stück
 Baumwollsegeltuch1 Stück
Benötigte Werkzeuge:
 Tintenstrahldrucker
 Leim
 Bastelmesser
 Kombinationswinkel
5
5
Laminate the head
Laminate the head
Brush contact cement on both faces to be joined, let it go touch-dry, and lay up the stack in order, ply 1 at the bottom: rubber, canvas, rubber, ... with the holes lined up over a 24 mm dowel through the middle, and plies 15, 16 and 17 rubber to rubber with no canvas. Press it between boards in clamps overnight. Trim the sides square with the knife and round the edges of the two striking faces slightly.
Materialien für diesen Schritt:
 Kontaktkleber1 Stück
Benötigte Werkzeuge:
 Hartholzdübel
 Schraubzwinge mit SchiebebügelBastelmesserKombinationswinkel
6
6
Turn the handle
Turn the handle
Turn a hardwood handle 330 mm long. At its head end turn the flared part 2a as long as plies 1 to 15 are thick, 32 mm at the end tapering to 24; then the groove 2b, 20 mm across and as long as plies 16 and 17; then the shoulder 2c, 28 mm, to bear on the head's inner face; then the grip, 28 mm tapering to 26 at its end, so it can pass the eye. Check each diameter with the caliper against the plies.
Materialien für diesen Schritt:
 Hartholzbrett1 Stück
Benötigte Werkzeuge:
 Holzdrechselbank
 Drechselwerkzeug-Set (HSS)
 Digitaler Messschieber 6 Zoll
 Schutzbrille
7
7
Fit the head
Fit the head
Warm the head for ten minutes in hot water and dry it. Push the grip end of the handle into the eye from the outer face (ply 1) and force it right through, the rib stretching over the grip and the shoulder, until the flared part seats in the eye and the rib snaps into the groove. Let it cool. Strike a board: the head must not move.
Benötigte Werkzeuge:
 Wasser
8
8
Troubleshooting
Troubleshooting
Rubber mallet troubleshooting.
Flow
Loading...
9
9
History and honest limits
History and honest limits
**Chauncy P. Whisler** of Kenmore, Ohio, assignor to The Miller Rubber Company, US 1,501,827, dated 15 July 1924, filed 2 January 1924. He claimed "a mallet having a head of elastic material provided with an outwardly flaring handle-receiving eye provided with an annular internal rib adjacent the inner face of the head, and a handle having an outwardly flared end engaging said flared eye, and an annular groove engaged by said annular rib", and "a stepped conical eye". His head was moulded of rubber and fibrous material, as in Maranville and Dabney's application; ours is laminated from rubber sheet and canvas with contact cement. He gives no sizes; every size here is ours.
Materialien
4- 2 StückPlatzhalter
- 1 StückPlatzhalter
- 1 StückPlatzhalter
- 1 StückPlatzhalter
Benötigte Werkzeuge
11- Platzhalter
- Platzhalter
- Platzhalter
- Platzhalter
- Platzhalter
- Platzhalter
- Platzhalter
- Platzhalter
- Platzhalter
- Platzhalter
- Platzhalter
Designdateien
1Dieser Bauplan stellt her

Verwandte Blueprints
Diese Blueprints teilen Wissen — Techniken, Materialien oder Prinzipien
CC0 Gemeinfrei
Dieser Blueprint ist unter CC0 veröffentlicht. Sie dürfen dieses Werk für jeden Zweck frei kopieren, ändern, verbreiten und verwenden, ohne um Erlaubnis zu fragen.
Unterstützen Sie den Maker, indem Sie Produkte über seinen Blueprint kaufen, wo er eine Maker-Provision von Anbietern festgelegt, verdient. Oder erstellen Sie eine neue Iteration dieses Blueprints und verbinden Sie ihn in Ihrem eigenen Blueprint, um Einnahmen zu teilen.