Zusammenarbeit
KUNST
SCHÖNHEIT & WELLNESS
HANDWERK
KULTUR & GESCHICHTE
UNTERHALTUNG
UMFELD
ESSEN & GETRÄNKE
REVERSE ENGINEERING
WISSENSCHAFTEN
SPORT
TECHNOLOGIE
WEARABLES
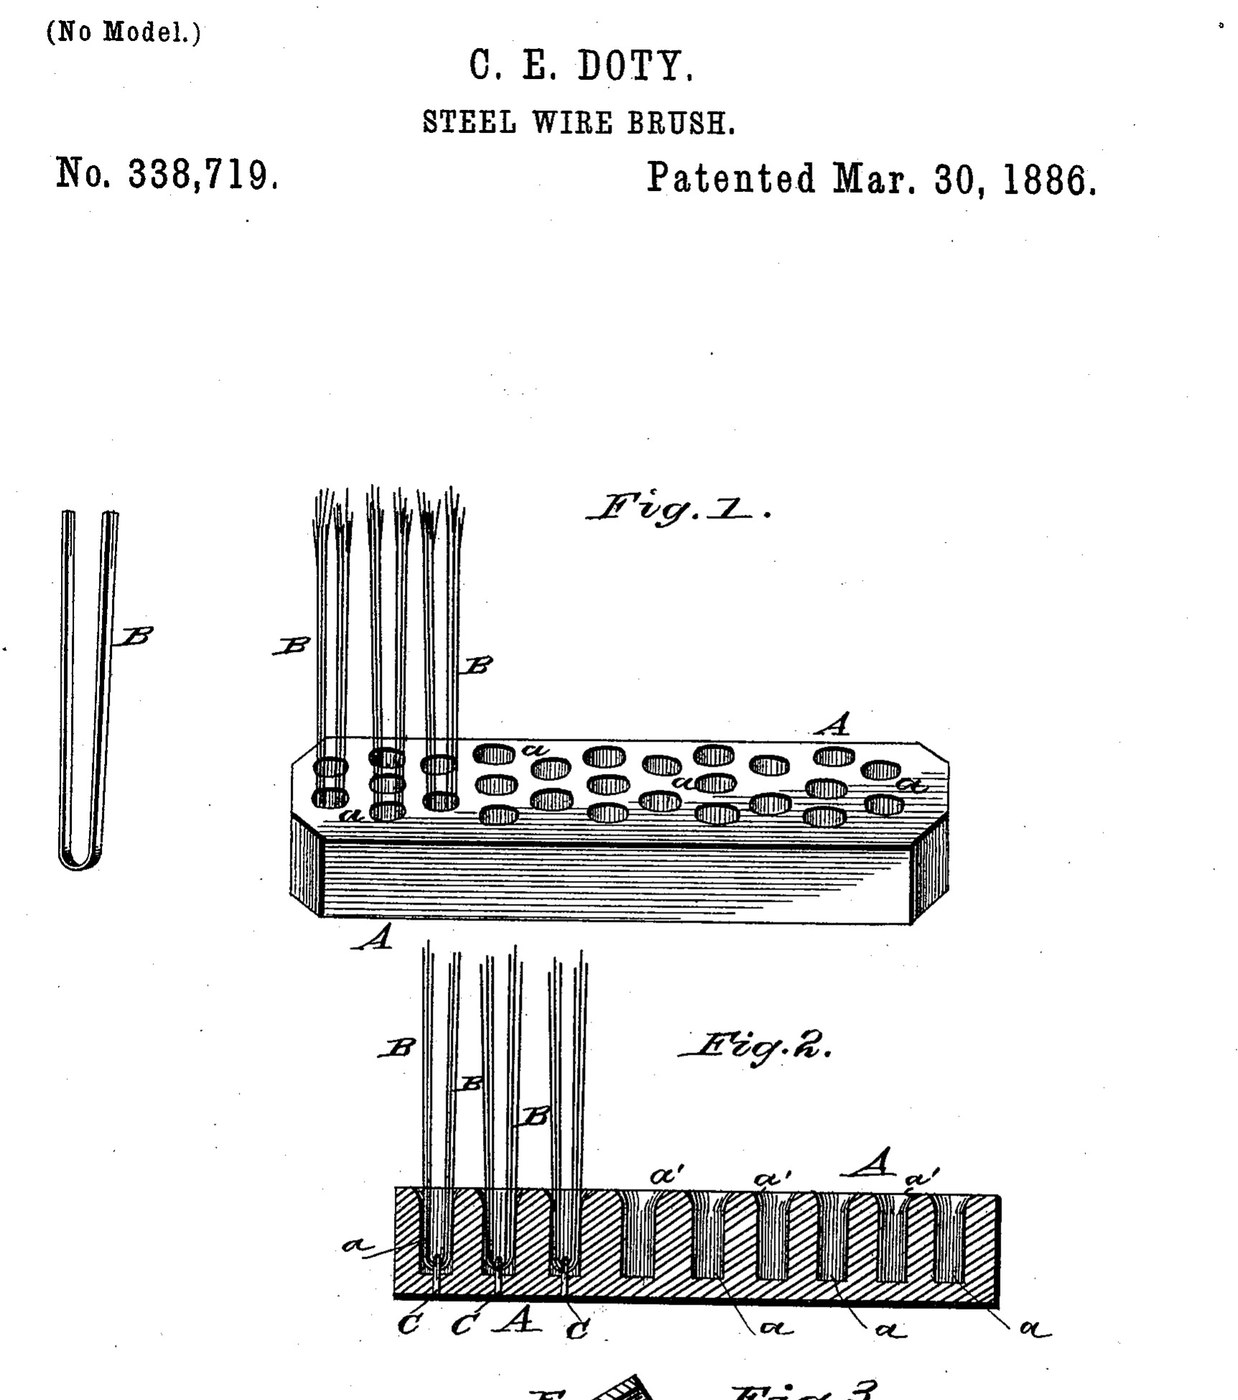


Wire Brush: Flat Steel Wire Tufts Stapled into a One-Piece Back (Doty, US 338,719, 1886)
A heavy steel wire brush whose back stays in one piece: flat steel wires are folded in bunches into blind holes and held by small staples driven right through the back and clinched on the other side. The holes flare at the mouth so the wires bend in a curve rather than snapping at the edge. All the wires lie the same way, so they flex alike and share the work.
Result: a steel wire brush for heavy scrubbing that holds its wires, with a smooth back.
Source: C. E. Doty, US 338,719 (1886). Unknown: the back material, sizes and wire gauge. Picture: the patent drawing.
Anfänger
Unknown
Anweisungen
1
1
Bore the back
Bore the back
Make the back in one piece and bore rows of holes into its face that do not go right through. Shape the mouth of each hole with a rounded, flaring wall so the wires bend in a curve there. Ours: a hardwood block. Not given: the back material, sizes.
Materialien für diesen Schritt:
 Hartholzblock1 brush back
Benötigte Werkzeuge:
 Standbohrmaschine
 Unbekannte Maße
2
2
Flatten the wires
Flatten the wires
Use flat steel wires, so they flex most across their thin side. Cut them to twice the bristle length so each bunch folds in the middle. Ours: spring steel wire flattened on the anvil. Not given: the wire gauge.
Materialien für diesen Schritt:
 Federstahldraht1 bristle wires
Benötigte Werkzeuge:
 Amboss
 Hammer
3
3
Staple in the tufts
Staple in the tufts
Lay the back, holes up, on a hard, smooth metal surface. Lay a bunch of wires across a hole, flat sides horizontal and lying the way the brush will be used. Set a short staple astride the middle of the bunch with its points in the hole. Bring a plunger down into the hole: it drives the folded bunch to the bottom and the staple's points right through the back. The points hit the metal surface and are bent over and clinched smoothly on the back. Tilt the back a little for the outer rows so their wires spread slightly outward.
Materialien für diesen Schritt:
 Unbekanntes Metall1 staples
Benötigte Werkzeuge:
 DornpresseAmboss
Materialien
3- 1 brush backPlatzhalter
- 1 bristle wiresPlatzhalter
- 1 staplesPlatzhalter
Materialien verbundener Blueprints
Dieser Bauplan stellt her

CC0 Gemeinfrei
Dieser Blueprint ist unter CC0 veröffentlicht. Sie dürfen dieses Werk für jeden Zweck frei kopieren, ändern, verbreiten und verwenden, ohne um Erlaubnis zu fragen.
Unterstützen Sie den Maker, indem Sie Produkte über seinen Blueprint kaufen, wo er eine Maker-Provision von Anbietern festgelegt, verdient. Oder erstellen Sie eine neue Iteration dieses Blueprints und verbinden Sie ihn in Ihrem eigenen Blueprint, um Einnahmen zu teilen.