Zusammenarbeit
KUNST
SCHÖNHEIT & WELLNESS
HANDWERK
KULTUR & GESCHICHTE
UNTERHALTUNG
UMFELD
ESSEN & GETRÄNKE
REVERSE ENGINEERING
WISSENSCHAFTEN
SPORT
TECHNOLOGIE
WEARABLES
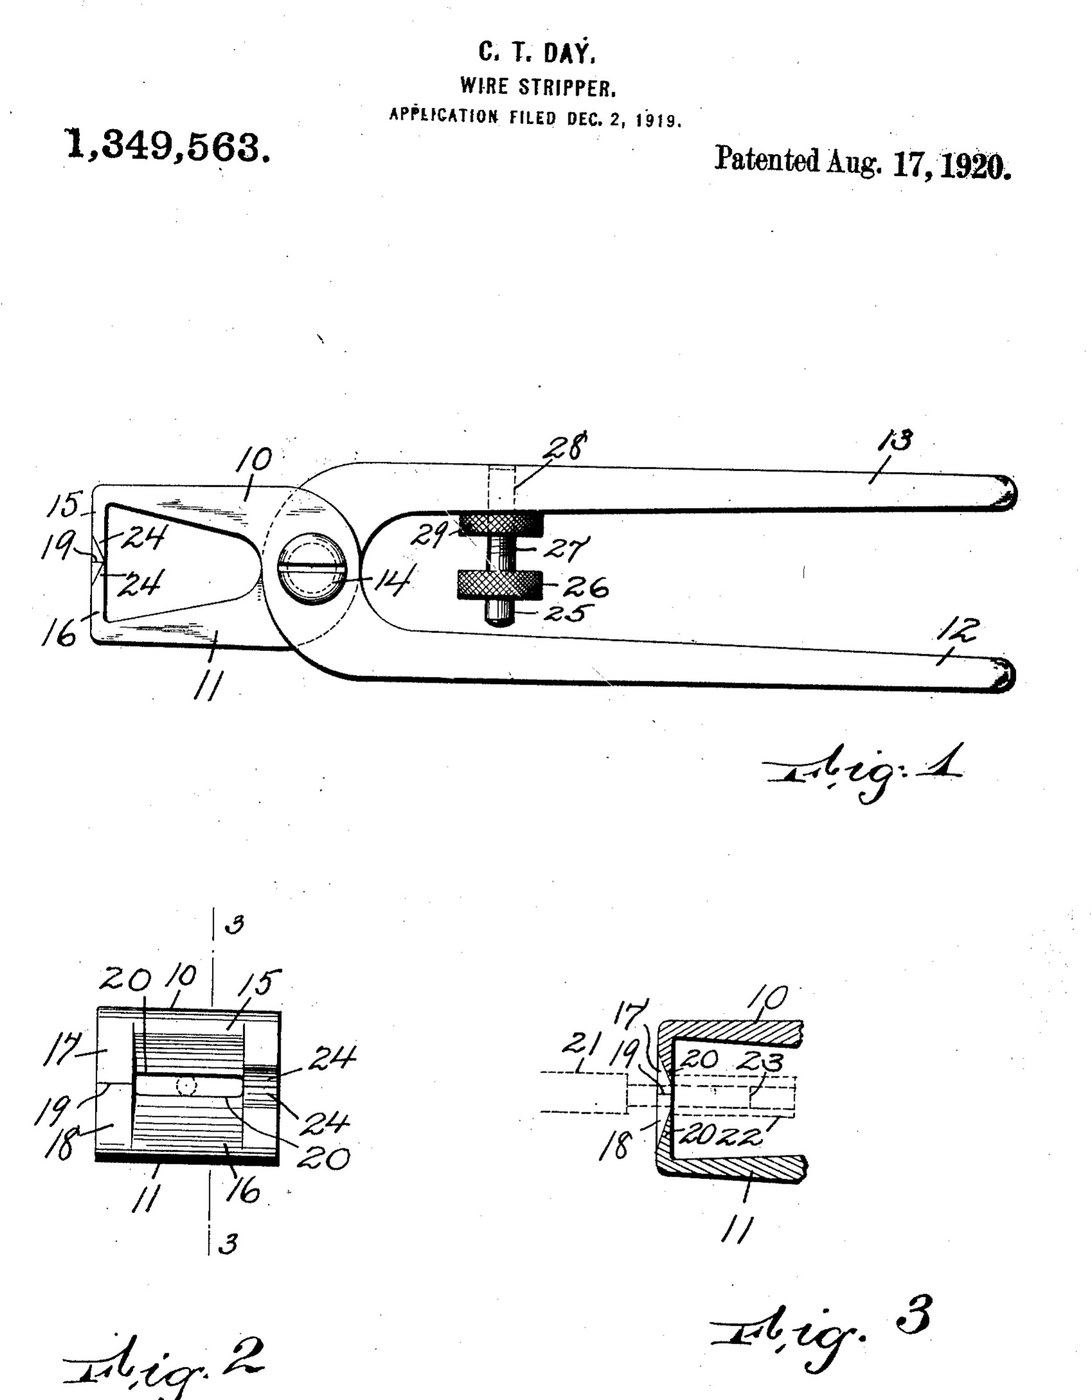


Wire Strippers: Pliers with Straight Parallel Stripping Edges (Day, US 1,349,563, 1920)
Pliers whose jaws stop with their two straight stripping edges exactly one wire-core apart. Grip the wire anywhere along the edges and twist: the insulation is cut through all round, but the copper is never nicked. A screw stop between the handles sets the gap for larger wire, and cutting edges beside the stripping edges cut the wire through.
Result: wire strippers that strip insulation without damaging the conductor.
Source: C. T. Day, US 1,349,563 (1920). Unknown: the metal, sizes and hardening. Picture: the patent drawing.
Fortgeschritten
Unknown
Anweisungen
1
1
Forge the two jaw-handles
Forge the two jaw-handles
Make two pieces like a pair of pliers: each a jaw with a long handle, pivoted together by a bolt. Bend each jaw's end inward. Ours: tool steel forged and filed. Not given: the metal, sizes.
Materialien für diesen Schritt:
 Werkzeugstahl-Flachstab1 jaws and handles
 Unbekanntes Metall1 pivot bolt
Benötigte Werkzeuge:
 Esse
 Amboss
 Hammer
 Standbohrmaschine
 Unbekannte Maße
2
2
Shape the cheek pieces and stripping edges
Shape the cheek pieces and stripping edges
Give each inward jaw end a cheek piece; the cheek faces meet when the jaws close and stop them closing further. Set back from those faces, file two straight, parallel stripping edges, much longer than the gap between them, so that with the jaws shut they stand apart by exactly the diameter of the wire's metal core. On the other side of the stripping edges, opposite the cheeks, file cutting edges that meet, for cutting the wire through.
Benötigte Werkzeuge:
 MetallfeileUnbekannte Maße
3
3
Add the stop, harden, and strip a wire
Add the stop, harden, and strip a wire
For use on a larger wire, drill and tap a hole in one handle and fit a stud with a hand piece and a threaded end. Screwed in, its free end meets the other handle and stops the jaws closing so far. A lock nut holds the setting. Harden the edges. To strip, lay the wire across the jaws anywhere along the stripping edges, close them and turn the pliers right and left with the wrist: the insulation is cut through all round, and a pull slides its end off the core. Not given: how they are hardened.
Materialien für diesen Schritt:
Unbekanntes Metall1 stud and lock nutBenötigte Werkzeuge:
Standbohrmaschine Gewindeschneidsatz
 Wärmebehandlungsofen
 Abschreckbottich
Materialien
2- 1 jaws and handlesPlatzhalter
- 1 stud and lock nutPlatzhalter
Materialien verbundener Blueprints
Dieser Bauplan stellt her

CC0 Gemeinfrei
Dieser Blueprint ist unter CC0 veröffentlicht. Sie dürfen dieses Werk für jeden Zweck frei kopieren, ändern, verbreiten und verwenden, ohne um Erlaubnis zu fragen.
Unterstützen Sie den Maker, indem Sie Produkte über seinen Blueprint kaufen, wo er eine Maker-Provision von Anbietern festgelegt, verdient. Oder erstellen Sie eine neue Iteration dieses Blueprints und verbinden Sie ihn in Ihrem eigenen Blueprint, um Einnahmen zu teilen.