Zusammenarbeit
KUNST
SCHÖNHEIT & WELLNESS
HANDWERK
KULTUR & GESCHICHTE
UNTERHALTUNG
UMFELD
ESSEN & GETRÄNKE
REVERSE ENGINEERING
WISSENSCHAFTEN
SPORT
TECHNOLOGIE
WEARABLES
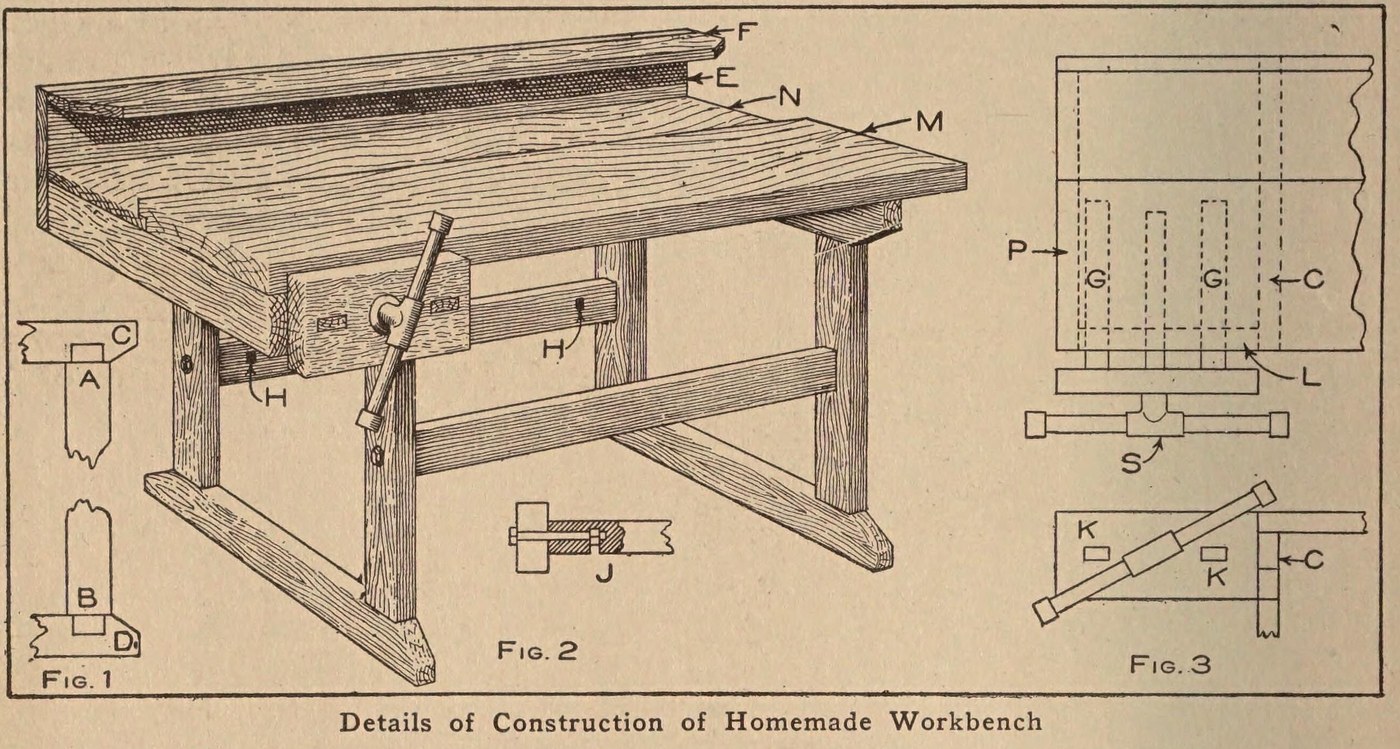


Workbench: a Pine Bench with a Laminated Maple Top and Vise (Boy Mechanic, 1913)
The same pine bench with a harder top: 14 maple strips set on edge, glued and screwed together, with a back board, a tool rack and a wooden vise on an iron bench screw.
Source: C. E. McKinney, Jr., 'Homemade Workbench', The Boy Mechanic, Book 1 (1913), pp. 442-443. Picture: Figs. 1-3 of the book.
Fortgeschritten
Unknown
Anweisungen
1
1
Make the two leg frames
Make the two leg frames
Cut four 2 x 4 in pine legs 23 in long with a tenon on each end 1/2 in thick, 3 1/2 in wide and 1 1/2 in long (Fig. 1, A and B). Cut four crosspieces of the same stock 20 in long, mortised in the narrow edge 1 1/4 in from each end, and slope their corners from the leg out to the middle. Fit each pair of legs to a pair of crosspieces to make the two supports.
Materialien für diesen Schritt:
 Kiefernholz1 2 x 4 in: legs, crosspieces
Benötigte Werkzeuge:
 Handsäge
 Lochbeitel
 Hammer
2
2
Brace them together
Brace them together
Join the supports with two 2 x 4 in braces 24 in long, ends sawn square. Bore through each leg and 4 in into the centre of each brace end, bore an intersecting hole on the back of each brace for the nut, and draw each joint tight with a 3/8 x 6 in bolt (Fig. 2, J). A cross brace on the back stops rocking when planing.
Materialien für diesen Schritt:
Kiefernholz1 2 x 4 in: braces Schlossschraube4 3/8 x 6 in
Benötigte Werkzeuge:
Handsäge Bohrwinde mit Bohrer
 Rollgabelschlüssel
3
3
Build up the maple top
Build up the maple top
Make the main top M of 14 maple strips 7/8 in thick, 2 in wide and 3 1/2 ft long, set on edge, each glued and screwed to the next, all with the grain one way so it planes smooth. Rabbet its back edge 1/2 in to take a back board N of the same length, 8 1/2 in wide and 7/8 in thick. Screw the top to the top crosspieces with long screws.
Materialien für diesen Schritt:
 Unbekanntes Material14 maple strips 7/8 x 2 in x 3 1/2 ft
 Holzleim1 Stück
 Kiefernbrett1 back board
 Holzschrauben1 Stück
Benötigte Werkzeuge:
Handsäge Einhandhobel
 Schlitzschraubendreher
4
4
Add the tool rack
Add the tool rack
Nail a board E 10 in wide to the back of the bench and fasten a 2 1/2 in board F on top of it at right angles; both 7/8 in thick and 3 1/2 ft long. Bore holes or cut notches in F to hold tools.
Materialien für diesen Schritt:
Kiefernbrett2 7/8 in, 3 1/2 ft Nägel1 Stück
Benötigte Werkzeuge:
Bohrwinde mit BohrerHandsägeHammer5
5
Fit the vise
Fit the vise
Fasten an iron bench screw in a 2 x 6 in block 12 in long. Mortise two guide rails 7/8 x 1 1/2 in and 20 in long into the block; they slide in mortises in a 2 x 4 piece L bolted under the top, which holds the bench-screw nut between the two mortises. Nail L to a top crosspiece and to a 2 x 4 piece P bolted under the top at the end (Fig. 3).
Materialien für diesen Schritt:
Kiefernholz1 2 x 6 block, 2 x 4 pieces, guide rails Hobelbankschraube für das Schnitzen1 StückSchlossschraube1 for L and PNägel1 Stück
Benötigte Werkzeuge:
HandsägeLochbeitelBohrwinde mit BohrerRollgabelschlüsselHammerMaterialien
8- 1 2 x 6 block, 2 x 4 pieces, guide railsPlatzhalter
- 1 for L and PPlatzhalter
- 14 maple strips 7/8 x 2 in x 3 1/2 ftPlatzhalter
- 1 StückPlatzhalter
- 2 7/8 in, 3 1/2 ftPlatzhalter
- 1 StückPlatzhalter
- 2 StückPlatzhalter
- Platzhalter
Dieser Bauplan stellt her

CC0 Gemeinfrei
Dieser Blueprint ist unter CC0 veröffentlicht. Sie dürfen dieses Werk für jeden Zweck frei kopieren, ändern, verbreiten und verwenden, ohne um Erlaubnis zu fragen.
Unterstützen Sie den Maker, indem Sie Produkte über seinen Blueprint kaufen, wo er eine Maker-Provision von Anbietern festgelegt, verdient. Oder erstellen Sie eine neue Iteration dieses Blueprints und verbinden Sie ihn in Ihrem eigenen Blueprint, um Einnahmen zu teilen.