
Boone Ironing Board
A flat plank presses a flat thing. The trouble is that almost nothing you wear is flat — a sleeve is a tube, a bodice is a curved shell, and pressing a tube on a plank puts a crease down each side that was never meant to be there.
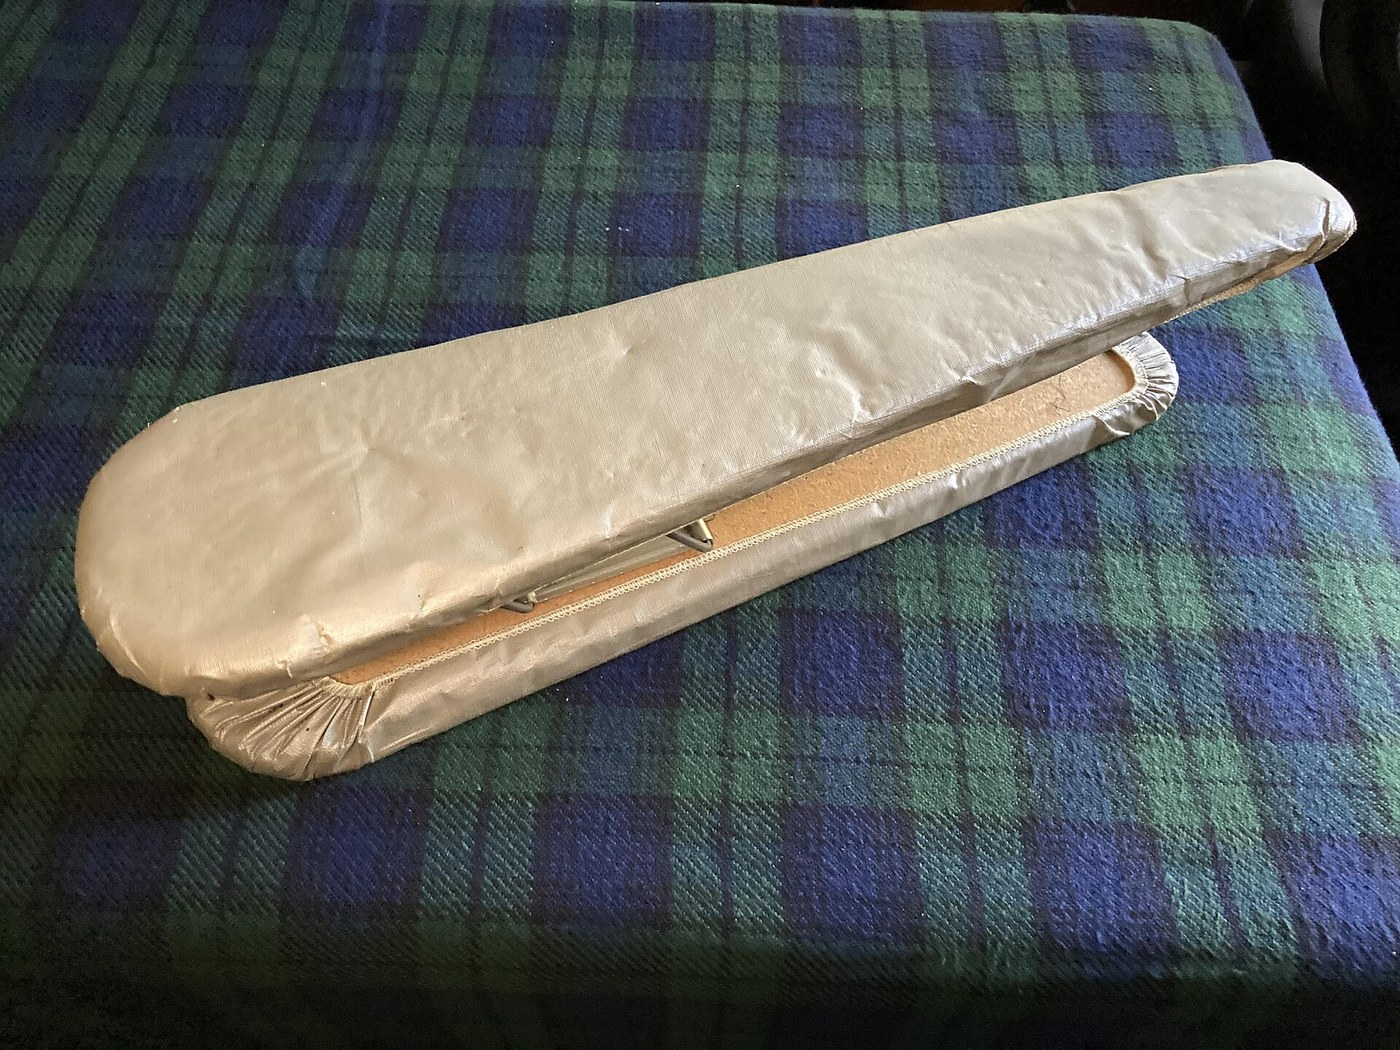
Sarah Boone's board is narrow and curved on purpose. Slip a sleeve over it and the tube is supported from the inside with no folded edges anywhere. You can press the seam, rotate the sleeve, press the next part, and the sleeve comes off round instead of flattened.
US Patent 473,653, granted 26 April 1892 to Sarah Boone of New Haven, Connecticut — one of the first patents issued to a Black woman in the United States. The improvement is small, specific and completely correct, which is what a good patent looks like.
Instructions
A hot iron on a padded board is a fire risk
A hot iron on a padded board is a fire risk
Use cotton or wool padding and a cotton cover. Synthetic wadding melts and can ignite. Never rest a hot iron face down on the board and leave it.
Read US 473,653 and note what is claimed
Read US 473,653 and note what is claimed
Boone claims a board that is narrow, curved, and pointed at both ends, padded and reversible. Each of those four words is doing work.
Measure the sleeves you actually own
Measure the sleeves you actually own
Take the circumference of a shirt cuff and of the upper arm. The board must slide inside the NARROWEST sleeve you want to press — that measurement sets everything.
Tools needed:
 Measuring Ruler
Try pressing a sleeve on a flat board first
Try pressing a sleeve on a flat board first
Press one on the kitchen table and look at the result. Two hard creases where the tube folded — that is the fault you are removing.
Mark out a board tapered to a point at both ends
Mark out a board tapered to a point at both ends
Draw a long narrow shape, widest in the middle, tapering to points. Two points, not one: the board is reversible so a sleeve can go on from either side.
Materials for this step:
 Pine Board1 piece
Cut the outline and true both edges
Cut the outline and true both edges
Saw to the line and plane the edges smooth. Any bump in the edge prints itself into the fabric through the padding.
Tools needed:
 Hand Saw
Round the top face across its width
Round the top face across its width
Plane a gentle convex curve from edge to edge. The curve is what makes the sleeve seam sit proud so the iron reaches it without touching the fabric either side.
Sand every surface and both points
Sand every surface and both points
Work up through the grits until nothing catches a cloth. A splinter at the point will snag the inside of a sleeve you cannot see.
Tools needed:
 Sandpaper (120 Grit)
Pad both faces with wool or cotton
Pad both faces with wool or cotton
Lay padding over the curve and down the sides. Boone's patent specifies padding on both faces because the board is used either way up.
Materials for this step:
 Wool Batting1 piece
Cover it in cotton and lace it underneath
Cover it in cotton and lace it underneath
Stretch a cotton cover over the padding and lace or tack it on the underside. Keep the tension even — a slack cover wrinkles and irons its own creases in.
Materials for this step:
 Linen Fabric1 sqm
Build a stand that supports it near the middle
Build a stand that supports it near the middle
Make a cradle or a pair of legs that hold the board from below without blocking either point. Both ends must stay clear or the sleeve cannot slide on.
Slide a sleeve on and press the seam
Slide a sleeve on and press the seam
Work the sleeve over one point until the seam lies along the crown. Press just the seam, then rotate the sleeve a little and press the next section.
Take the sleeve off and check for edge creases
Take the sleeve off and check for edge creases
There should be none. A crease means the board is too wide for that garment — the narrowness is a specification, not a saving of timber.
Use it on a curved bodice seam
Use it on a curved bodice seam
Press a shaped waist or shoulder seam over the crown. The board supports the curve from inside so the shaping survives the iron instead of being flattened out.
Compendium — a narrow board and a specific problem
Compendium — a narrow board and a specific problem
The patent. US 473,653, "Ironing-Board", granted 26 April 1892 to Sarah Boone of New Haven, Connecticut. Boone was born into slavery in North Carolina around 1832, moved north before the Civil War, and worked as a dressmaker. She is among the earliest Black women to receive a United States patent. The specification states the object plainly: to produce a cheap, simple, convenient device for ironing sleeves and the bodies of ladies' garments, and it names the fault it removes — the impossibility of pressing a curved or tubular piece on a flat surface without creasing it.
Why narrow, curved and pointed. Narrow so it enters a sleeve. Curved across its width so only the seam contacts the iron, leaving the fabric either side unpressed and uncreased. Pointed at both ends so a sleeve can be fed on from either direction and the board reversed — useful when one face is padded for heavier work than the other. Every clause of the claim answers a practical dressmaking failure, which is why the modern sleeve board still has that shape.
What it belongs to. Boone was working during a period when clothing was tightly fitted and heavily seamed, and pressing was a skilled part of garment construction, not just laundry. A dressmaker pressed seams open at every stage of assembly; a bad press showed permanently in the finished garment. The tailor's ham, the seam roll and the sleeve board all come from the same insight — that shaped garments need shaped supports — and Boone's patent is the one that fixed the sleeve case in the record.
An honest note on the record itself. Boone is frequently described as the inventor of the ironing board. She was not, and her patent does not claim that; ironing boards long predate her. What she patented is the improvement that made curved and tubular garments pressable, which is a smaller and much more interesting claim. Overstating it does her no favours — the actual invention is precise, well-argued and still in production.
Materials
3- 1 piecePlaceholder
- 1 piecePlaceholder
- 1 sqmPlaceholder
Tools Required
3- Placeholder
- Placeholder
- Placeholder
This blueprint makes
Related Blueprints
These blueprints share knowledge with this one — techniques, materials, or principles that connect them in the learning graph.

CC0 Public Domain
This blueprint is released under CC0. You are free to copy, modify, distribute, and use this work for any purpose, without asking permission.
Support the Maker by purchasing products through their Blueprint where they earn a Maker Commission set by Vendors, or create a new iteration of this Blueprint and include it as a connection in your own Blueprint to share revenue.