

Galileo Thermoscope
Before about 1600 nobody could say how hot anything was. Hot and cold were qualities you judged by touch, and touch is a liar — a metal rail and a wooden bench at the same temperature feel nothing alike. Galileo's thermoscope is the first instrument that made warmth into a position on a scale you could point at.
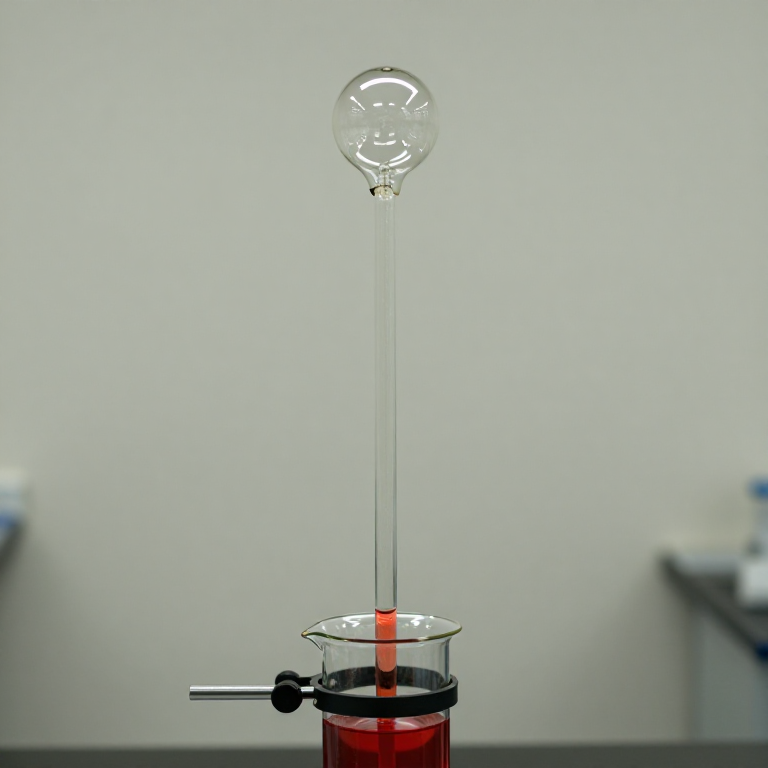
A glass bulb with a long open tube, inverted with its mouth in water. Warm the bulb and the trapped air expands, pushing the water down. Cool it and the air contracts, drawing the water up. The column height tracks the temperature of the bulb.
It is beautifully simple and quietly wrong in an instructive way: an open thermoscope also responds to the weather. Building one shows you exactly why the sealed thermometer had to be invented.
Instructions
Handle hot glass with care
Handle hot glass with care
If you are forming your own bulb, hot glass looks identical to cold glass. Let everything cool on a heatproof surface and never test by touch.
Obtain a bulb with a long narrow tube
Obtain a bulb with a long narrow tube
Use a round-bottomed flask with a long stem, or blow a bulb about 40 mm across on the end of glass tubing 4-6 mm in bore.
Materials for this step:
 Glass Rod Stock1 piece
Keep the bore narrow
Keep the bore narrow
A narrow tube gives a big movement for a small change in air volume. Wide bore, insensitive instrument — this single choice sets the resolution.
Check the tube is clean and dry inside
Check the tube is clean and dry inside
Any grease breaks the water column into beads that stick and jump. Wash with detergent, rinse well and dry completely.
Half-fill a tall vessel with coloured water
Half-fill a tall vessel with coloured water
Add a drop of food colouring so the column is visible against the glass. The vessel must be deep enough that the tube mouth stays submerged throughout.
Warm the bulb in your hands
Warm the bulb in your hands
Cup the bulb until the air inside has clearly expanded. You should see bubbles escape if the tube is already in the water.
Invert it and put the tube mouth under water
Invert it and put the tube mouth under water
With the bulb still warm, lower the open end into the coloured water and clamp it upright, bulb uppermost.
Let it cool and watch the water climb
Let it cool and watch the water climb
As the trapped air cools and contracts, water rises up the tube. Wait until it settles — that is your starting level.
Set the column mid-tube
Set the column mid-tube
Adjust the warming so the water settles roughly halfway. You need headroom in both directions to see rises and falls.
Fix a paper scale beside the tube
Fix a paper scale beside the tube
Tape an evenly divided strip alongside. The divisions are arbitrary — this instrument has no units, which is precisely what makes it a thermoscope.
Tools needed:
 Measuring Ruler
Mark two reference points
Mark two reference points
Note the level in melting ice and in a warm room. Two fixed points is the idea that later turned thermoscopes into thermometers.
Test the response with a warm hand
Test the response with a warm hand
Cup the bulb and watch the column fall within seconds. The instrument is sensitive and fast — far more responsive than most people expect.
Log the level at the same hour for a week
Log the level at the same hour for a week
Record the reading and a real thermometer's reading daily. Plot both. They will not track each other perfectly, and the discrepancy is the interesting part.
Watch it respond to the weather
Watch it respond to the weather
On a day when barometric pressure shifts sharply, the column moves with no temperature change at all. Your thermoscope is also a barometer — and that is its fatal flaw.
Compendium — the instrument that was not yet a thermometer
Compendium — the instrument that was not yet a thermometer
What Galileo made, around 1593. An air thermoscope: a bulb and open tube standing in water, with no sealed volume, no units and no fixed points. It showed that something had changed and roughly in which direction, which was revolutionary in itself — warmth became a quantity rather than a sensation. Galileo did not invent the thermometer, and the pretty sealed glass with floating weighted bulbs sold today as a "Galileo thermometer" is a later device based on buoyancy and density, not on his thermoscope at all. Two different instruments share his name.
Why the open design fails. The water column is held up by the difference between atmospheric pressure outside and the trapped air's pressure inside. That means the reading depends on the atmosphere as well as the temperature, so a passing weather system moves the column just as a warm hand does. There is no way to separate the two effects from a single reading. Santorio Santorio added a scale around 1612 and applied it to medicine; the decisive fix was sealing the liquid inside the tube, which removed atmospheric pressure from the equation entirely and produced the true thermometer.
The physics you can verify. The trapped gas obeys what we now write as the ideal gas law. At roughly constant pressure, volume is proportional to absolute temperature — Charles's law, formalised over a century later. Your bulb is a crude gas thermometer, and gas thermometry remained the most accurate primary standard well into the twentieth century precisely because gases behave so predictably.
Fixed points were the real breakthrough. An instrument that shows change is a thermoscope; one that gives a number that another person can reproduce is a thermometer, and that requires agreed reference points. Fahrenheit's mercury scale of 1714 and Celsius's water-based scale of 1742 supplied them. The distinction is not pedantry — it is the difference between noticing and measuring, and this bulb of air sits exactly on the line between the two.
This blueprint makes
Related Blueprints
These blueprints share knowledge with this one — techniques, materials, or principles that connect them in the learning graph.


CC0 Public Domain
This blueprint is released under CC0. You are free to copy, modify, distribute, and use this work for any purpose, without asking permission.
Support the Maker by purchasing products through their Blueprint where they earn a Maker Commission set by Vendors, or create a new iteration of this Blueprint and include it as a connection in your own Blueprint to share revenue.