ARTE
BELLEZA Y BIENESTAR
ARTESANÍA
CULTURA E HISTORIA
ENTRETENIMIENTO
MEDIO AMBIENTE
COMIDA Y BEBIDAS
INGENIERÍA INVERSA
CIENCIAS
DEPORTES
TECNOLOGÍA
TECNOLOGÍA VESTIBLE


Acrylic Block: Methyl Methacrylate Syrup Cast in Layers between Glass
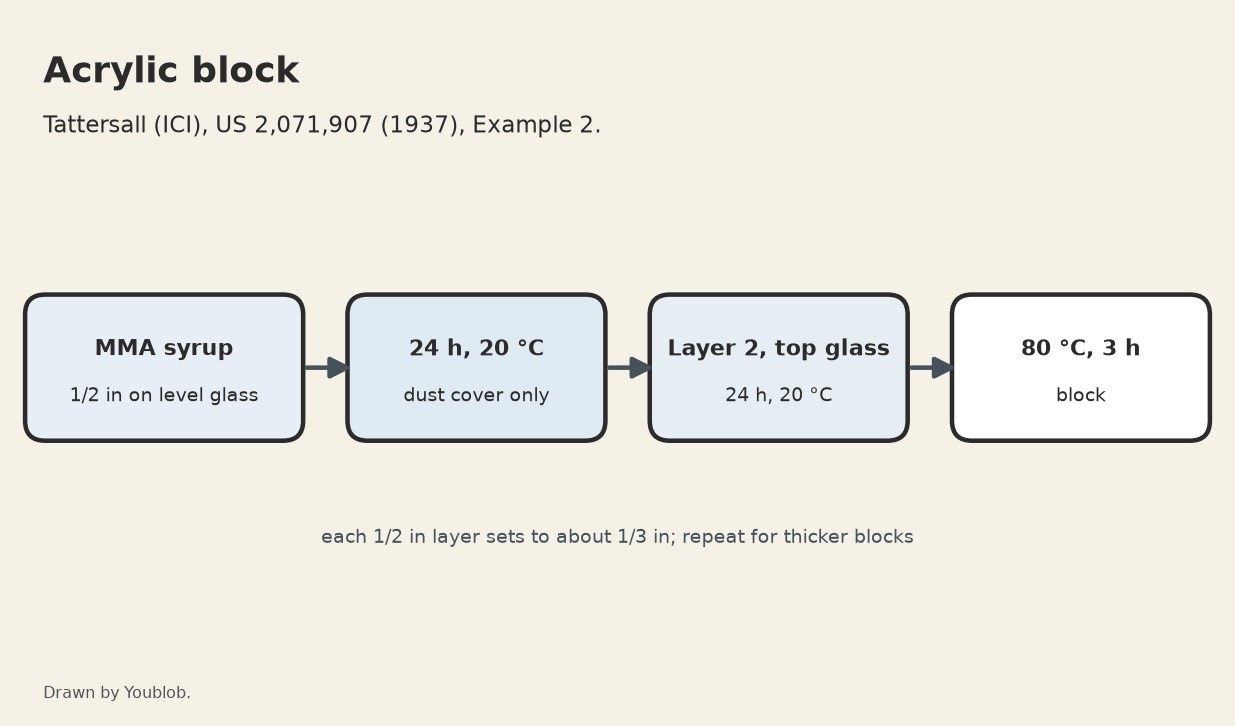
A thick acrylic block cannot be cast flawless in one pour. Tattersall (ICI, US 2,071,907, 1937) built it up in layers: pour 1/2 inch of syrup on a level glass plate, let it set for a day at room temperature, pour the next 1/2 inch on top, cover with a second glass plate, wait another day, then heat the sandwich at 80 °C. Each 1/2 inch layer shrinks to about 1/3 inch. The glass gives both faces a finished polish with no grinding.
The picture: our diagram.
Intermedio
3 days
Instrucciones
1
1
Level the bottom plate
Level the bottom plate
Set a glass plate on a ledge in a wooden frame, on a body of plaster of Paris, and level it carefully. The example sheet was 10 by 18 inches.
Herramientas necesarias:
 Panel de vidrio
 Bastidor de madera
 Escayola
 Nivel de burbuja de 1,5 m
2
2
Pour the first 1/2 inch
Pour the first 1/2 inch
Pour room-temperature syrup 1/2 inch deep (about 1.5 litres for 10 by 18 inches; our figure). Cover against dust, but do not put the top plate on yet. Leave 24 hours at about 20 °C.
Materiales para este paso:
 Jarabe de metacrilato de metilo3 l
Herramientas necesarias:
 Guantes de goma
 Termómetro de laboratorio
3
3
Pour the next layer and cover
Pour the next layer and cover
Pour a second 1/2 inch layer on the first. Lower the top glass plate onto it so it rests on the syrup and keeps pressing on it. Leave another 24 hours at about 20 °C. For a thicker block repeat the layers, a day apart, and put the plate on the last one.
Herramientas necesarias:
Panel de vidrio4
4
Heat at 80 °C
Heat at 80 °C
Take the glass sandwich out of the frame and heat it for three hours at 80 °C to finish the polymerisation.
Herramientas necesarias:
 Horno de secadoTermómetro de laboratorio
 Guantes resistentes al calor
5
5
Spring off the glass
Spring off the glass
Spring the glass plates off the block with a knife blade. Both faces come out smooth and polished.
Herramientas necesarias:
 Cúter de precisiónGuantes de goma
Materiales
1- Marcador de posición
Herramientas requeridas
9- Marcador de posición
- Marcador de posición
- Marcador de posición
- Marcador de posición
- Marcador de posición
- Marcador de posición
- Marcador de posición
- Marcador de posición
- Marcador de posición
Este plano hace
Blueprints relacionados
Estos blueprints comparten conocimiento — técnicas, materiales o principios

CC0 Dominio público
Este Blueprint se publica bajo CC0. Eres libre de copiar, modificar, distribuir y usar este trabajo para cualquier propósito, sin pedir permiso.
Apoya al Maker comprando productos a través de su Blueprint, donde gana una Comisión del Maker establecida por los vendedores, o crea una nueva iteración de este Blueprint e inclúyela como conexión en tu propio Blueprint para compartir ingresos.