Colaboración
ARTE
BELLEZA Y BIENESTAR
ARTESANÍA
CULTURA E HISTORIA
ENTRETENIMIENTO
MEDIO AMBIENTE
COMIDA Y BEBIDAS
INGENIERÍA INVERSA
CIENCIAS
DEPORTES
TECNOLOGÍA
TECNOLOGÍA VESTIBLE
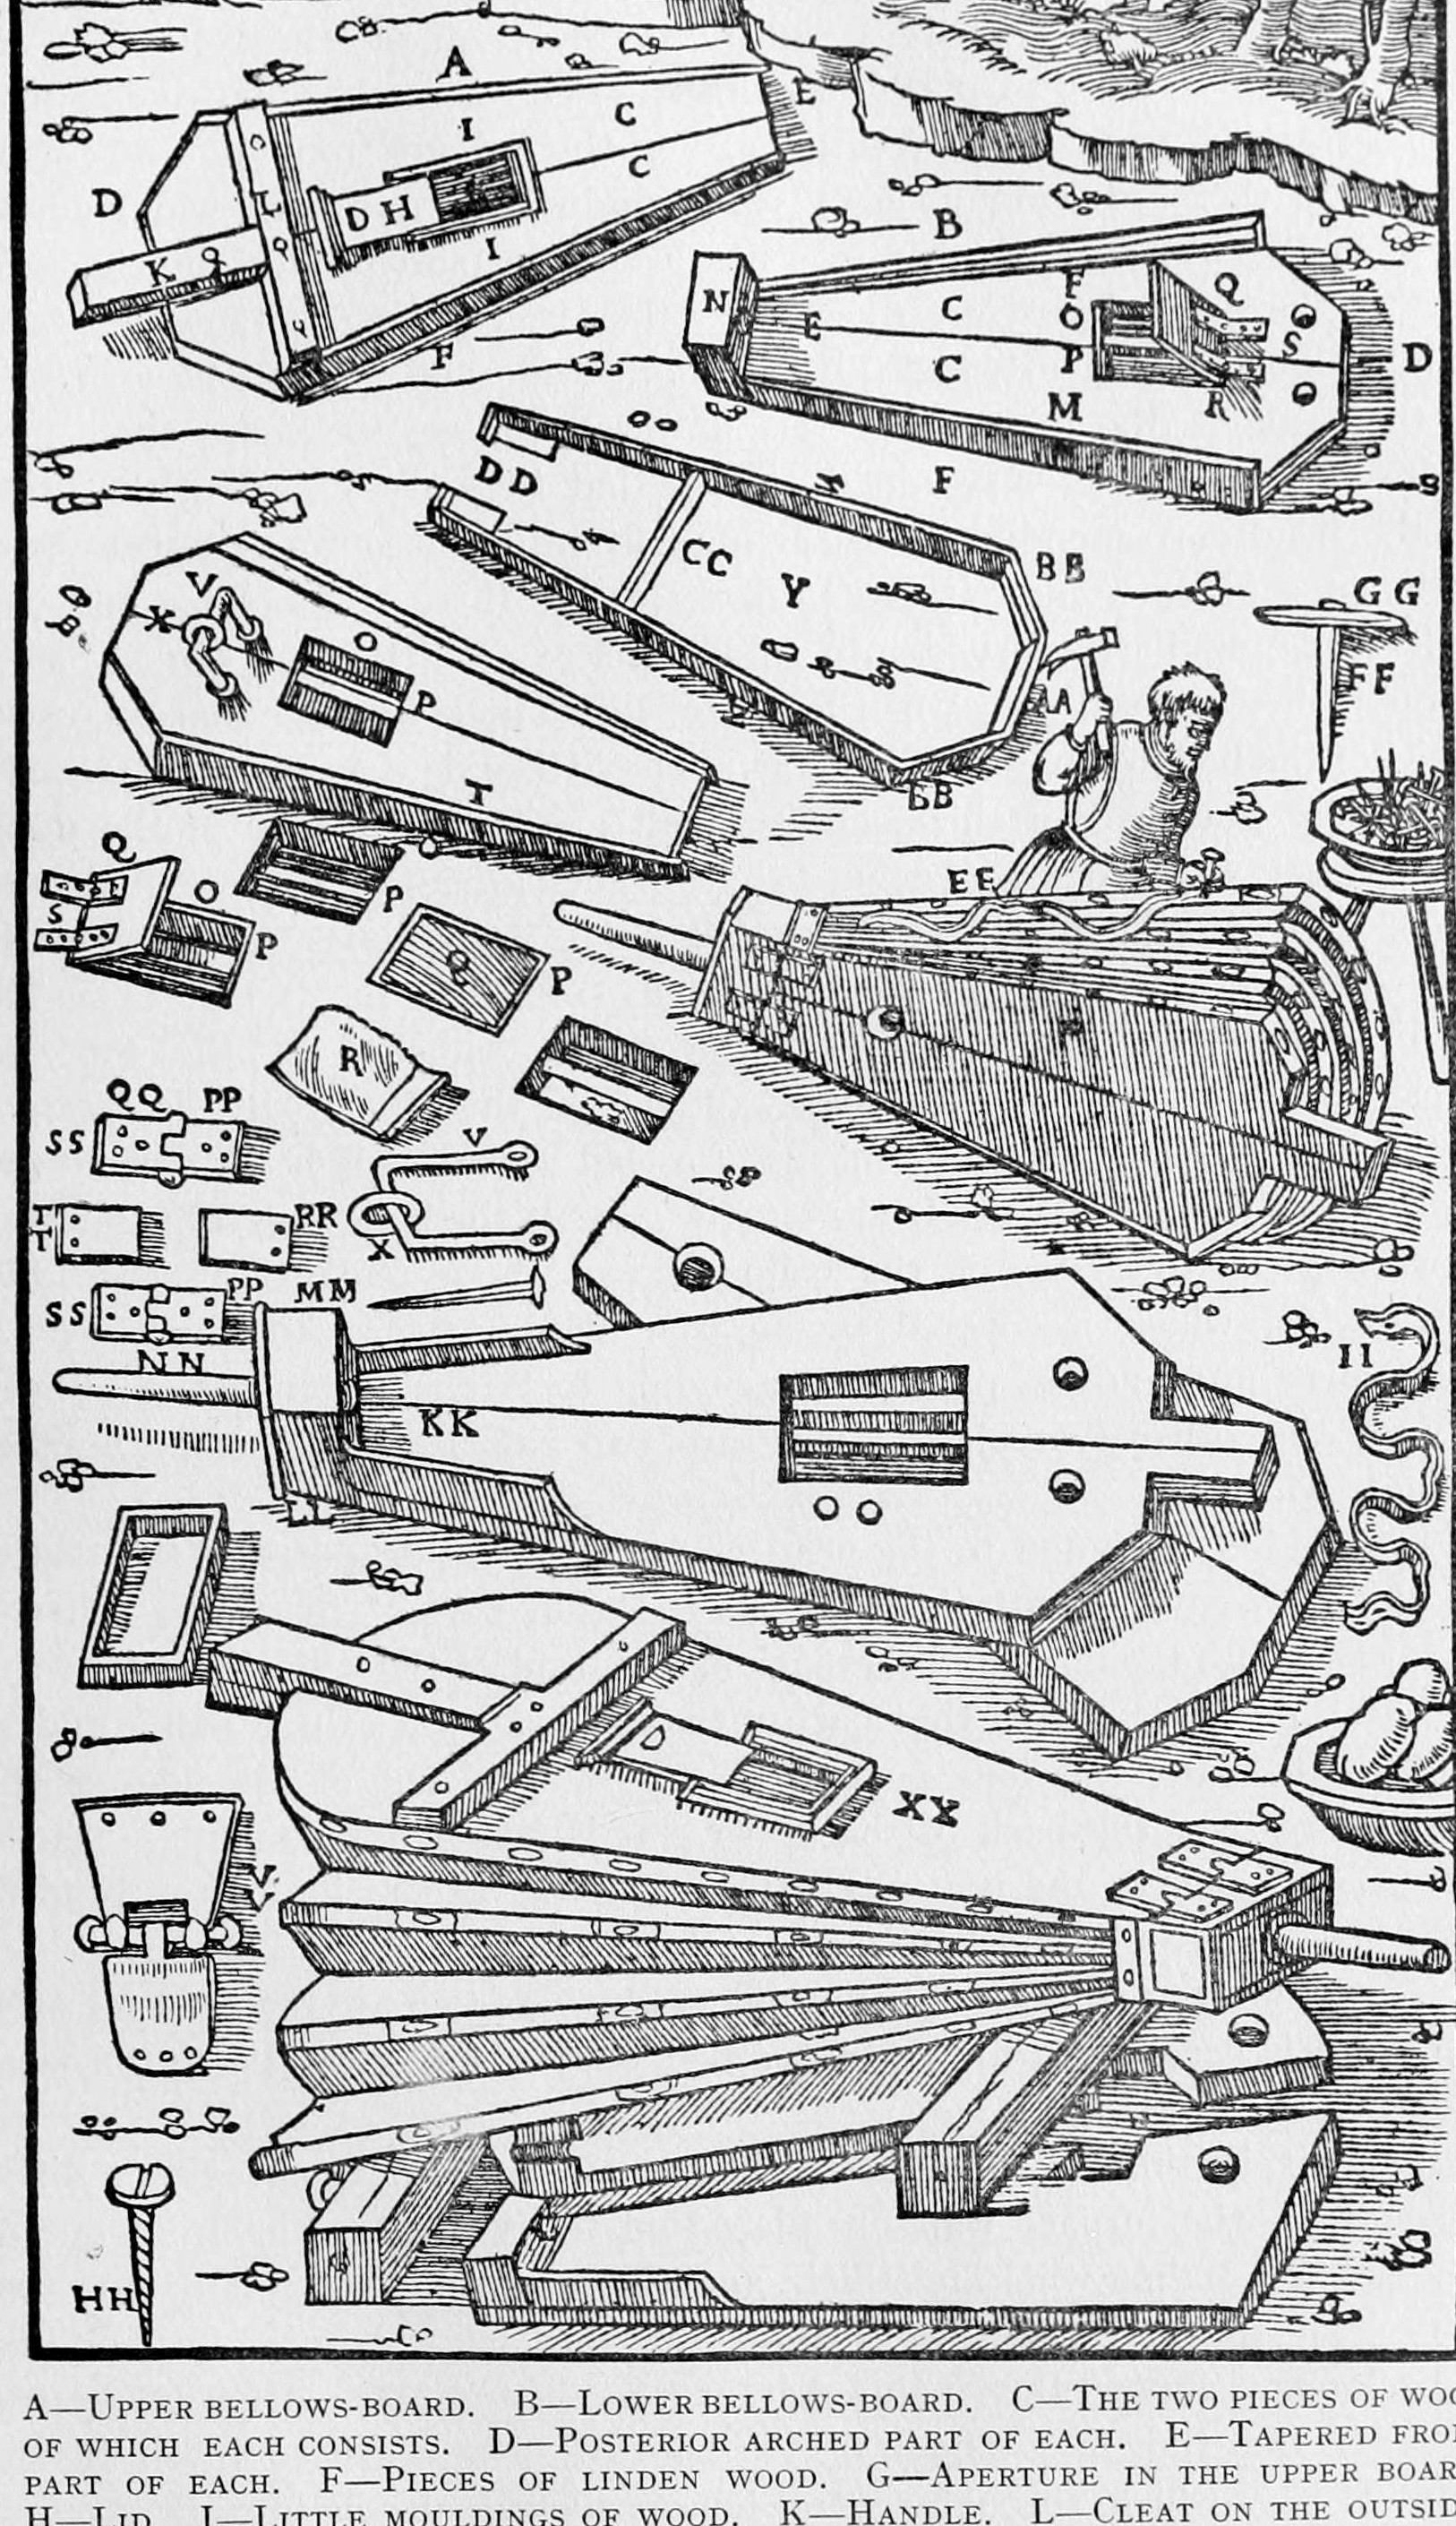


Great Bellows of the Smelting Works: Pine Boards, Linden Bows, Ox-Hide and Iron Nozzle (Agricola, 1556)
The large blast bellows of a 16th-century smelting works, every part measured, from Agricola's De Re Metallica, Book IX (1556): two tapered boards of glued pine edged with linden, about 1.7 m long, two linden bows, two ox-hides nailed on with T-headed nails, a goatskin flap valve in the lower board, and a glued head carrying a 3 ft iron nozzle.
Avanzado
About 2 weeks
Instrucciones
1
1
Roman units in metric
Roman units in metric
Cargando el cuaderno de Jupyter…
2
2
Read De Re Metallica, Book IX
Read De Re Metallica, Book IX
"Each bellows consists of a body and a head. The body is composed of two 'boards', two bows, and two hides."
3
3
Make the upper board
Make the upper board
Glue two pieces of pine into a board a palm thick, 5 ft 3 palms long, 2-1/2 ft wide at the back (sides a little curved) and a cubit wide at the front, tapering to the head. Glue on linden edge strips, 7 digits wide at the back and 1-1/2 at the front, to take the nails. Cut an aperture 6 by 4 digits in the middle, 1 ft 3 palms from the head, with a sliding lid 2 palms 1 digit square and 3 digits thick running in mouldings a palm wide and 3 digits thick (or bore 2-3 round holes with plugs). Glue and peg a handle 7 palms or longer (2 palms wide, 1 thick on the board; rounded and 7 digits thick beyond), with a 2 ft cleat 2 palms wide and a palm thick over it and another 2 ft cleat underneath, 3 palms from the end.
Materiales para este paso:
 Tabla de pino2 piezas
 Plancha de tilo1 pieza
 Cola de piel animal1 pieza
 Varilla de madera (tarugo)1 pieza
Herramientas necesarias:
 Serrucho
 Cepillo de carpintero
 Formones
 Berbiquí y barrena
 Sargento
4
4
Make the lower board and flap valve
Make the lower board and flap valve
Make the lower board the same way and a cubit longer (the extra length is part of the head). About a cubit from the back, centred, cut an air-hole a foot long and 3 palms wide, leaving a rib a palm long and 1/3 digit wide across it. Make the flap a foot 3 digits by 3 palms 3 digits of thin board covered with goatskin, hair toward the ground, hinged with a doubled strip of leather a palm wide nailed to it and tied through two holes 7 digits apart. A foot beyond, fix a slightly elliptical iron ring 2 palms by 1 on a staple, 3 palms from the back, for the wooden bolt that holds the board to its frame (or use two iron screws).
Materiales para este paso:
Tabla de pino2 piezasPlancha de tilo1 piezaCola de piel animal1 pieza Piel cruda de cabra1 pieza
 Tira de cuero1 pieza
 Anilla metálica1 pieza
 Clavos1 pieza
Herramientas necesarias:
SerruchoFormonesBerbiquí y barrena Martillo
5
5
Make the bows
Make the bows
Make each bow as long as the upper board from four pieces of linden 3 digits thick: two long pieces 7 digits wide at the back and 2-1/2 at the front, a back piece 2 palms wide, its ends a little over a digit thick, bent to meet the long pieces, mortised, bored and pegged with glued pegs. Mortise in a crossbar a cubit from the head, a foot long without tenons and a palm 2 digits wide. Glue and peg two small pieces, 3 palms 2 digits long, a palm high and a digit thick, at the head to keep the bow ends off the air passage.
Materiales para este paso:
Plancha de tilo2 piezasCola de piel animal1 piezaVarilla de madera (tarugo)1 piezaHerramientas necesarias:
SerruchoFormonesBerbiquí y barrena Mazo de madera
6
6
Make the head and nozzle
Make the head and nozzle
Glue the upper head board, a cubit long and 1-1/2 palms thick, onto the lower board's extension (a palm and a digit thick). Shape it a cubit wide at the back, 2 digits narrower 3 palms forward, then round the front to 2 palms 2 digits across and bind it with an iron ring 3 digits wide. Bore it for the nozzle: a pipe of thin iron plate 3 ft long, 3 digits across in front and a palm high by 2 palms wide at the back.
Materiales para este paso:
Tabla de pino1 piezaCola de piel animal1 pieza Chapa de hierro (forjada a martillo)1 piezaAnilla metálica1 pieza
Herramientas necesarias:
SerruchoBerbiquí y barrena Fragua
 YunqueMartillo
7
7
Hide the bellows
Hide the bellows
Use ox-hide (far better than horse), two hides each 3-1/2 ft wide at the back. Lay a long leather thong along each board and bow and nail the hide through it with T-shaped iron nails 5 digits long, horns 2-1/2 digits long and half a digit wide, the horn of one nail almost touching the next along the boards; on each bow two nails in the back piece and four in each long piece, ten in all. Pine strips nailed over the hide on the long pieces guard against tearing; iron screws through strips over the hide hold even better.
Materiales para este paso:
 Cuero curtido al vegetal2 piezasTira de cuero1 piezaClavos1 pieza
Herramientas necesarias:
Martillo Cuchilla para cuero
 Tijeras
8
8
Troubleshooting
Troubleshooting
Bellows troubleshooting.
Flow
Loading...
9
9
History and honest limits
History and honest limits
From Georgius Agricola, **De Re Metallica** (1556), Book IX, translated by Herbert C. and Lou H. Hoover, 1912 (checked on the archive.org scan georgiusagricola00agri, pp. 362-365). The frame and the machinery that work the bellows are not covered here. The metric conversions (digit ~1.85 cm, palm ~7.4 cm, Roman foot ~29.6 cm, cubit ~44.4 cm) and the tools are ours.
Materiales
10- 2 piezasMarcador de posición
- 2 piezasMarcador de posición
- 1 piezaMarcador de posición
- 1 piezaMarcador de posición
- 1 piezaMarcador de posición
- 2 piezasMarcador de posición
- 1 piezaMarcador de posición
- 2 piezasMarcador de posición
- Marcador de posición
- 2 piezasMarcador de posición
Herramientas requeridas
11- Marcador de posición
- Marcador de posición
- Marcador de posición
- Marcador de posición
- Marcador de posición
- Marcador de posición
- Marcador de posición
- Marcador de posición
- Marcador de posición
- Marcador de posición
- Marcador de posición
Este plano hace
Blueprints relacionados
Estos blueprints comparten conocimiento — técnicas, materiales o principios
CC0 Dominio público
Este Blueprint se publica bajo CC0. Eres libre de copiar, modificar, distribuir y usar este trabajo para cualquier propósito, sin pedir permiso.
Apoya al Maker comprando productos a través de su Blueprint, donde gana una Comisión del Maker establecida por los vendedores, o crea una nueva iteración de este Blueprint e inclúyela como conexión en tu propio Blueprint para compartir ingresos.