Colaboración
ARTE
BELLEZA Y BIENESTAR
ARTESANÍA
CULTURA E HISTORIA
ENTRETENIMIENTO
MEDIO AMBIENTE
COMIDA Y BEBIDAS
INGENIERÍA INVERSA
CIENCIAS
DEPORTES
TECNOLOGÍA
TECNOLOGÍA VESTIBLE
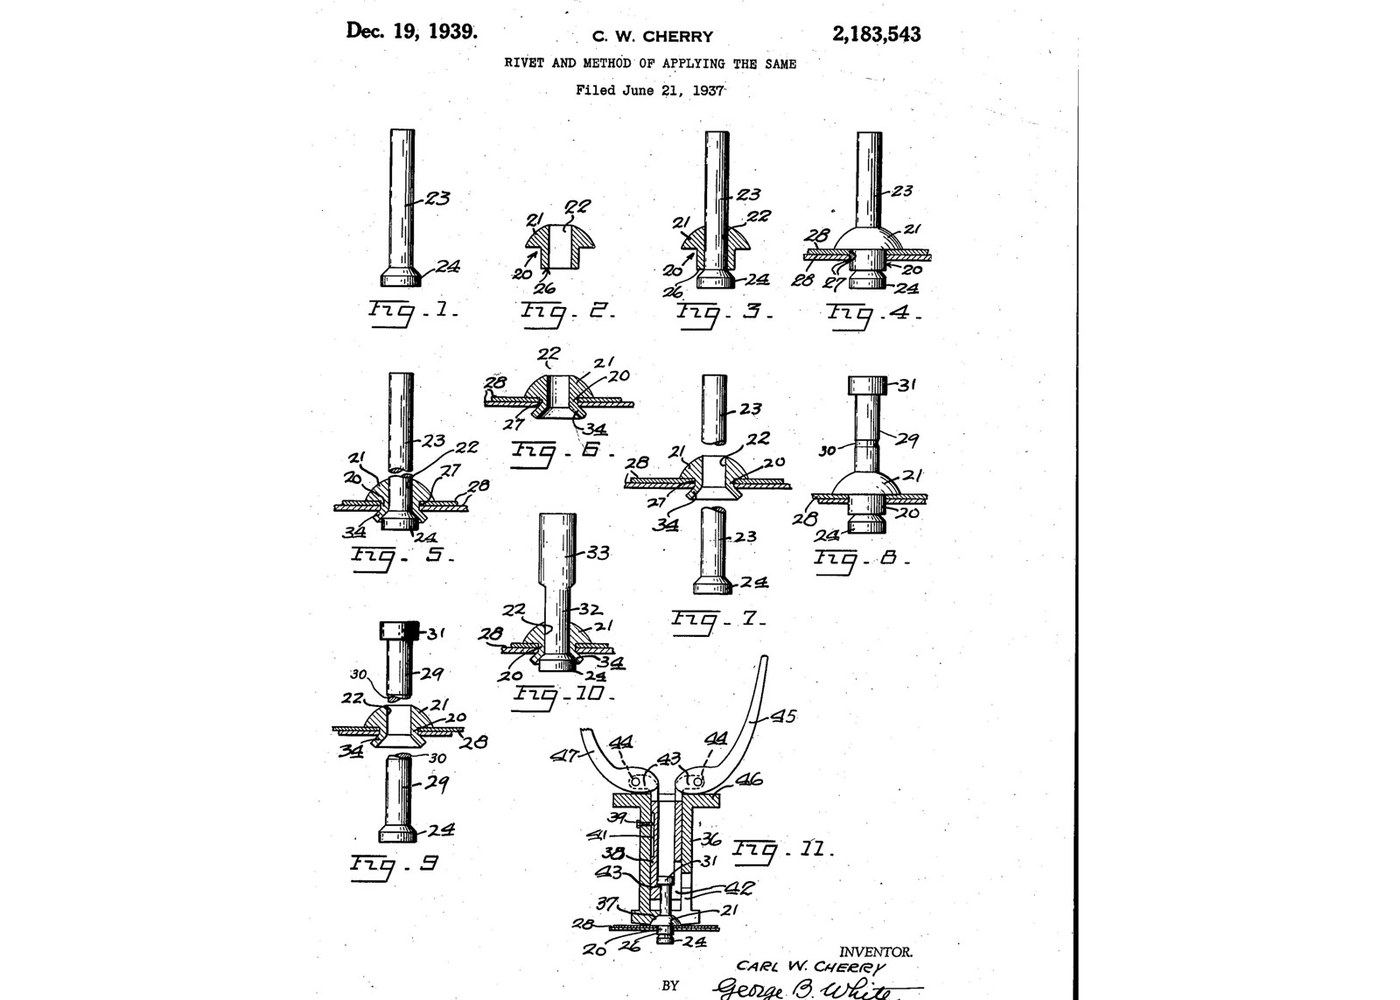


Pop Rivets: Hollow Rivet on a Break-Off Former Shank (Cherry 1939)
A rivet you set from one side. Cherry threaded a hollow rivet onto a shank with a bevelled head, the former, at the far end. Pull the shank while pushing on the rivet head and the former spreads the rivet's tail against the back of the work. A groove in the shank makes it break at a set pull, so every rivet is set to the same tightness.
Source: Carl W. Cherry, US 2,183,543 (1939). Unknown: the metal and the dimensions. Cherry gives neither, so both are linked to unknown heads. Turning the parts on a lathe and setting them with a pop rivet gun are ours. Picture: the patent's drawing.
Avanzado
1 day
Instrucciones
1
1
Turn the hollow rivet
Turn the hollow rivet
Turn a tubular rivet with a head formed at one end and a passage right through it. Unknown: the metal and the sizes.
Materiales para este paso:
 Metal desconocido1 as required
Herramientas necesarias:
 Torno de metal
 Juego de herramientas de torno (HSS)
 Calibre vernier
 Dimensiones desconocidas
2
2
Turn the former shank
Turn the former shank
Turn a shank that slides through the rivet's passage, with a former head at one end: no wider than the rivet, and bevelled on its inner edge where it meets the rivet's tail. The bevel sets the angle the tail spreads to. Cut a groove around the shank where it should break.
Materiales para este paso:
Metal desconocido1 as requiredHerramientas necesarias:
Torno de metalJuego de herramientas de torno (HSS)Calibre vernierDimensiones desconocidas3
3
Assemble and set
Assemble and set
Push the shank through the rivet so the former sits against the tail. Put the rivet into matching holes in the work. Press on the rivet head and pull the shank at the same time (Cherry's tool: a casing with a dolly on the head, and a shank holder pulled by cammed handles; ours: a pop rivet gun). The former spreads the tail against the far plate. Then the shank breaks at its groove, and the broken pieces fall out of the passage.
Herramientas necesarias:
 Taladro de columna
 Kit de remachadora
 Gafas de seguridad
Materiales
1- 1 as requiredMarcador de posición
Herramientas requeridas
7- Marcador de posición
- Marcador de posición
- Marcador de posición
- Marcador de posición
- Marcador de posición
- Marcador de posición
- Marcador de posición
Este plano hace

Blueprints relacionados
Estos blueprints comparten conocimiento — técnicas, materiales o principios

CC0 Dominio público
Este Blueprint se publica bajo CC0. Eres libre de copiar, modificar, distribuir y usar este trabajo para cualquier propósito, sin pedir permiso.
Apoya al Maker comprando productos a través de su Blueprint, donde gana una Comisión del Maker establecida por los vendedores, o crea una nueva iteración de este Blueprint e inclúyela como conexión en tu propio Blueprint para compartir ingresos.