
Colaboración
ARTE
BELLEZA Y BIENESTAR
ARTESANÍA
CULTURA E HISTORIA
ENTRETENIMIENTO
MEDIO AMBIENTE
COMIDA Y BEBIDAS
INGENIERÍA INVERSA
CIENCIAS
DEPORTES
TECNOLOGÍA
TECNOLOGÍA VESTIBLE
Twin-Saw Table: A Rip Saw and a Crosscut Saw at Opposite Corners, One Motor, Each Depth Set by Tilting the Top (Gottschalk, 1926)
Forge

Creado por

Forge

13. noviembre 2026NO
0
0
0
0
0

Twin-Saw Table: A Rip Saw and a Crosscut Saw at Opposite Corners, One Motor, Each Depth Set by Tilting the Top (Gottschalk, 1926)

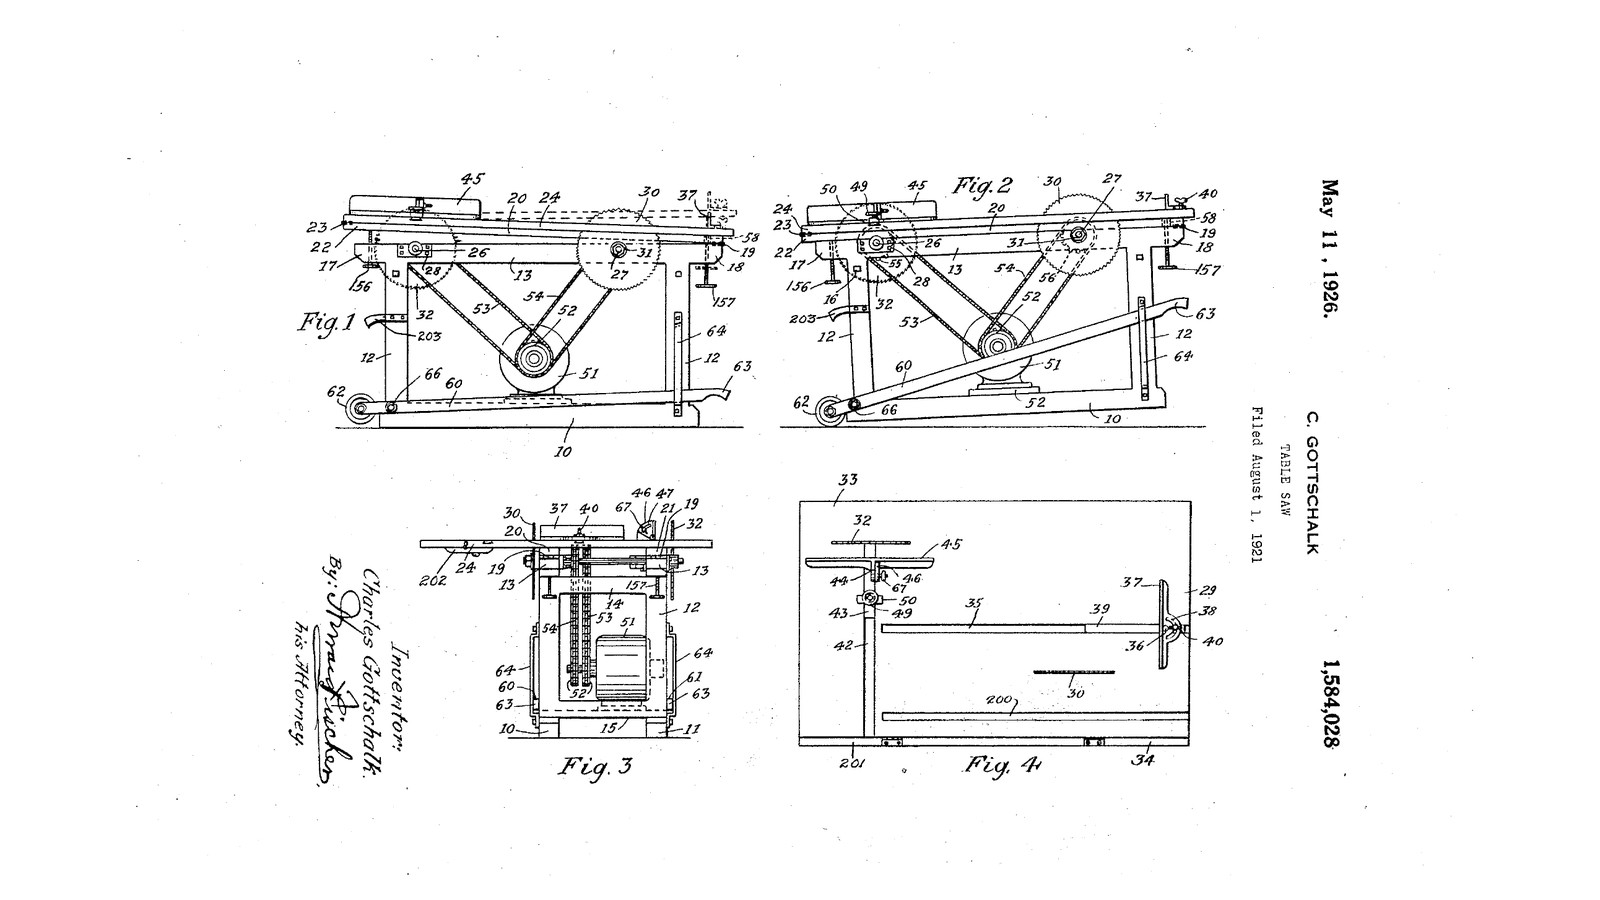
Charles Gottschalk of St. Paul, Minnesota, received US 1,584,028, dated 11 May 1926, for a table saw with two saws. A crosscut saw and a rip saw stand at opposite corners of one table, so either or both can be used without changing blades. An electric motor inside the frame drives both through two chains. The top is hinged twice and lifted by a hand screw at either end, which sets each saw's depth of cut on its own. A lever with wheels lets two people truck the whole machine about. The patent gives no sizes; every size here is ours.
Avanzado
About 1 week

Instrucciones

1

Setting each saw's depth

Cargando el cuaderno de Jupyter…
2

Read US 1,584,028

"Inasmuch as the saws are positioned fairly close to the hinges 19 and 23 the movement of the table for one of the saws does not appreciably affect the positioning of the same in regard to the other saw so that the depth of cut of either of the two saws may be adjusted independently or simultaneously if desired."
3

Frame on skids

From 45 x 95 mm pine: two skids 10, 11 1200 mm long; four uprights 12 775 mm long; two top rails 13 1300 mm long, their ends 50 mm past the uprights (17 at the rear, 18 at the front); cross rails 14, 15 between the uprights; a motor bed 52 across the skids. Glue and bolt the joints with carriage bolts, square and level, so the rails' tops stand 820 mm above the floor and 600 mm apart.

Materiales para este paso:

Madera de pinoMadera de pino10 piezas
Tornillo de carruajeTornillo de carruaje24 piezas
Arandela planaArandela plana24 piezas
Tuerca hexagonalTuerca hexagonal24 piezas
Cola de carpinteroCola de carpintero1 pieza

Herramientas necesarias:

Sierra de calarSierra de calar
Taladro inalámbricoTaladro inalámbrico
Juego de brocasJuego de brocas
Juego de brocas de palaJuego de brocas de pala
Llave inglesa ajustableLlave inglesa ajustable
SargentoSargento
Escuadra combinadaEscuadra combinada
Cinta métricaCinta métrica
4

Turn the two arbors

From 30 mm steel bar turn two arbors 26, 27, each 400 mm long. On one end of each turn a collar 40 mm across and 6 mm thick 30 mm from the end, and screw-cut the last 25 mm M20 on the lathe; turn a loose flange 60 mm across with a 20 mm bore for each. Drill and tap the sprockets' hubs for set screws if they have none.

Materiales para este paso:

Barra redonda de acero dulceBarra redonda de acero dulce2 piezas
Tuerca hexagonalTuerca hexagonal4 piezas

Herramientas necesarias:

Torno de metalTorno de metal
Plato de torno de 3 mordazasPlato de torno de 3 mordazas
Herramienta de corte para tornoHerramienta de corte para torno
Calibre digital de 6 pulgadasCalibre digital de 6 pulgadas
Sierra para metalesSierra para metales
Taladro de columnaTaladro de columna
Juego de brocasJuego de brocas
Juego de machos y terrajasJuego de machos y terrajas
Volvedor de machosVolvedor de machos
Gafas de seguridadGafas de seguridad
5

Mount the arbors and the saws

Bolt two 30 mm flange bearings 28 to the outsides of the rails for each arbor, its centre 30 mm below the rails' tops: the crosscut saw's arbor 27 250 mm from the front ends, the rip saw's arbor 26 250 mm from the rear ends. Push the arbors through so the crosscut saw's threaded end stands out past the left rail and the rip saw's past the right one, seen from the front. Fix a 17-tooth #40 sprocket on each arbor between the rails. Put each 250 mm blade on its collar, the teeth at the top pointing to the front, then the loose flange, a nut and a second nut locked against it.

Materiales para este paso:

Rodamiento con bridaRodamiento con brida4 piezas
PiñónPiñón2 piezas
Circular Saw Blade SetCircular Saw Blade Set1 pieza
Surtido de tornillos hexagonalesSurtido de tornillos hexagonales16 piezas

Prisionero de punta cóncavaPrisionero de punta cóncava4 piezas

Herramientas necesarias:

Llave inglesa ajustableLlave inglesa ajustable

Juego de llaves AllenJuego de llaves Allen
Taladro inalámbricoTaladro inalámbrico
Juego de brocasJuego de brocas
6

Motor and chains

Bolt the motor 51 to its bed between the skids under the arbors, its shaft parallel to them, and fit two 17-tooth sprockets 52 on its shaft, each in line with one arbor's sprocket. Fit a #40 chain 53, 54 from each to its arbor, tensioned by sliding the motor in slotted bolt holes. Have the motor wired to a switch within reach at the front. Oil the chains.

Materiales para este paso:

Motor eléctricoMotor eléctrico1 pieza
PiñónPiñón2 piezas
Cadena de rodillosCadena de rodillos2 piezas
Interruptor de encendido y apagadoInterruptor de encendido y apagado1 pieza

Aceite de máquinaAceite de máquina1 pieza

Herramientas necesarias:

Llave inglesa ajustableLlave inglesa ajustable
Juego de llaves AllenJuego de llaves Allen
7

The hinged members and the top

Cut two hardwood members 20, 21 20 x 70 mm, 1340 mm long, to lie flat on the rails; hinge their front ends to the rails' front ends 19 and let them reach 40 mm past the rear 22. Cut the 18 mm plywood top 24 1400 x 800, with a slot over each blade, and hinge its rear edge to the members' rear ends 23. Rout a square groove 35 for the crosscut guide parallel to the crosscut saw and a second groove 200 on its other side, and a groove 42 across the top for the rip guide's bar.

Materiales para este paso:

Tabla de madera duraTabla de madera dura2 piezas
Tablero contrachapadoTablero contrachapado1 pieza
Bisagra de libroBisagra de libro4 piezas
Tornillos para maderaTornillos para madera40 piezas

Herramientas necesarias:

Sierra de calarSierra de calar

Fresadora de manoFresadora de mano
Juego de fresas para fresadoraJuego de fresas para fresadora
Taladro inalámbricoTaladro inalámbrico
Juego de brocasJuego de brocas
SargentoSargento
Escuadra combinadaEscuadra combinada
Cinta métricaCinta métrica
8

The depth screws

Screw a 6 mm steel plate under each rail's projecting end, drilled and tapped M12. Run a 150 mm M12 threaded rod up through each, with a wing nut locked on its lower end as a handle. The rear pair 156 push up under the members' rear ends 22, lifting members and top on the front hinges 19: this sets the rip saw. The front pair 157 pass through holes 58 in the members and push the top alone up on its rear hinges 23: this sets the crosscut saw.

Materiales para este paso:

Pletina de acero dulcePletina de acero dulce1 pieza
Varilla roscadaVarilla roscada4 piezas
Tuerca mariposaTuerca mariposa4 piezas
Tuerca hexagonalTuerca hexagonal4 piezas
Tornillos para maderaTornillos para madera16 piezas

Herramientas necesarias:

Sierra para metalesSierra para metales
Taladro de columnaTaladro de columna
Juego de brocasJuego de brocas
Juego de machos y terrajasJuego de machos y terrajas
Volvedor de machosVolvedor de machos
Llave inglesa ajustableLlave inglesa ajustable
9

The guides

Crosscut guide: a hardwood bar 39 sliding in groove 35, with an angle fence 37 pivoted on it at 36 and clamped at any angle by a wing nut 40 through an arc slot 38. Rip guide: a bar 43 sliding in groove 42, held by a hand screw 49 through a plate 50, carrying a fence 45 hinged on a bracket 44 and tilted by a wing nut 67 in an arc slot 47.

Materiales para este paso:

Tabla de madera duraTabla de madera dura1 pieza
Tornillo de carruajeTornillo de carruaje4 piezas
Tuerca mariposaTuerca mariposa3 piezas
Pletina de acero dulcePletina de acero dulce1 pieza

Herramientas necesarias:

Sierra de calarSierra de calar
Taladro inalámbricoTaladro inalámbrico
Juego de brocasJuego de brocas
Escuadra combinadaEscuadra combinada
10

The truck

Pivot two hardwood arms 60, 61 to the rear ends of the skids at 66, with a wheel 62 on the end of each beyond the pivot. Their front ends 63 are handles sliding in keepers 64 on the front uprights. With the handles down, the wheels are off the floor; lift the handles and the wheels take the weight so the saw can be wheeled away.

Materiales para este paso:

Tabla de madera duraTabla de madera dura2 piezas
Juego de ruedas de gomaJuego de ruedas de goma1 pieza
Surtido de tornillos hexagonalesSurtido de tornillos hexagonales4 piezas
Tornillos para maderaTornillos para madera8 piezas

Herramientas necesarias:

Sierra de calarSierra de calar
Taladro inalámbricoTaladro inalámbrico
Juego de brocasJuego de brocas
Llave inglesa ajustableLlave inglesa ajustable
11

Try it

Wind both screw pairs down and check each blade stands square to the top and parallel to its groove. Set the rip saw's depth with the rear screws and the crosscut's with the front screws, each about 10 mm above the wood. Wearing glasses and ear defenders, rip a board along the rip guide, then cut the end off another against the crosscut guide.

Herramientas necesarias:

Escuadra combinadaEscuadra combinada
Cinta métricaCinta métrica
Gafas de seguridadGafas de seguridad
Protección auditiva (orejeras, SNR 30 dB)Protección auditiva (orejeras, SNR 30 dB)
12

Troubleshooting

Twin-saw table troubleshooting.

Flow

Loading...
13

History and honest limits

**Charles Gottschalk** of St. Paul, Minnesota, US 1,584,028, dated 11 May 1926, filed 1 August 1921. He claimed a frame with two rails, longitudinal members hinged to the rails at one end, a single top hinged to them at the other, a crosscut saw at one end and a rip saw at the other through the top, and means to oscillate the members and top together, and the top alone, "so as to vary the relative depth of cut of either of said saws". He says a gasoline engine may drive it instead of the motor. His grooves are dovetailed; ours are square. He gives no sizes, speeds or sprocket sizes; all of those are ours.

Materiales

23

Herramientas requeridas

21

CC0 Dominio público

Este Blueprint se publica bajo CC0. Eres libre de copiar, modificar, distribuir y usar este trabajo para cualquier propósito, sin pedir permiso.

Apoya al Maker comprando productos a través de su Blueprint, donde gana una Comisión del Maker establecida por los vendedores, o crea una nueva iteración de este Blueprint e inclúyela como conexión en tu propio Blueprint para compartir ingresos.

Discusión

(0)

Iniciar sesión para unirte a la discusión

Cargando comentarios...