Colaboración
ARTE
BELLEZA Y BIENESTAR
ARTESANÍA
CULTURA E HISTORIA
ENTRETENIMIENTO
MEDIO AMBIENTE
COMIDA Y BEBIDAS
INGENIERÍA INVERSA
CIENCIAS
DEPORTES
TECNOLOGÍA
TECNOLOGÍA VESTIBLE
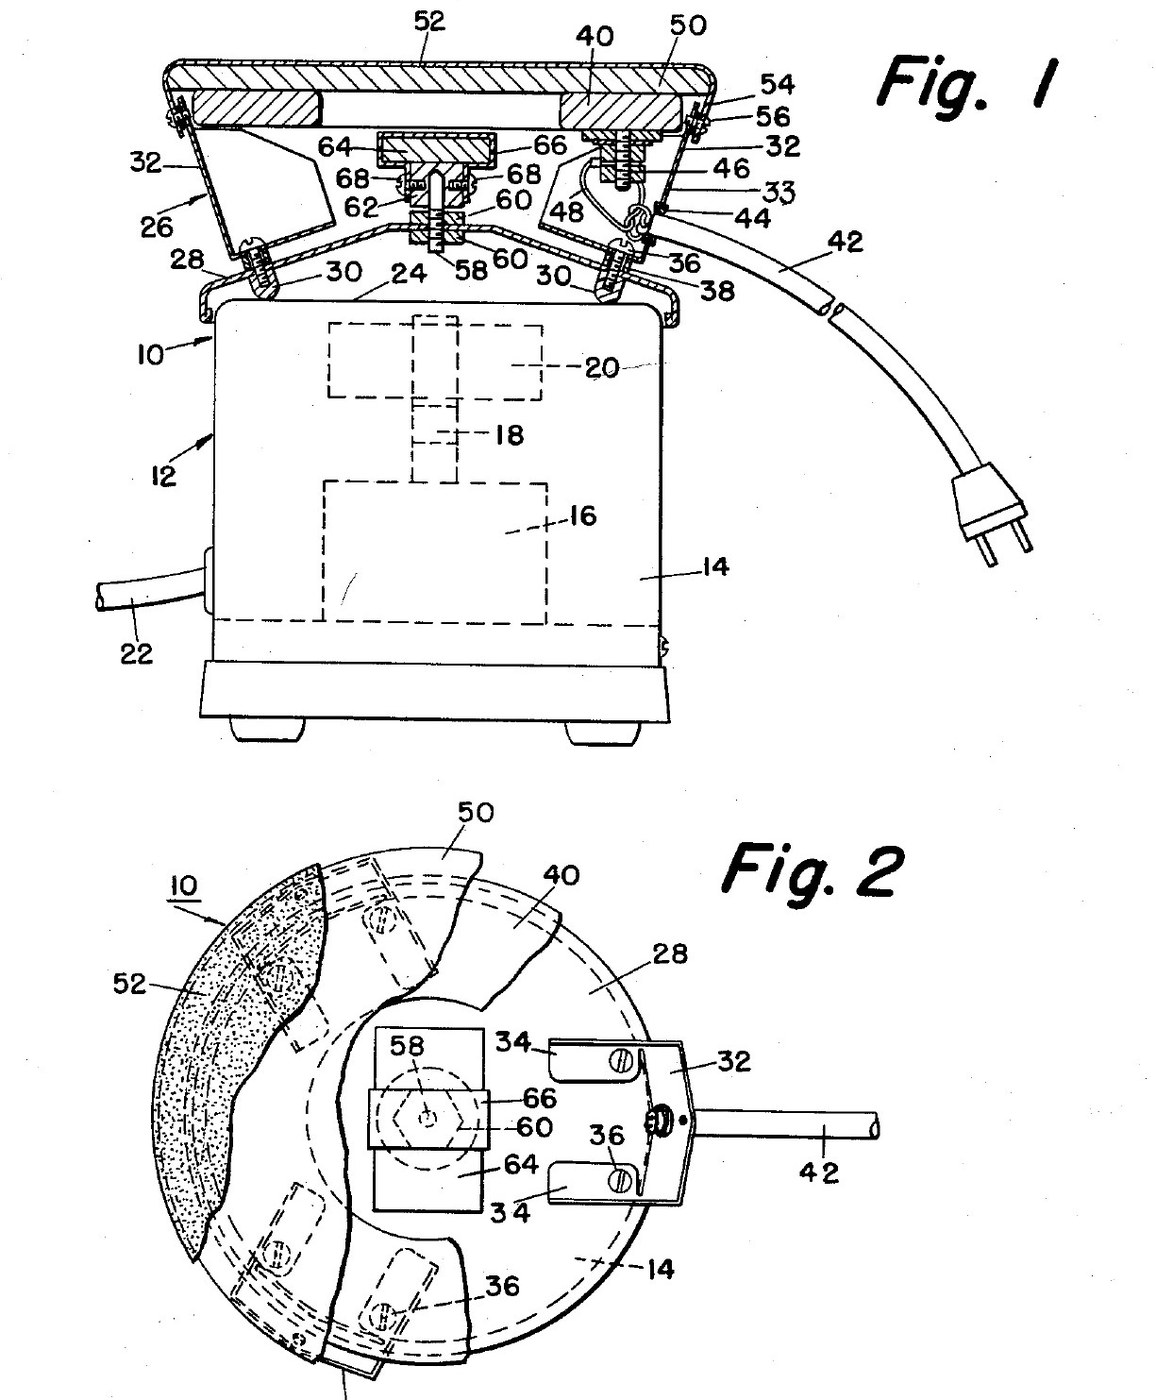


Hot Plate Magnetic Stirrer: Ring Heater over a Relay Magnet on a Shielded Spindle (Hug, US 3,028,476)
A laboratory stand that heats a vessel and stirs it at the same time. A motor in the base spins a bar magnet; in Theodore Hug's design (US 3,028,476, 1962) that magnet turns a second, free bar magnet on a spindle inside the hot plate, which in turn spins a coated stirring bar in the vessel.
A stainless-steel radiation shield and an air gap keep the ring heater's heat away from the motor. The relay magnet sits about 1/2 in. under the aluminium heat sink: closer, eddy currents in the sink slow the stirring.
Source: T. Hug, "Hot Plate and Magnetic Stirrer", US Patent 3,028,476 (filed 1960, granted 1962). Picture: its Figs. 1-2.
Avanzado
Unknown
Instrucciones
1
1
Read Hug
Read Hug
"Attempts have been made to couple conventional heating means to magnetic stirrers, but the same have proved to be unsuccessful. Thus, the base of a laboratory vessel must be positioned relatively close to the driving rotating magnet ... Moreover, if an appreciable amount of heat from the heating means is transmitted to the motor of the magnetic stirrer, it will drastically reduce the useful operating life of said motor."
2
2
Build the stirrer base
Build the stirrer base
Make a housing of aluminium (or another non-magnetic material) and mount an electric motor inside with its shaft upright. Fix a permanent bar magnet horizontally on the top of the shaft, just under the housing top. Wire the motor through a rheostat to its cord so the speed can be varied. Sizes, motor rating and how the housing is formed are not given.
Materiales para este paso:
 Chapa de aluminio1 housing
 Motor eléctrico1 pieza
 Juego de imanes de barra1 drive magnet
 Reóstato1 pieza
 Cable flexible con clavija1 pieza
Herramientas necesarias:
 Dimensiones desconocidas
 Método de conformado desconocido
3
3
Make the radiation shield
Make the radiation shield
Shape a radiation shield of non-magnetic stainless steel so it straddles the top of the housing, on stainless-steel legs (a poor conductor of heat) that stand on the housing top. Bore its centre and fit a threaded spindle there with a nut on each side of the shield. Tap a blind thread in each leg.
Materiales para este paso:
 Chapa de acero inoxidable - 3041 shield and legs
 Varilla roscada1 spindle
 Tuerca hexagonal2 piezas
Herramientas necesarias:
 Tijeras de chapa
 Taladro de columna
 Juego de brocas
 Juego de machos y terrajasMétodo de conformado desconocido
4
4
Fit the relay magnet
Fit the relay magnet
Bore a blind cavity in a hub of non-magnetic material so it turns freely on the spindle. Lay a permanent bar magnet 1/4 in. by 1 in. by 1 3/4 in. on top of the hub and hold it with a strap screwed to the hub. The hub and strap material is not given.
Materiales para este paso:
Juego de imanes de barra1 relay magnet, 1/4 x 1 x 1 3/4 in. Material desconocido1 hub and strap
 Tornillos de máquina2 piezas
Herramientas necesarias:
 Torno de metalTaladro de columnaJuego de brocasJuego de machos y terrajas
5
5
Mount the supports
Mount the supports
Make three support members of non-magnetic stainless steel, each an upright with flanges. Screw the flanges down into the legs, with small tubular spacers of insulating material round the screws between the shield and the flanges, so air can circulate and carry heat away. Fit a grommet in one support for the heater cord. The spacer material is not given.
Materiales para este paso:
Chapa de acero inoxidable - 3041 three supportsTornillos de máquina3 piezas Material aislante desconocido3 tubular spacers
Herramientas necesarias:
Tijeras de chapaTaladro de columnaJuego de brocas6
6
Fit the heater and top
Fit the heater and top
Mount an annular ring heater (elements in a non-magnetic sheath) coaxial with the spindle; join its cord wires to its threaded stud between two nuts. Above it lay an aluminium heat sink, a flat plate wider than the heater, so the relay magnet is about 1/2 in. below it. Cover with a top plate of aluminium or stainless steel whose edge is spun into an inverted dish, and screw the edge to the tops of the supports. The patent claims a blackened outer surface on the heat sink and top plate (how is not given). In use, set the hot plate on the stirrer and put a stirring bar (a short bar magnet sealed in glass or coated with PTFE) in the vessel: the drive magnet turns the relay magnet, which turns the bar.
Materiales para este paso:
 Resistencia calefactora1 ring heaterCable flexible con clavija1 piezaTuerca hexagonal2 piezas
 Placa de aluminio1 heat sinkChapa de aluminio1 top plateTornillos de máquina3 piezas
Herramientas necesarias:
 Herramienta de repujado al tornoTorno de metalTaladro de columnaJuego de brocas
Materiales
13- 1 top plateMarcador de posición
- 1 piezaMarcador de posición
- 1 relay magnet, 1/4 x 1 x 1 3/4 in.Marcador de posición
- 1 piezaMarcador de posición
- 1 piezaMarcador de posición
- 1 three supportsMarcador de posición
- 1 spindleMarcador de posición
- 4 piezasMarcador de posición
- 1 hub and strapMarcador de posición
- 8 piezasMarcador de posición
- 3 tubular spacersMarcador de posición
- 1 ring heaterMarcador de posición
- 1 heat sinkMarcador de posición
Herramientas requeridas
8- Marcador de posición
- Marcador de posición
- Marcador de posición
- Marcador de posición
- Marcador de posición
- Marcador de posición
- Marcador de posición
- Marcador de posición
Este plano hace

CC0 Dominio público
Este Blueprint se publica bajo CC0. Eres libre de copiar, modificar, distribuir y usar este trabajo para cualquier propósito, sin pedir permiso.
Apoya al Maker comprando productos a través de su Blueprint, donde gana una Comisión del Maker establecida por los vendedores, o crea una nueva iteración de este Blueprint e inclúyela como conexión en tu propio Blueprint para compartir ingresos.