ARTE
BELLEZA Y BIENESTAR
ARTESANÍA
CULTURA E HISTORIA
ENTRETENIMIENTO
MEDIO AMBIENTE
COMIDA Y BEBIDAS
INGENIERÍA INVERSA
CIENCIAS
DEPORTES
TECNOLOGÍA
TECNOLOGÍA VESTIBLE
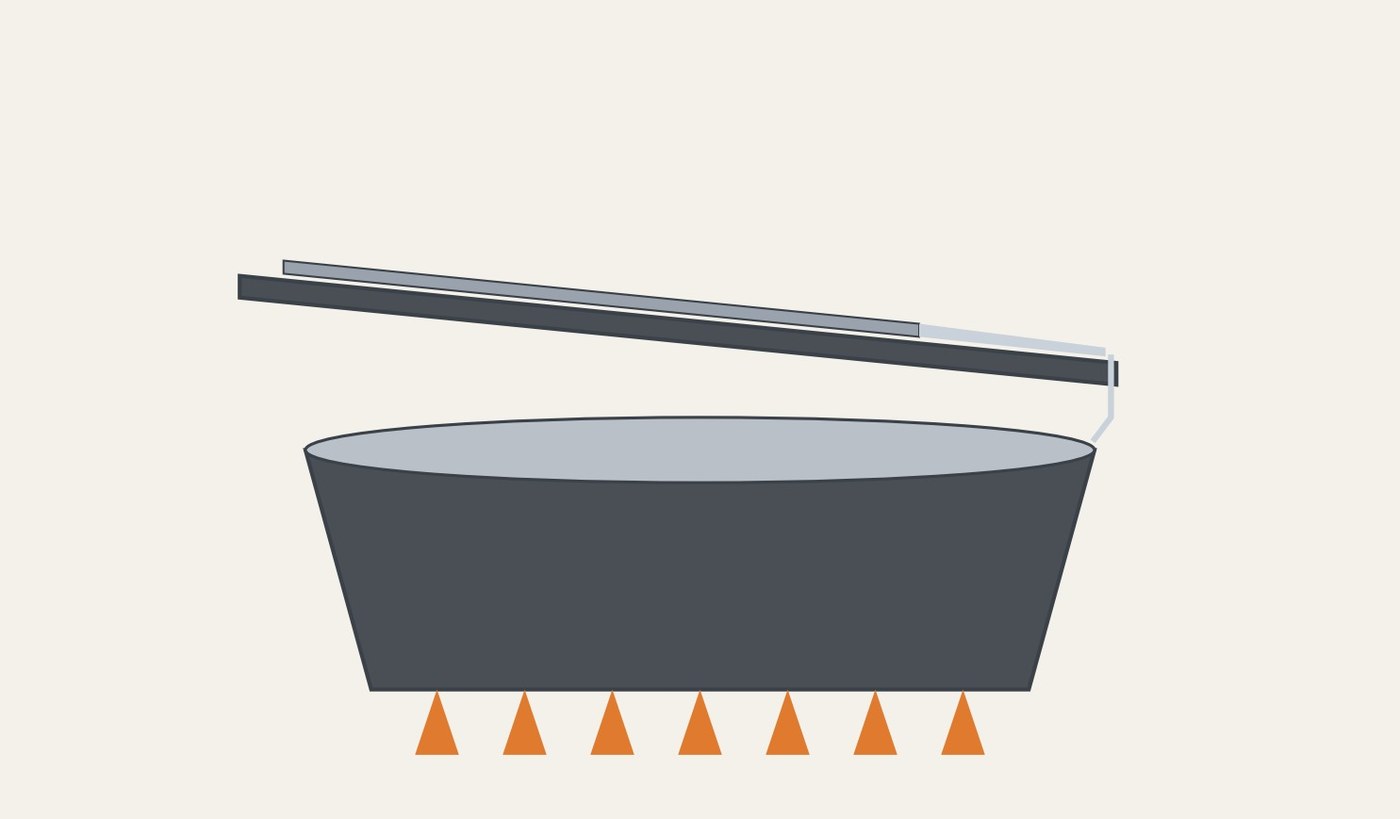


Lead Sheet Cast on a Tilted Iron Plate, Ure 1839
Thin lead sheet can be cast without rolling. Andrew Ure (1839) describes the white-lead works: melted lead is poured on an iron plate over the pot, and as soon as its surface begins to set the plate is tipped, so the still-liquid lead runs back and leaves a thin sheet that lifts off like paper. Their sheets were 1/24 inch thick or less.
The picture: our diagram, the plate tipped over the pot as the liquid runs off.
Intermedio
An afternoon
Instrucciones
1
1
Melt the lead
Melt the lead
Melt lead in a cast-iron pot over the fire. Work outdoors, keep food and drink away, and wash your hands after.
Materiales para este paso:
 Lingote de plomo5 kg
 Carbón vegetal3 as required
Herramientas necesarias:
 Crisol de hierro fundido
 Fragua de herrero
 Mascarilla antipolvo
 Guantes de soldador
 Gafas de seguridad
2
2
Set the plate
Set the plate
Lay a clean, dry iron plate across the pot so it can be tipped toward one side to drain into the pot.
Herramientas necesarias:
 Chapa de hierro (forjada a martillo)Crisol de hierro fundidoGuantes de soldadorGafas de seguridad
3
3
Pour and tip
Pour and tip
Ladle lead onto the plate. The moment its surface starts to set, tip the plate so the liquid runs back into the pot; the thin set layer stays as a sheet.
Herramientas necesarias:
 Cuchara de fundiciónChapa de hierro (forjada a martillo)Guantes de soldadorGafas de seguridad
4
4
Lift and repeat
Lift and repeat
Lift the sheet off, cool the plate with water, and pour again. Trim the sheets with snips.
Materiales para este paso:
 Agua5 litros
Herramientas necesarias:
 Tijeras de chapaGuantes de soldadorGafas de seguridad
5
5
Sheet from a pot
Sheet from a pot
Cargando el cuaderno de Jupyter…
Materiales
3- 5 kgMarcador de posición
- 3 as requiredMarcador de posición
- 5 litrosMarcador de posición
Herramientas requeridas
8- Marcador de posición
- Marcador de posición
- Marcador de posición
- Marcador de posición
- Marcador de posición
- Marcador de posición
- Marcador de posición
- Marcador de posición
Este plano hace
Blueprints relacionados
Estos blueprints comparten conocimiento — técnicas, materiales o principios


CC0 Dominio público
Este Blueprint se publica bajo CC0. Eres libre de copiar, modificar, distribuir y usar este trabajo para cualquier propósito, sin pedir permiso.
Apoya al Maker comprando productos a través de su Blueprint, donde gana una Comisión del Maker establecida por los vendedores, o crea una nueva iteración de este Blueprint e inclúyela como conexión en tu propio Blueprint para compartir ingresos.