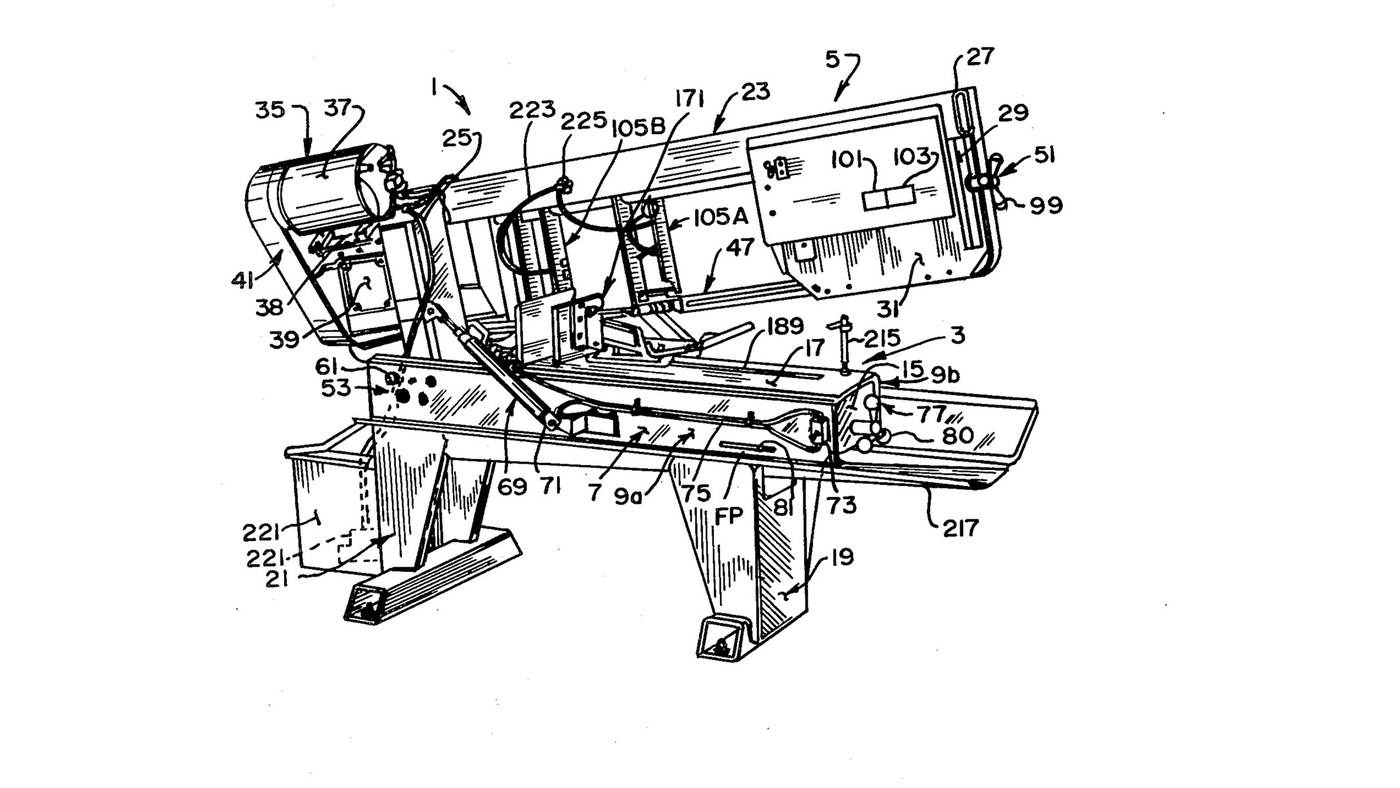


Metal Band Saw: Horizontal Saw on a Welded Steel Frame
Instrucciones
Weld the bed
Weld the bed
Materiales para este paso:
 Perfil de acero en U2 piezas
 Placa de acero dulce1 pieza
 Tornillo hexagonal - grado 8.81 pieza
Herramientas necesarias:
 Soldadora MIG
 Taladro de columna
 Llave inglesa
Weld and bolt on the legs
Weld and bolt on the legs
Materiales para este paso:
 Chapa de acero1 pieza
 Tubo de acero1 piezaTornillo hexagonal - grado 8.81 pieza
Herramientas necesarias:
Soldadora MIGLlave inglesaWeld the head
Weld the head
Materiales para este paso:
Tubo de acero1 piezaPlaca de acero dulce1 piezaHerramientas necesarias:
Soldadora MIGFit the trunnions and align the pivot
Fit the trunnions and align the pivot
Materiales para este paso:
 Eje de acero1 pieza
 Casquillo metálico2 piezas
 Soporte de rodamiento2 piezasTornillo hexagonal - grado 8.88 piezas
 Prisionero de punta cóncava1 pieza
Herramientas necesarias:
Taladro de columna Llave dinamométrica
Mount motor, belt drive and gearbox
Mount motor, belt drive and gearbox
Materiales para este paso:
 Motor eléctrico1 piezaPlaca de acero dulce1 pieza
 Correa de transmisión1 pieza
 Polea1 pieza
 Caja reductora1 pieza
 Volante de sierra de cinta1 pieza
Herramientas necesarias:
Llave inglesaBuild the idler tensioner
Build the idler tensioner
Materiales para este paso:
Placa de acero dulce1 pieza Pasador de acero a presión1 piezaEje de acero1 piezaVolante de sierra de cinta1 pieza
 Rodamiento de bolas1 pieza
 Varilla roscada1 pieza
 Coil Spring1 pieza
 Abrazadera en U1 pieza
 Perilla de mando1 pieza
Herramientas necesarias:
Soldadora MIGLlave inglesaBuild the two blade guides
Build the two blade guides
Materiales para este paso:
 Rodillo guía4 piezasRodamiento de bolas4 piezas
 Casquillo excéntrico4 piezas
 Inserto de carburo6 piezasCoil Spring2 piezasPerilla de mando2 piezasTubo de acero1 pieza
Herramientas necesarias:
Llave inglesaFit the blade and set the tension
Fit the blade and set the tension
Materiales para este paso:
 Hoja de sierra de cinta1 pieza
Fit the feed cylinder and counterbalance
Fit the feed cylinder and counterbalance
Materiales para este paso:
 Cilindro hidráulico1 pieza
 Aceite hidráulico1 batch
 Tubo hidráulico1 pieza
 Válvula reguladora de caudal1 piezaCoil Spring1 piezaVarilla roscada1 piezaPerilla de mando1 pieza
Herramientas necesarias:
Llave inglesaBolt on the vice
Bolt on the vice
Materiales para este paso:
 Mordaza de máquina1 piezaTornillo hexagonal - grado 8.81 pieza
Herramientas necesarias:
Llave inglesaMateriales
29- 2 piezasMarcador de posición
- 1 piezaMarcador de posición
- 11 piezasMarcador de posición
- 1 piezaMarcador de posición
- 1 piezaMarcador de posición
- 1 piezaMarcador de posición
- 2 piezasMarcador de posición
- 2 piezasMarcador de posición
- 1 piezaMarcador de posición
- 1 piezaMarcador de posición
- 1 piezaMarcador de posición
- 1 piezaMarcador de posición
- 1 piezaMarcador de posición
- 1 piezaMarcador de posición
- 1 piezaMarcador de posición
- Marcador de posición
- 1 piezaMarcador de posición
- 4 piezasMarcador de posición
- 1 piezaMarcador de posición
- Marcador de posición
- 4 piezasMarcador de posición
- 4 piezasMarcador de posición
- 6 piezasMarcador de posición
- 1 piezaMarcador de posición
- 1 piezaMarcador de posición
- 1 batchMarcador de posición
- 1 piezaMarcador de posición
- 1 piezaMarcador de posición
- 1 piezaMarcador de posición
Este plano hace
CC0 Dominio público
Este Blueprint se publica bajo CC0. Eres libre de copiar, modificar, distribuir y usar este trabajo para cualquier propósito, sin pedir permiso.
Apoya al Maker comprando productos a través de su Blueprint, donde gana una Comisión del Maker establecida por los vendedores, o crea una nueva iteración de este Blueprint e inclúyela como conexión en tu propio Blueprint para compartir ingresos.