ARTE
BELLEZA Y BIENESTAR
ARTESANÍA
CULTURA E HISTORIA
ENTRETENIMIENTO
MEDIO AMBIENTE
COMIDA Y BEBIDAS
INGENIERÍA INVERSA
CIENCIAS
DEPORTES
TECNOLOGÍA
TECNOLOGÍA VESTIBLE
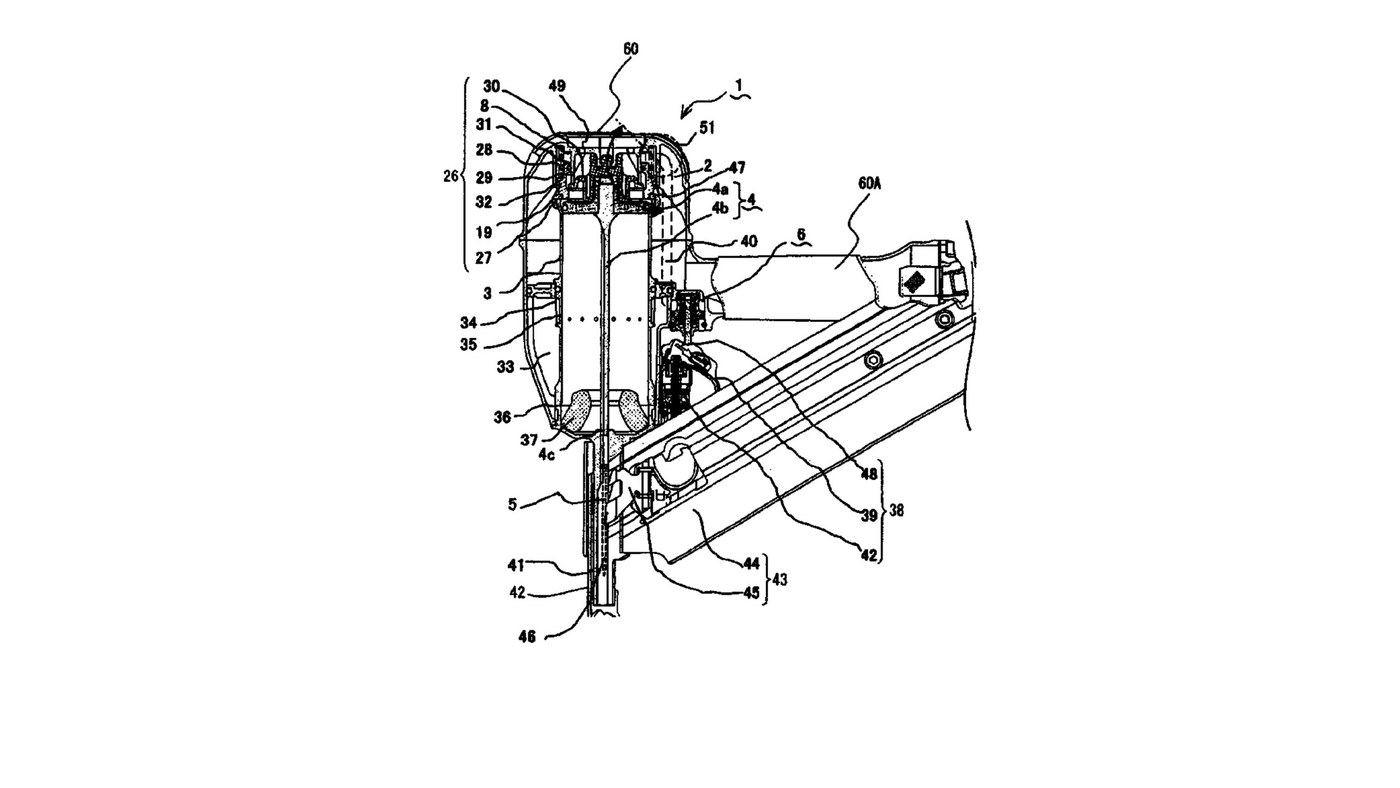


Pneumatic Nail Gun: Main Valve, Return Chamber and Fast Trigger Valve
Hitachi Koki's air nailer (US 7,156,012, 2007). Compressed air stored in the handle holds a main valve shut over the cylinder. Pulling the trigger with the nose pressed to the work vents a small trigger-valve chamber, which vents the main-valve chamber; the main valve jumps up, closes the exhaust and lets stored air throw the piston and driver blade down onto a nail. Air caught below the piston in a return chamber pushes it back up. Hitachi sized the valve chambers against their vents to make the gun fire and reset faster.
The patent gives no materials, bore, stroke, air pressure or nail size. The picture: the patent's Fig. 1.
Avanzado
2 days
Instrucciones
1
1
Use the one-piece frame, handle and nose
Use the one-piece frame, handle and nose
Use a frame (60), handle (60A) and nose (41) made as one outer frame; the space inside the handle and frame is the air accumulator (2). Screw a hose nipple into the handle's end for the air hose.
Materiales para este paso:
 Carcasa de motor de herramienta1 pieza
 Racor roscado para manguera1 pieza
Herramientas necesarias:
 Llave inglesa
2
2
Fit the cylinder with its return chamber
Fit the cylinder with its return chamber
Fit the cylinder (3) in the frame with a return chamber (33) round its lower part. Halfway up, a one-way valve (34) lets air pass only from the cylinder into the return chamber; a channel (36) near the bottom joins them always. Seat a piston bumper (37) at the bottom.
Materiales para este paso:
 Camisa de cilindro1 pieza
 Válvula antirretorno1 pieza
 Amortiguador de pistón1 pieza
Herramientas necesarias:
Llave inglesa3
3
Insert the piston and driver blade
Insert the piston and driver blade
By hand, slide the piston (4a) with its integral driver blade (4b) into the cylinder; the blade's free end (4c) runs down the nose to strike the nail.
Materiales para este paso:
 Pistón impulsor1 pieza
4
4
Fit the main valve section
Fit the main valve section
Over the top of the cylinder fit the main valve rubber (27), the main valve (19) with O-rings (31, 32) sliding in the main valve chamber (8), the main valve spring (28) pushing it down, and the exhaust rubber (30) under the exhaust passage (29) to the top exhaust hole (49).
Materiales para este paso:
 Válvula principal1 pieza
 Anillo de asiento de válvula2 piezas
 Coil Spring1 pieza
 Junta tórica2 piezas
Herramientas necesarias:
Llave inglesa5
5
Fit the trigger valve
Fit the trigger valve
At the base of the handle fix an outer and an inner valve bush (10, 11). Inside them fit the valve piston (9) and the plunger (7), with a spring (12) between them pushing the piston up and the plunger down, and O-rings 15, 17, 18, 21, 23, 24, 25. Join it to the main valve chamber by the control channel (40), a tube with a gentle bend.
Materiales para este paso:
 Casquillo de válvula2 piezas
 Pistón de válvula1 pieza
 Vástago de válvula1 piezaCoil Spring1 piezaJunta tórica7 piezas
Herramientas necesarias:
Llave inglesa6
6
Fit trigger, arm plate and push lever
Fit trigger, arm plate and push lever
Fit the trigger (39) with its pivoting arm plate (48) under the plunger, and the push lever (42) sprung out from the nose bottom. Only with both pulled and pressed does the arm plate push the plunger up.
Materiales para este paso:
 Gatillo de herramienta1 pieza
 Palpador de seguridad1 piezaCoil Spring1 pieza
Herramientas necesarias:
Llave inglesa7
7
Fit the magazine and feeder
Fit the magazine and feeder
Fit the magazine (44), holding nails side by side, with the feed mechanism (45) that moves each next nail into the injection opening (46) in the nose.
Materiales para este paso:
 Cargador de clavos1 pieza
 Empujador de clavos1 pieza
Herramientas necesarias:
Llave inglesa8
8
Why the valve chambers are small
Why the valve chambers are small
Cargando el cuaderno de Jupyter…
9
9
Connect and fire
Connect and fire
Ours: connect an air hose from a compressor. At rest the stored air holds the main valve down and the piston up. Press the nose to the work and pull the trigger: the main valve lifts, the piston drives the nail, and the return-chamber air brings it back up.
Herramientas necesarias:
 Compresor de aire
 Manguera de aire comprimido
Materiales
17- Marcador de posición
- 1 piezaMarcador de posición
- 1 piezaMarcador de posición
- 1 piezaMarcador de posición
- 1 piezaMarcador de posición
- 1 piezaMarcador de posición
- 1 piezaMarcador de posición
- 2 piezasMarcador de posición
- 3 piezasMarcador de posición
- 9 piezasMarcador de posición
- 2 piezasMarcador de posición
- 1 piezaMarcador de posición
- 1 piezaMarcador de posición
- 1 piezaMarcador de posición
- 1 piezaMarcador de posición
- 1 piezaMarcador de posición
- 1 piezaMarcador de posición
Este plano hace
CC0 Dominio público
Este Blueprint se publica bajo CC0. Eres libre de copiar, modificar, distribuir y usar este trabajo para cualquier propósito, sin pedir permiso.
Apoya al Maker comprando productos a través de su Blueprint, donde gana una Comisión del Maker establecida por los vendedores, o crea una nueva iteración de este Blueprint e inclúyela como conexión en tu propio Blueprint para compartir ingresos.