
Colaboración
ARTE
BELLEZA Y BIENESTAR
ARTESANÍA
CULTURA E HISTORIA
ENTRETENIMIENTO
MEDIO AMBIENTE
COMIDA Y BEBIDAS
INGENIERÍA INVERSA
CIENCIAS
DEPORTES
TECNOLOGÍA
TECNOLOGÍA VESTIBLE
Push Button: Normally Open Momentary Switch with a Cushioned Contact (De Reamer, GE 1939)
English
Ed

Creado por

Ed

28. octubre 2026FI
14
0
0
0
0

Push Button: Normally Open Momentary Switch with a Cushioned Contact (De Reamer, GE 1939)

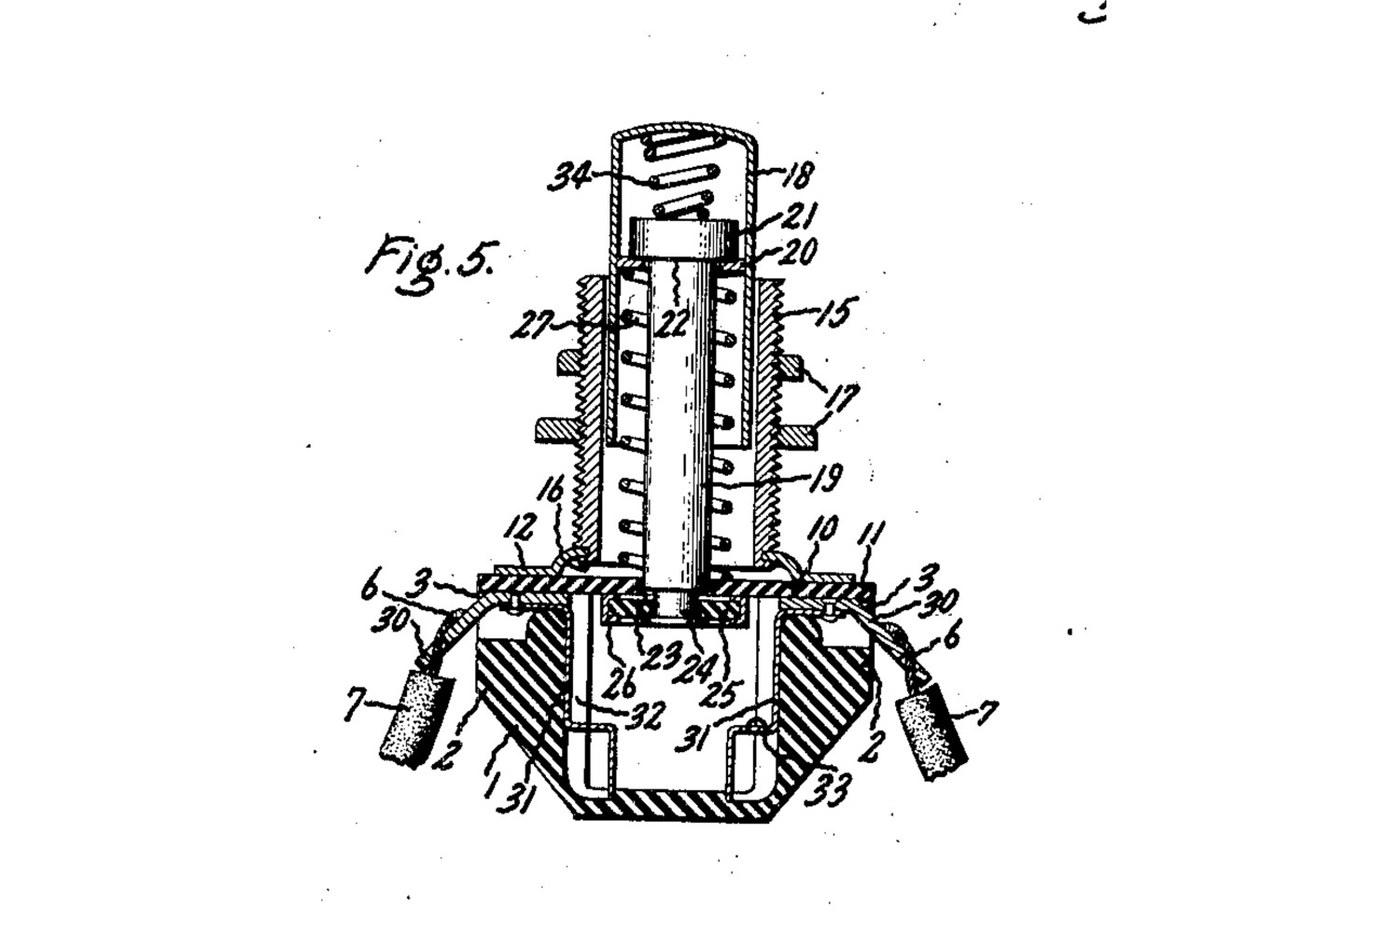
A panel push button that closes a circuit only while you press it. A spring holds the button out, and a metal rim on the end of its rod sits clear of two contacts. Press it and the rim bridges both contacts. A second spring inside the button lets the rod give, so the contacts never take more than that spring's force. Source: Frank C. De Reamer, US 2,166,803 (General Electric, 1939), Fig. 5. Unknown: the insulating material, the metals and every size. De Reamer gives none of them, so they are linked to unknown heads. The tools are ours. Picture: the patent's Fig. 5.
Avanzado
2 days

Instrucciones

1

Mould the housing

Mould a cup-shaped housing of insulating material, with a boss on each of two opposite sides, a recess in the top of each boss, a groove inside below each boss, and a bead round the top. Unknown: the material, the sizes and the moulding.

Materiales para este paso:

Material aislante desconocidoMaterial aislante desconocido1 as required

Herramientas necesarias:
Molde de compresiónMolde de compresión
Dimensiones desconocidasDimensiones desconocidas
2

Make the terminals and contacts

Bend two angled metal strips. The upper end of each sits in a boss recess, and the lower end is a solder lug. Fix each upper end to a contact that fits the groove inside the housing, stepped at its bottom end. Unknown: the metal.

Materiales para este paso:

Metal desconocidoMetal desconocido1 as required

Herramientas necesarias:

Tijeras de chapaTijeras de chapa
Alicates de boca planaAlicates de boca plana
Dimensiones desconocidasDimensiones desconocidas
3

Make the sleeve, plate and cover

Turn a threaded sleeve and cut its thread. Spin its lower end over onto a metal plate with tangs. Cut a cover of insulating sheet with ears that reach over the bosses and a hole in the middle to guide the rod.

Materiales para este paso:

Metal desconocidoMetal desconocido1 as required
Material aislante desconocidoMaterial aislante desconocido1 as required

Herramientas necesarias:

Torno de metalTorno de metal
Juego de herramientas de torno (HSS)Juego de herramientas de torno (HSS)
PortaterrajasPortaterrajas
Tijeras de chapaTijeras de chapa
Calibre vernierCalibre vernier
Dimensiones desconocidasDimensiones desconocidas
4

Make the push button

Make a drawn metal tube closed at the top, and a rod with a head. Put a small coil spring in the top of the tube, then the rod's head. Wedge a washer into the tube under the head. Leave clearance so the rod can swivel a little. Turn the rod's lower end down to a smaller diameter. Unknown: the metal.

Materiales para este paso:

Metal desconocidoMetal desconocido1 as required
Juego de muelles de compresiónJuego de muelles de compresión1 spring

Herramientas necesarias:

Torno de metalTorno de metal
Juego de herramientas de torno (HSS)Juego de herramientas de torno (HSS)
Calibre vernierCalibre vernier
Dimensiones desconocidasDimensiones desconocidas
5

Assemble

Set the terminals in their recesses and the contacts in their grooves. Slide the button into the sleeve, with a coil spring round the rod between the cover and the wedged washer. Pass the rod's end through the cover's hole. Put on it a loose insulating washer with a metal rim round its edge. Hammer the rod's end over into a flange. Lay the cover on the housing, so its ears clamp the terminals, and bend the plate's tangs over the bead.

Materiales para este paso:

Material aislante desconocidoMaterial aislante desconocido1 as required
Metal desconocidoMetal desconocido1 as required
Juego de muelles de compresiónJuego de muelles de compresión1 spring

Herramientas necesarias:

Tornillo de bancoTornillo de banco
Martillo de bolaMartillo de bola
Alicates de boca planaAlicates de boca plana
Gafas de seguridadGafas de seguridad
6

Mount and wire it

Put the sleeve through a hole in the panel and clamp the panel between two nuts on the thread. Solder the bared wire ends to the two lugs.

Materiales para este paso:

Tuerca hexagonalTuerca hexagonal2 pcs
Alambre de soldaduraAlambre de soldadura1 as required

Herramientas necesarias:

Soldador de estañoSoldador de estaño
Alicates de boca planaAlicates de boca plana
7

Check it

At rest, the rim sits against the underside of the cover and the circuit is open. Pressed, the rim meets the stepped ends of both contacts and closes it. The checking is ours: the meter reads open, then closed while pressed.

Herramientas necesarias:

MultímetroMultímetro

Materiales

5

Herramientas requeridas

13

CC0 Dominio público

Este Blueprint se publica bajo CC0. Eres libre de copiar, modificar, distribuir y usar este trabajo para cualquier propósito, sin pedir permiso.

Apoya al Maker comprando productos a través de su Blueprint, donde gana una Comisión del Maker establecida por los vendedores, o crea una nueva iteración de este Blueprint e inclúyela como conexión en tu propio Blueprint para compartir ingresos.

Discusión

(0)

Iniciar sesión para unirte a la discusión

Cargando comentarios...