ARTE
BELLEZA Y BIENESTAR
ARTESANÍA
CULTURA E HISTORIA
ENTRETENIMIENTO
MEDIO AMBIENTE
COMIDA Y BEBIDAS
INGENIERÍA INVERSA
CIENCIAS
DEPORTES
TECNOLOGÍA
TECNOLOGÍA VESTIBLE
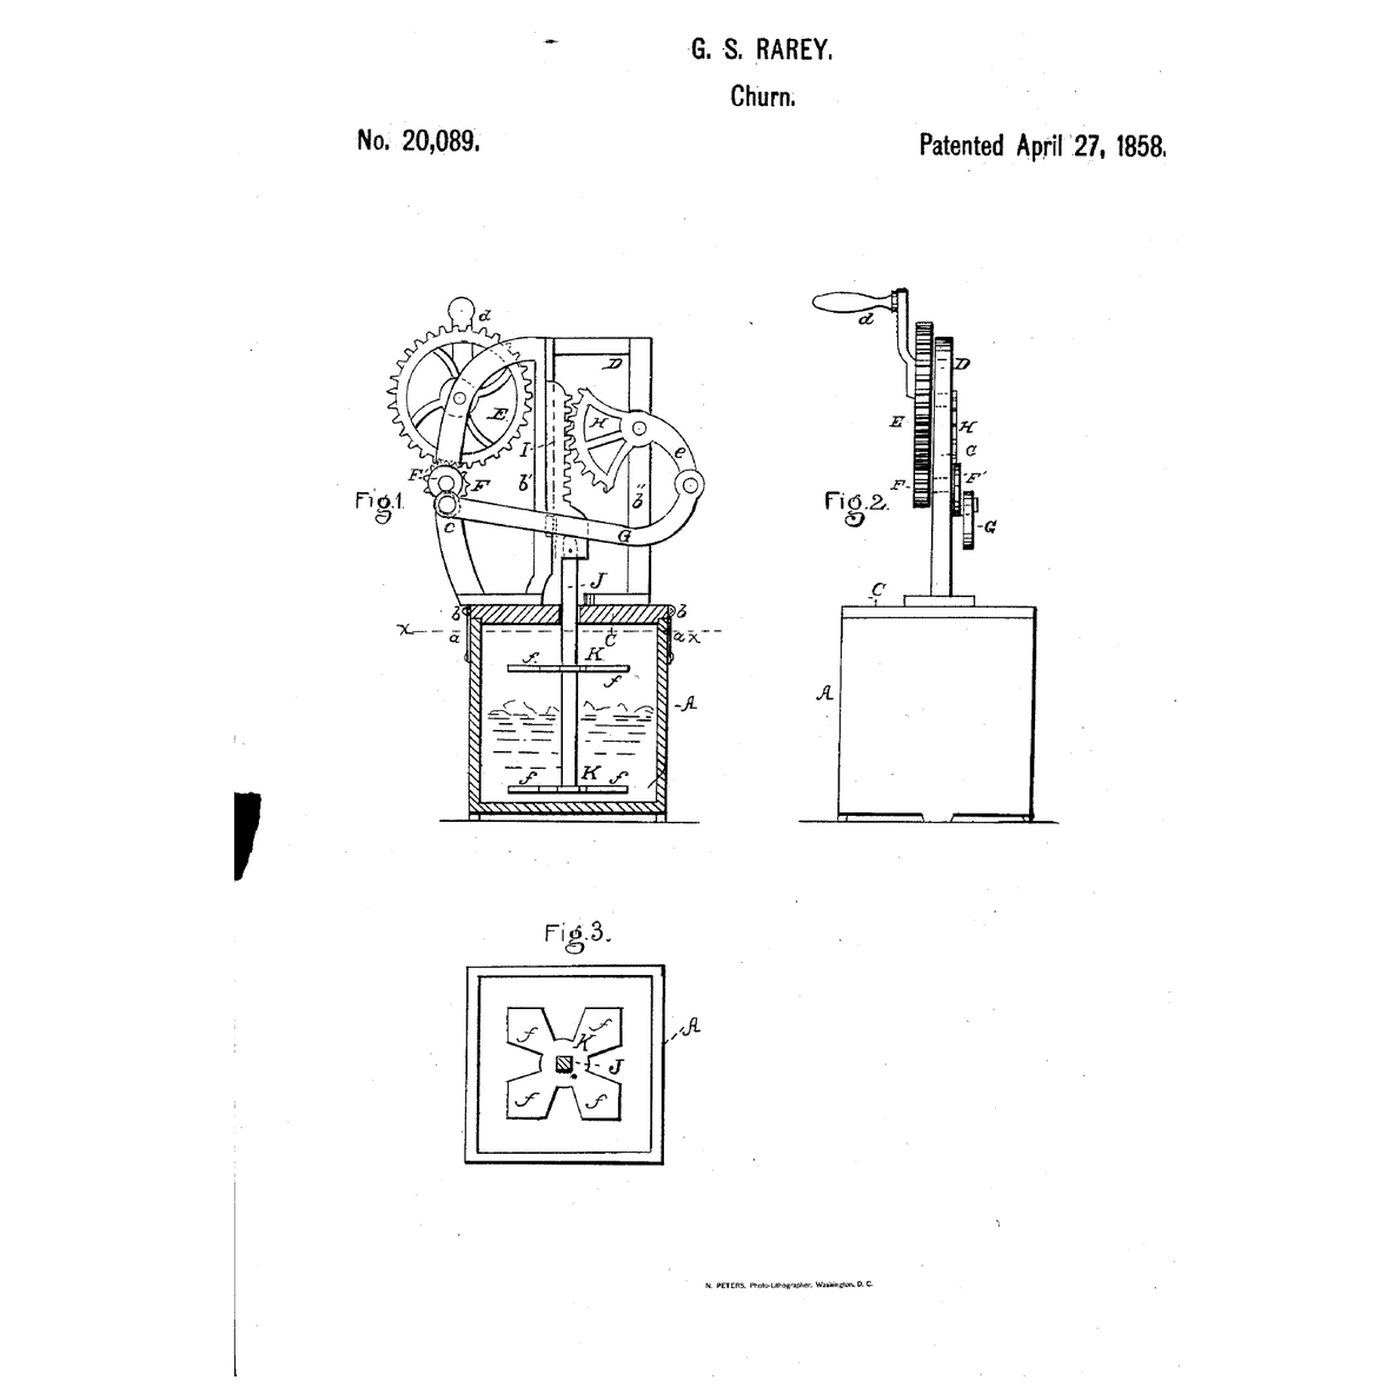


Rack-and-Segment Crank Churn: A Crank Rocks a Toothed Segment That Drives the Dasher Up and Down
G. S. Rarey of Columbus, Ohio, received US 20,089, dated 27 April 1858, for a churn that turns a crank into an up-and-down dasher stroke: a toothed wheel drives a pinion with a crank pulley, a rod from it rocks a toothed segment, and the segment works a rack bar carrying the dasher rod.
This rung prints the frame, gears, segment, rack and dashers at tabletop scale, on a stock pot.
Avanzado
About 6 hours, plus printing
Instrucciones
1
1
Gearing and stroke
Gearing and stroke
Cargando el cuaderno de Jupyter…
2
2
Crank-worked dashers, before it
Crank-worked dashers, before it
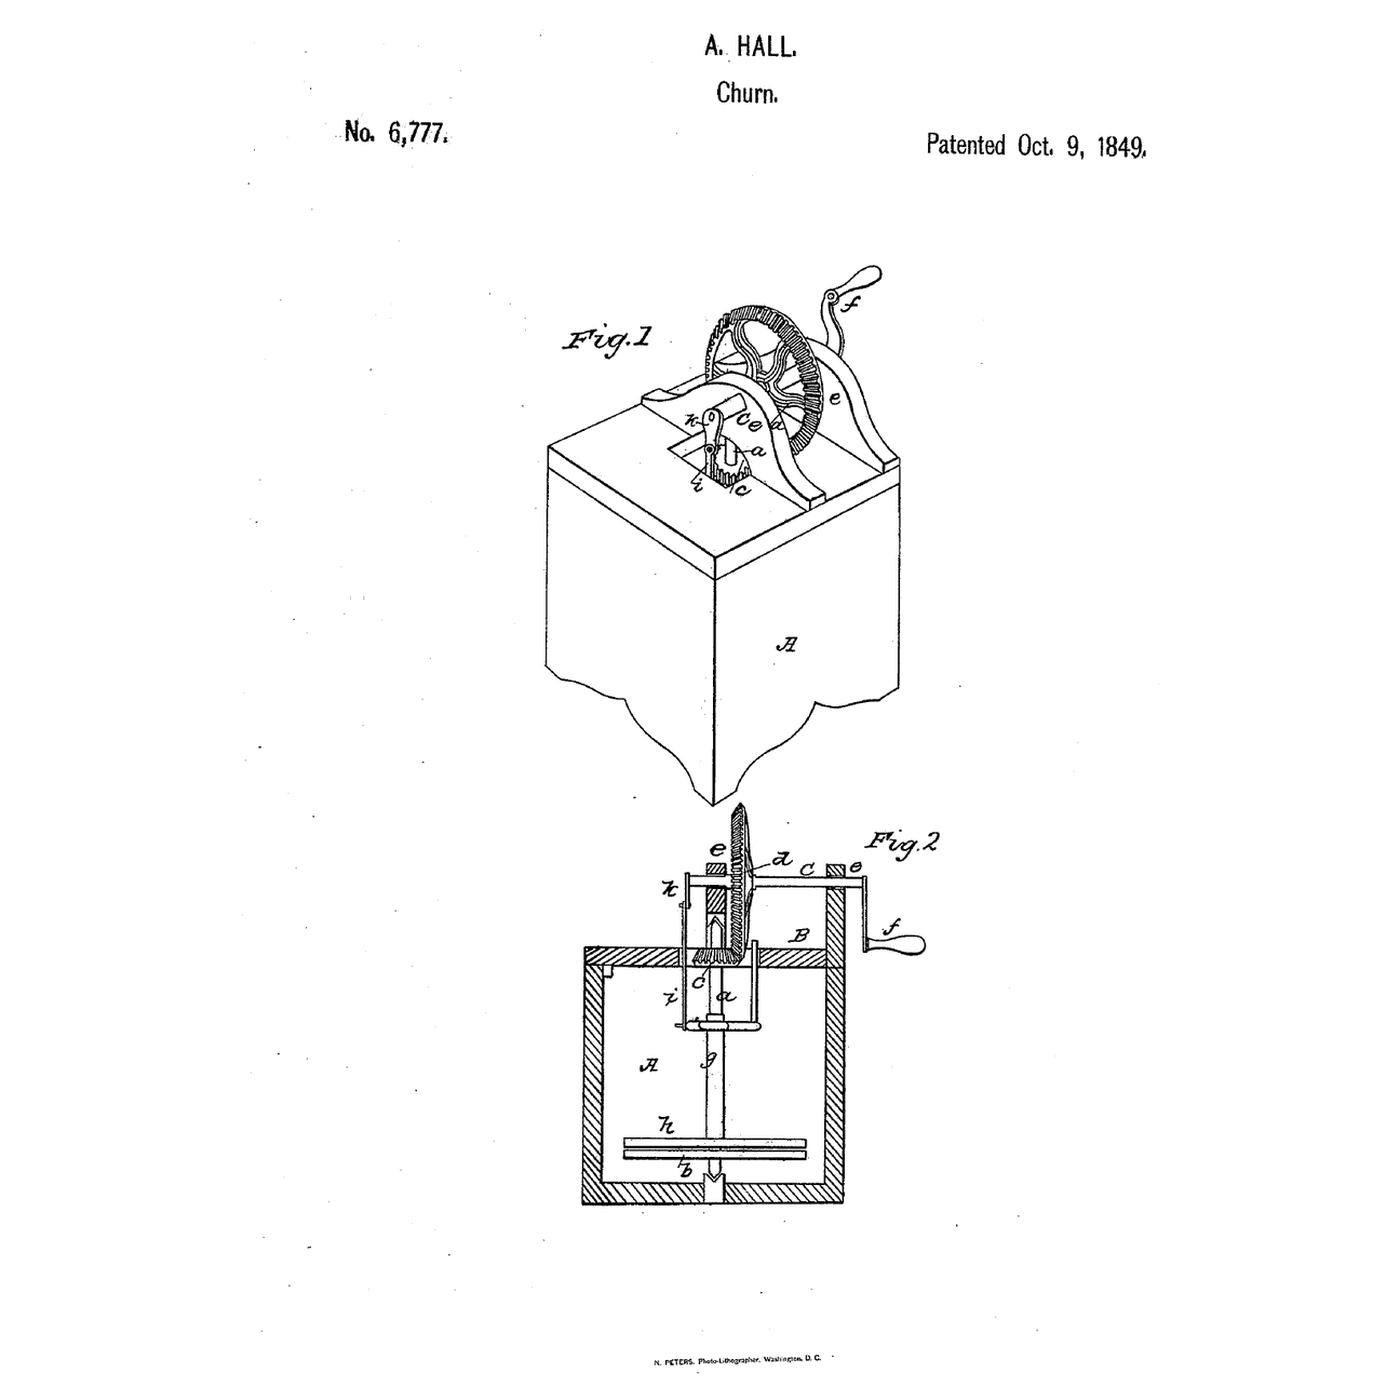
Hall worked a plunging dasher from a crank through a rod; Rarey adds a pinion, a toothed segment and a rack.
3
3
Read US 20,089
Read US 20,089
"This is a simple device and a good length of stroke with a quick speed may be given the dasher K, and by a very direct means so that not much power can be lost by friction."
4
4
Print the parts
Print the parts
Print the frame, the lid, wheel E with its crank, pinion F, the crank pulley, the segment, the rack, the rod and two dashers. The lid and frame need a 240 mm print bed. Print in PETG at 0.2 mm layers, 30 % infill, 4 walls; wash before first use.
Materiales para este paso:
 Filamento PETG1 pieza
Herramientas necesarias:
 Impresora 3D de filamento (FDM)
5
5
Print the frame
Print the frame
The frame, printed as step 4 describes.
6
6
Print the lid
7
7
Print the wheel E
Print the wheel E
The wheel E, printed as step 4 describes.
8
8
Print the pinion F
Print the pinion F
The pinion F, printed as step 4 describes.
9
9
Print the crank pulley
Print the crank pulley
The crank pulley, printed as step 4 describes.
10
10
Print the segment
Print the segment
The segment, printed as step 4 describes.
11
11
Print the rack
12
12
Print the rod
13
13
Print the dashers
Print the dashers
The dashers, printed as step 4 describes.
14
14
Frame on the lid
Frame on the lid
Bolt the frame upright on the lid with two M4 screws, washers and lock nuts. Glue a 10 mm dowel into the boss for wheel E, standing 16 mm out in front, and one into the boss for the segment, standing 14 mm out behind. Drill a small pilot in each dowel's end.
Materiales para este paso:
 Espigas de madera dura1 pieza
 Cola de carpintero1 pieza
 Tornillos de máquina1 pieza
 Arandela plana1 pieza
 Tuerca autoblocante con inserto de nailon1 pieza
Herramientas necesarias:
 Serrucho
 Taladro de mano
 Juego de destornilladores
15
15
Gears, rod and rack
Gears, rod and rack
Push pinion F's axle through the curved bar from the front, slide the crank pulley onto its flat behind, and fix it with an M3 screw and washer in the axle's end. Put wheel E on its dowel, meshing with F, held by an M3 screw and washer through the hole in its crank arm; put the segment on its dowel, held the same way. Slide the rack into the guide with its teeth toward the segment. Join the crank pulley to the end of the segment's curved arm with the rod, using M6 screws and lock nuts.
Materiales para este paso:
Tornillos de máquina1 piezaArandela plana1 piezaTuerca autoblocante con inserto de nailon1 piezaHerramientas necesarias:
Juego de destornilladores16
16
Dasher and rod
Dasher and rod
Cut a 10 mm square hardwood strip 231 mm long as the dasher rod and sand it. Fit one dasher at its foot and the other about 86 mm higher, each fixed by an M3 screw through its boss, drilled through the rod. Stand the rod in the pot, set the lid on with the rod through its square hole, and screw the rod into the rack's socket.
Materiales para este paso:
 Olla alta1 pieza
 Listón de madera dura1 piezaTornillos de máquina1 pieza
Herramientas necesarias:
SerruchoTaladro de mano Papel de lijaJuego de destornilladores
17
17
The build in 3D
The build in 3D
FreeCAD model of this build: the pot and lid, the frame with its curved bar, wheel E with the crank, pinion F, the crank pulley and rod, the segment with its curved arm, the rack in its guide, the square dasher rod and two notched dashers.
18
18
Churn
Churn
Pour in 1 litre of heavy cream at about 15 °C, checked with the thermometer. Turn the handle steadily and time it with the stopwatch: the dashers rise and fall four times for each turn. When the butter comes, lift the lid and dashers out, pour off the buttermilk, wash the butter in cold water until it runs clear, work in a pinch of salt and weigh it.
Materiales para este paso:
 Crema de leche espesa1 l
 Sal marina gruesa1 pieza
 Agua1 pieza
Herramientas necesarias:
 Termómetro de sonda permanente
 Cronómetro
 Báscula digital de cocina
 Bol grande de acero inoxidable
19
19
Troubleshooting
Troubleshooting
Rack-and-segment churn troubleshooting.
Flow
Loading...
20
20
History and honest limits
History and honest limits
**G. S. Rarey** of Columbus, Franklin County, Ohio, US 20,089, 27 April 1858. His case was a wooden box of any proper size, its lid hooked down to it; the frame could be cast of metal in one piece. His dasher was two plates or boards notched to form projecting arms. He claimed working the dasher up and down from the wheel through the pinion, crank pulley, connecting rod, segment and rack bar. Our pot, sizes, gear counts and printed parts are ours. FDM prints hold food in their layer lines, so wash well and replace when worn.
Materiales
11- 1 piezaMarcador de posición
- 1 piezaMarcador de posición
- 1 piezaMarcador de posición
- 3 piezasMarcador de posición
- 2 piezasMarcador de posición
- Marcador de posición
- 1 piezaMarcador de posición
- 1 piezaMarcador de posición
- Marcador de posición
- 1 piezaMarcador de posición
- 1 piezaMarcador de posición
Herramientas requeridas
9- Marcador de posición
- Marcador de posición
- Marcador de posición
- Marcador de posición
- Marcador de posición
- Marcador de posición
- Marcador de posición
- Marcador de posición
- Marcador de posición
Archivos de diseño
10Este plano hace

Blueprints relacionados
Estos blueprints comparten conocimiento — técnicas, materiales o principios



CC0 Dominio público
Este Blueprint se publica bajo CC0. Eres libre de copiar, modificar, distribuir y usar este trabajo para cualquier propósito, sin pedir permiso.
Apoya al Maker comprando productos a través de su Blueprint, donde gana una Comisión del Maker establecida por los vendedores, o crea una nueva iteración de este Blueprint e inclúyela como conexión en tu propio Blueprint para compartir ingresos.