Colaboración
ARTE
BELLEZA Y BIENESTAR
ARTESANÍA
CULTURA E HISTORIA
ENTRETENIMIENTO
MEDIO AMBIENTE
COMIDA Y BEBIDAS
INGENIERÍA INVERSA
CIENCIAS
DEPORTES
TECNOLOGÍA
TECNOLOGÍA VESTIBLE
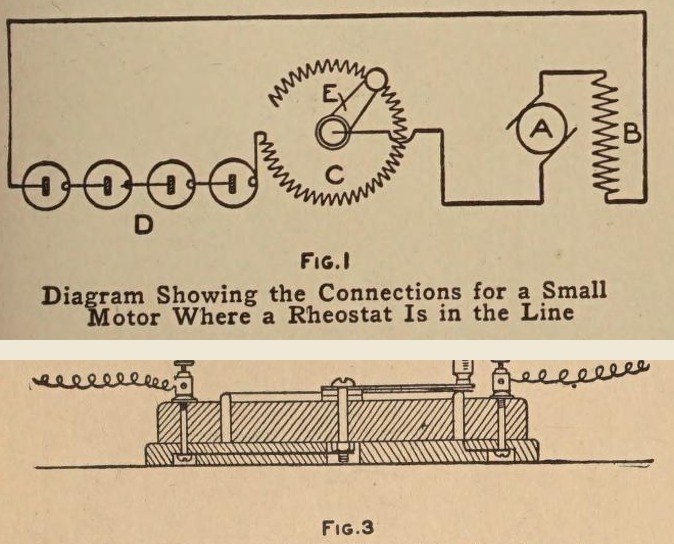


Rheostat: a Small Ring Rheostat for Toy Motors (Boy Mechanic, 1915)
A small variable resistor to set the speed of a toy motor: resistance wire wound on a fibre strip bent into a ring, set in a groove in a hardwood base, with a brass arm that slides round the bared top of the winding.
Wired in series with the motor, it works like a valve in a water pipe.
Source: The Boy Mechanic, Book 2 (1915), pp. 393-394. Unknown: wire alloy. Picture: Figs. 1 and 3 of the book.
Intermedio
Unknown
Instrucciones
1
1
Wind the resistance strip
Wind the resistance strip
Smooth a strip of thin fibre about 1/16 in thick, 1/2 in wide and 10 in long. Wind it with No. 22 cotton-covered resistance wire, close turns from 1/4 in from one end to 1/4 in from the other, securing the ends through small drilled holes and leaving 3 to 4 in free. Bend the strip into a ring round a round object, winding outward, and note its inside and outside diameters.
Materiales para este paso:
 Material desconocido1 fibre strip
 Hilo de resistencia de alpaca1 No. 22
Herramientas necesarias:
 Taladro de mano
2
2
Make the base
Make the base
Round the corners and top edges of a seasoned hardwood block 1/2 x 4 1/2 x 4 1/2 in, mark the ring's two diameters from the centre, and saw out the circles so the ring fits between them. Screw this onto a second board 1/4 x 4 3/4 x 4 3/4 in from below with countersunk screws. Drill a hole for one wire end, fit two back-connected binding posts in the corners, and cut grooves underneath for the leads; one post goes to the winding, the other to the centre bolt.
Materiales para este paso:
 Tabla de madera dura2 1/2 and 1/4 in
 Tornillos para madera1 pieza
 Borne de panel2 piezas
Herramientas necesarias:
 Compás de puntas
 Serrucho de costillaTaladro de mano
 Destornillador plano
3
3
Make and mount the arm
Make and mount the arm
Cut the arm from 1/16 in sheet brass, 2 in long, 1/2 in wide at one end and 1/4 in at the other. Under the narrow end solder thin spring brass to bear on the ring; fit a small handle on top. Mount it on a 1/8 in brass bolt about 1 in long through the centre, with washers under it, the base hole countersunk underneath 1/2 in wide and 1/4 in deep. Solder a short brass strip to the nut, set in a recess, and lock with a second nut or a spring washer.
Materiales para este paso:
 Lámina de latón1 arm, spring
 Metal desconocido1 1/8 in brass bolt
 Arandela plana3 piezas
 Spring Washer1 pieza
 Estaño-plomo de soldadura1 pieza
Herramientas necesarias:
 Tijeras de chapaTaladro de mano
 Soldador eléctrico
4
4
Bare the track and finish
Bare the track and finish
Set the ring in its groove. Sand the insulation off the top edge of the winding so the spring contact touches the wire. Give the wood a coat of shellac.
Materiales para este paso:
 Barniz de goma laca1 pieza
Herramientas necesarias:
 Papel de lija
 Pinceles finos
Materiales
11- 1 fibre stripMarcador de posición
- 1 No. 22Marcador de posición
- 2 1/2 and 1/4 inMarcador de posición
- 1 piezaMarcador de posición
- Marcador de posición
- 1 arm, springMarcador de posición
- 1 1/8 in brass boltMarcador de posición
- 3 piezasMarcador de posición
- 1 piezaMarcador de posición
- 1 piezaMarcador de posición
- 1 piezaMarcador de posición
Herramientas requeridas
8- Marcador de posición
- Marcador de posición
- Marcador de posición
- Marcador de posición
- Marcador de posición
- Marcador de posición
- Marcador de posición
- Marcador de posición
Este plano hace
CC0 Dominio público
Este Blueprint se publica bajo CC0. Eres libre de copiar, modificar, distribuir y usar este trabajo para cualquier propósito, sin pedir permiso.
Apoya al Maker comprando productos a través de su Blueprint, donde gana una Comisión del Maker establecida por los vendedores, o crea una nueva iteración de este Blueprint e inclúyela como conexión en tu propio Blueprint para compartir ingresos.