Colaboración
ARTE
BELLEZA Y BIENESTAR
ARTESANÍA
CULTURA E HISTORIA
ENTRETENIMIENTO
MEDIO AMBIENTE
COMIDA Y BEBIDAS
INGENIERÍA INVERSA
CIENCIAS
DEPORTES
TECNOLOGÍA
TECNOLOGÍA VESTIBLE
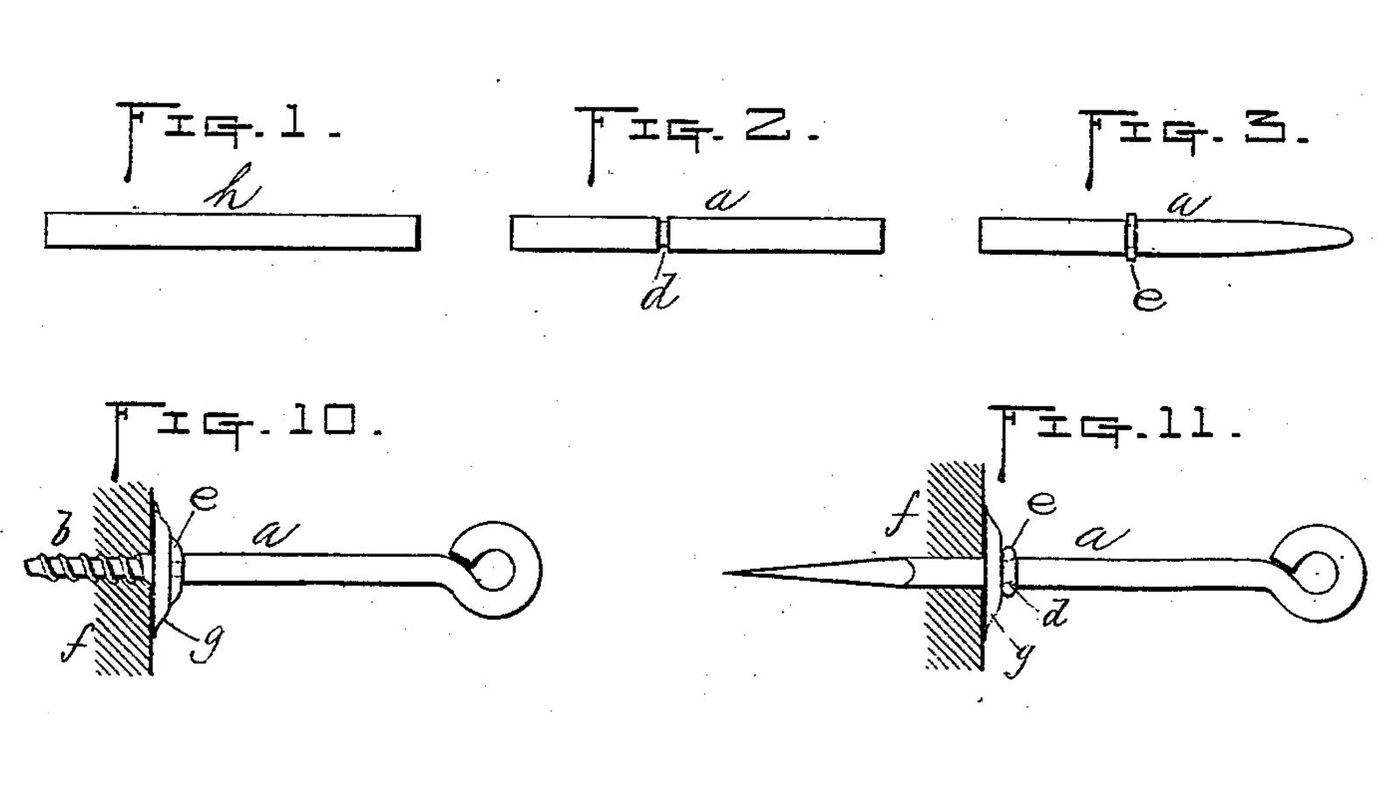


Screw Eye: Parmelee's One-Piece Wire Eye with a Stop-Ring
A screw eye bent from one piece of wire, by Arthur W. Parmelee of Worcester, Massachusetts (US 350,209, 1886). One end is threaded to turn into wood, the other bent into a closed eye. His addition is a ring closed into a groove around the shank: it stops the screw at the right depth, looks neat, and is left a little loose so the eye can turn without marking the wood under it.
The patent gives no metal or sizes. Iron wire, the 3 mm size, the pliers and the die are ours. The picture: Figs. 1-3 and 10-11 of the patent.
Principiante
30 minutes
Instrucciones
1
1
Cut a piece of wire
Cut a piece of wire
Cut a straight piece of iron wire about 3 mm thick (ours), long enough for the screw, the shank and the eye (Fig. 1).
Materiales para este paso:
 Alambre de hierro1 pieza
Herramientas necesarias:
 Regla
 Alicates de corte
2
2
Cut the groove
Cut the groove
File a narrow groove right round the wire, a screw length from one end (Fig. 2). Parmelee cuts it or presses it in.
Herramientas necesarias:
 Juego de limas de aguja
 Tornillo de banco
3
3
Point the screw end
Point the screw end
File that end to a tapering point (Fig. 3).
Herramientas necesarias:
 Lima para metalTornillo de banco
4
4
Thread the screw end
Thread the screw end
Cut a screw thread on the pointed end "in the usual way". Ours: a die in a die stock, run on as far as the point allows.
Herramientas necesarias:
 PortaterrajasTornillo de banco
5
5
Bend the eye
Bend the eye
Bend the other end into a closed round eye, the end turned in against the shank (Fig. 10).
Herramientas necesarias:
 Alicates de punta redonda
 Alicates de boca plana
6
6
Make the split ring
Make the split ring
Bend a short piece of the same wire round into an open ring that just slips over the shank (Figs. 9 and 11).
Materiales para este paso:
Alambre de hierro1 piezaHerramientas necesarias:
Alicates de corteAlicates de punta redonda7
7
Close the ring into the groove
Close the ring into the groove
Slide the ring onto the groove and squeeze it until its two ends meet in a continuous band. Leave it a little loose, so the eye turns while the ring stays still against the wood.
Herramientas necesarias:
Alicates de boca plana8
8
Turn it into the wood
Turn it into the wood
Turn the screw into the wood by the eye until the ring meets the surface: the ring is the depth stop. Parmelee also allows washers under the ring; we leave them out.
Materiales
1- 2 piezasMarcador de posición
Herramientas requeridas
8- Marcador de posición
- Marcador de posición
- Marcador de posición
- Marcador de posición
- Marcador de posición
- Marcador de posición
- Marcador de posición
- Marcador de posición
Este plano hace
Blueprints relacionados
Estos blueprints comparten conocimiento — técnicas, materiales o principios
CC0 Dominio público
Este Blueprint se publica bajo CC0. Eres libre de copiar, modificar, distribuir y usar este trabajo para cualquier propósito, sin pedir permiso.
Apoya al Maker comprando productos a través de su Blueprint, donde gana una Comisión del Maker establecida por los vendedores, o crea una nueva iteración de este Blueprint e inclúyela como conexión en tu propio Blueprint para compartir ingresos.