Colaboración
ARTE
BELLEZA Y BIENESTAR
ARTESANÍA
CULTURA E HISTORIA
ENTRETENIMIENTO
MEDIO AMBIENTE
COMIDA Y BEBIDAS
INGENIERÍA INVERSA
CIENCIAS
DEPORTES
TECNOLOGÍA
TECNOLOGÍA VESTIBLE
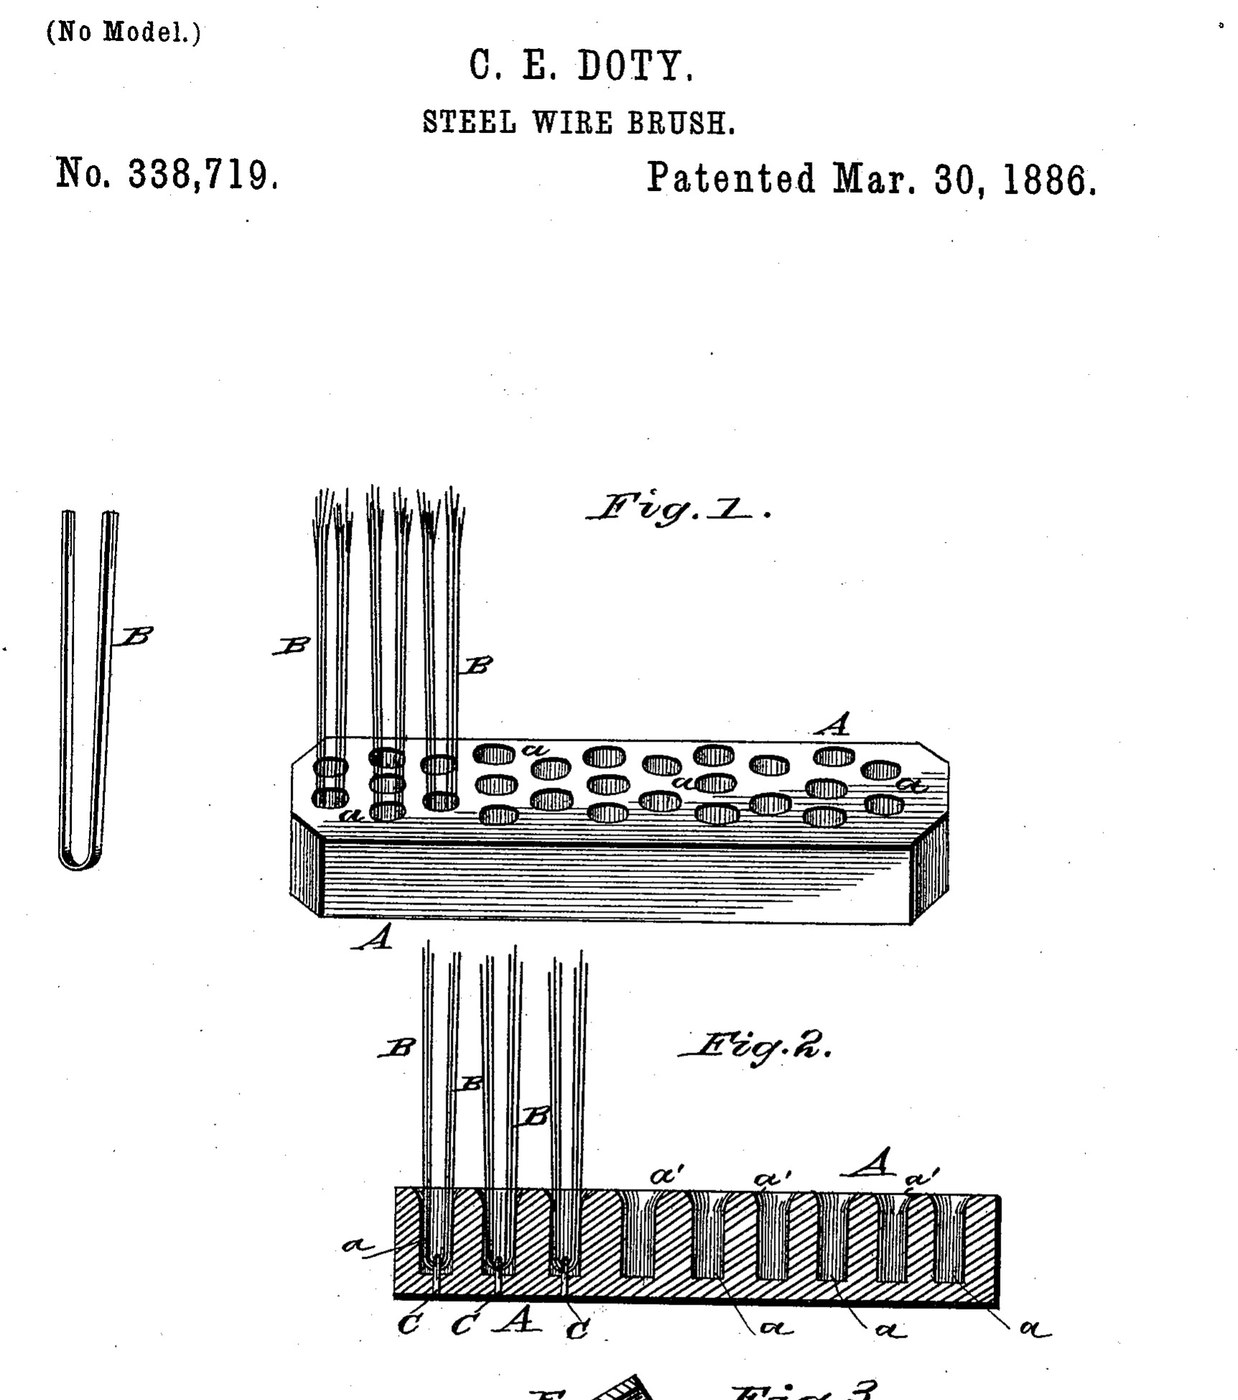


Wire Brush: Flat Steel Wire Tufts Stapled into a One-Piece Back (Doty, US 338,719, 1886)
A heavy steel wire brush whose back stays in one piece: flat steel wires are folded in bunches into blind holes and held by small staples driven right through the back and clinched on the other side. The holes flare at the mouth so the wires bend in a curve rather than snapping at the edge. All the wires lie the same way, so they flex alike and share the work.
Result: a steel wire brush for heavy scrubbing that holds its wires, with a smooth back.
Source: C. E. Doty, US 338,719 (1886). Unknown: the back material, sizes and wire gauge. Picture: the patent drawing.
Principiante
Unknown
Instrucciones
1
1
Bore the back
Bore the back
Make the back in one piece and bore rows of holes into its face that do not go right through. Shape the mouth of each hole with a rounded, flaring wall so the wires bend in a curve there. Ours: a hardwood block. Not given: the back material, sizes.
Materiales para este paso:
 Bloque de madera dura1 brush back
Herramientas necesarias:
 Taladro de columna
 Dimensiones desconocidas
2
2
Flatten the wires
Flatten the wires
Use flat steel wires, so they flex most across their thin side. Cut them to twice the bristle length so each bunch folds in the middle. Ours: spring steel wire flattened on the anvil. Not given: the wire gauge.
Materiales para este paso:
 Alambre de acero para muelles1 bristle wires
Herramientas necesarias:
 Yunque
 Martillo
3
3
Staple in the tufts
Staple in the tufts
Lay the back, holes up, on a hard, smooth metal surface. Lay a bunch of wires across a hole, flat sides horizontal and lying the way the brush will be used. Set a short staple astride the middle of the bunch with its points in the hole. Bring a plunger down into the hole: it drives the folded bunch to the bottom and the staple's points right through the back. The points hit the metal surface and are bent over and clinched smoothly on the back. Tilt the back a little for the outer rows so their wires spread slightly outward.
Materiales para este paso:
 Metal desconocido1 staples
Herramientas necesarias:
 Prensa de husilloYunque
Materiales
3- 1 brush backMarcador de posición
- 1 bristle wiresMarcador de posición
- 1 staplesMarcador de posición
Materiales de Blueprints conectados
Este plano hace

CC0 Dominio público
Este Blueprint se publica bajo CC0. Eres libre de copiar, modificar, distribuir y usar este trabajo para cualquier propósito, sin pedir permiso.
Apoya al Maker comprando productos a través de su Blueprint, donde gana una Comisión del Maker establecida por los vendedores, o crea una nueva iteración de este Blueprint e inclúyela como conexión en tu propio Blueprint para compartir ingresos.